Urban Gridlock Tote Free Pattern – Modern Crochet with Woven Strap Accents
Urban Gridlock Tote: A Modern Crochet Masterpiece
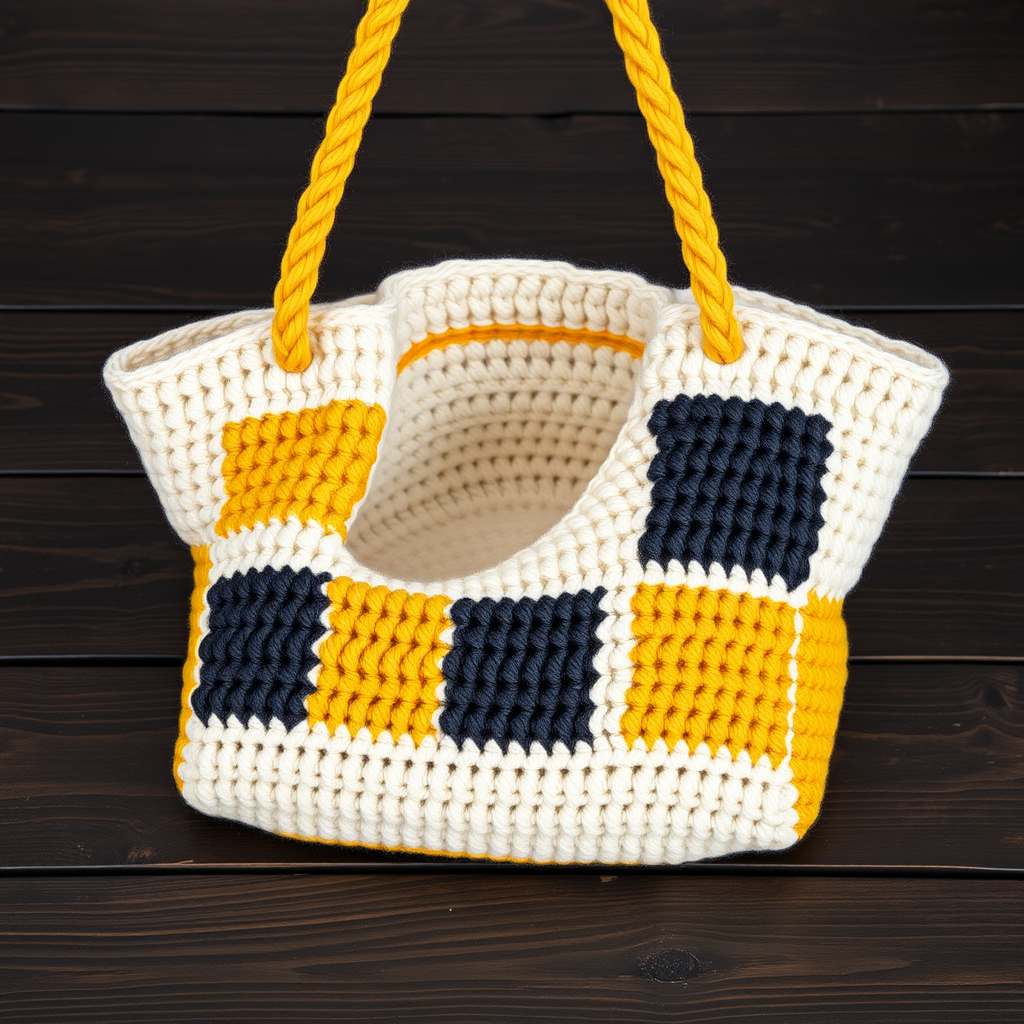
Are you ready to create a statement piece that combines urban sophistication with handcrafted charm? The Urban Gridlock Tote is the perfect project for crocheters looking to elevate their skills while producing a genuinely functional accessory. This structured yet soft tote features a bold geometric grid pattern that evokes city maps and modern architecture, all brought to life with a contemporary neutral palette and a vibrant pop of mustard yellow.
What makes this pattern truly special is its clever construction—worked in one seamless piece from the bottom up, then finished with stunning woven braided straps. The result is a bag that stands upright on its own, carries your daily essentials with ease, and turns heads wherever you go. Whether you're commuting to work, heading to the farmers market, or meeting friends for coffee, this tote adds an artisanal touch to any outfit.
Best of all, this pattern is beginner-friendly! If you know basic single crochet and can change colors, you have all the skills needed to create this masterpiece. Let's dive into everything you'll need to bring your Urban Gridlock Tote to life.
Materials Needed
Before we begin, gather these essential supplies to ensure a smooth crochet experience:
Yarn Requirements
- Yarn A (Oatmeal): Approximately 400g of worsted weight cotton yarn (Lion Brand 24/7 Cotton or similar)
- Yarn B (Charcoal): Approximately 200g of worsted weight cotton yarn
- Yarn C (Mustard): Approximately 100g of worsted weight cotton yarn
Pro tip: Cotton yarn is ideal for this project because it provides structure, durability, and a beautiful stitch definition. The Lion Brand 24/7 Cotton is an excellent choice, but any worsted weight cotton yarn will work beautifully.
Tools & Notions
- Crochet Hook: 5.0 mm (US H-8) hook
- Yarn needle: For weaving in ends and sewing seams
- Scissors: Sharp scissors for cutting yarn
- Stitch markers: Optional, but helpful for keeping track of rows
- Bobbins: Useful for managing multiple yarn colors (or you can carry yarn loosely up the side)
Gauge Information
16 single crochet stitches x 18 rows = 4 x 4 inches (10 x 10 cm)
Always check your gauge before starting! If your gauge is off, adjust your hook size accordingly. A swatch that's too small means you need a larger hook; too large means a smaller hook.
Step-by-Step Instructions
Understanding the Pattern Structure
This tote is worked in one continuous piece from the bottom up. You'll create a large rectangle, then fold it in half and seam the sides to form the bag shape. The woven straps are created separately and attached to the top edges. The grid pattern is achieved through strategic color changes that create bold geometric blocks.
Bag Body: Foundation and Base
Foundation Chain: With Yarn A (Oatmeal), chain 46 stitches.
Row 1: Single crochet in the 2nd chain from your hook, then single crochet in each chain across. You should have 45 single crochet stitches. Chain 1 and turn.
Rows 2-10: Chain 1, single crochet in each single crochet across. Turn at the end of each row. (45 stitches)
These first 10 rows create the sturdy base of your tote. The even, consistent single crochet fabric provides a solid foundation for the colorful grid pattern to come. Take your time with these rows to ensure your tension is even—this will make the entire bag look more professional.
Creating the Grid Pattern
Now we enter the exciting part! The grid pattern spans Rows 11-30 and uses strategic color blocking to create a modern geometric design. You have two options for managing your yarn:
- Carrying method: Carry the unused yarn loosely up the side of your work. This creates a cleaner look but uses slightly more yarn.
- Bobbin method: Wind small amounts of each color onto bobbins and pick them up as needed. This prevents tangling and is ideal for larger color blocks.
Row 11: With Yarn A, single crochet in the first 15 stitches. Switch to Yarn B (Charcoal) and single crochet in the next 15 stitches. Switch back to Yarn A and single crochet in the last 15 stitches. Chain 1 and turn.
Row 12: With Yarn A, single crochet in the first 10 stitches. With Yarn B, single crochet in the next 25 stitches. With Yarn A, single crochet in the last 10 stitches. Chain 1 and turn.
Row 13: With Yarn A, single crochet in the first 5 stitches. With Yarn B, single crochet in the next 35 stitches. With Yarn A, single crochet in the last 5 stitches. Chain 1 and turn.
Row 14: With Yarn B, single crochet across all 45 stitches. Chain 1 and turn.
Row 15: Repeat Row 13 (5 A, 35 B, 5 A).
Row 16: Repeat Row 12 (10 A, 25 B, 10 A).
Row 17: Repeat Row 11 (15 A, 15 B, 15 A).
Row 18: With Yarn A, single crochet across all 45 stitches. Chain 1 and turn.
Rows 19-30: Repeat Rows 11-18 once more, then repeat Rows 11-14 again. This creates the full grid pattern with two complete diamond shapes.
Important tip: When changing colors, always complete the last yarn over of the previous stitch with the new color. This creates a clean color transition without gaps or holes.
Top Border and Finishing the Body
Row 31: With Yarn A, single crochet across all 45 stitches. Chain 1 and turn.
Rows 32-34: Repeat Row 31. After completing Row 34, fasten off and weave in the yarn end.
These final rows create a clean, neutral border at the top of your bag, giving it a polished, finished appearance.
Seaming the Sides
Now it's time to transform your rectangle into a bag! Follow these steps carefully:
- Fold your rectangle in half with right sides together, matching the short edges.
- Using Yarn A and a yarn needle, whip stitch the side seams together. Start at the bottom corner and work your way up, leaving the top open.
- Make sure your stitches are even and secure—this seam needs to support the weight of your belongings!
- Once both sides are seamed, turn the bag right side out.
- Gently shape the bag, ensuring the corners are crisp and the bottom lies flat.
Creating the Woven Straps
The woven straps are what truly set this tote apart! These thick, braided handles in mustard yellow add both visual interest and practical durability.
Step 1: Cut Your Yarn
Cut 8 strands of Yarn C (Mustard), each measuring 60 inches long. Group them into 4 pairs (2 strands per pair).
Step 2: Attach to the Bag
Attach the 4 pairs to the top edge of the bag at the side seams using a slip knot. Space them evenly across the top edge—you want the strap to be well-distributed for comfortable carrying.
Step 3: Create the Braid
Braid the 4 pairs together using a 4-strand braid technique. Here's how:
- Take the leftmost pair and cross it over the two middle pairs.
- Take the rightmost pair and cross it over the two middle pairs.
- Continue this pattern, alternating sides, until your braid measures approximately 24 inches.
Step 4: Secure the Braid
Once your braid reaches 24 inches, secure the end with an overhand knot. Trim any excess yarn.
Step 5: Repeat for the Other Side
Repeat the entire process to create the second strap on the other side of the bag.
Step 6: Attach the Free Ends
Attach the free ends of the braids to the opposite top edge of the bag. This creates a long shoulder strap that spans the width of the bag opening. Weave in all loose ends carefully.
Final Touches
Congratulations! Your Urban Gridlock Tote is complete. Before you show it off, take a few moments to:
- Weave in all ends: Use your yarn needle to hide any remaining loose threads inside the bag.
- Block if desired: While cotton doesn't require blocking, a gentle steam press can help even out your stitches.
- Check your seams: Reinforce any areas that feel loose or weak.
Styling Your Urban Gridlock Tote
This versatile tote pairs beautifully with both casual and dressy outfits. The neutral oatmeal and charcoal tones make it easy to coordinate, while the mustard straps add a playful pop of color. Carry it over your shoulder for a hands-free option, or hold it by the straps for a more polished look.
The structured shape means it stands upright on its own, making it perfect for keeping your belongings organized and accessible. It's roomy enough for a tablet, wallet, keys, sunglasses, and even a small water bottle—everything you need for a day in the city.
Customization Ideas
Once you've mastered the Urban Gridlock pattern, consider making it your own:
- Color variations: Try different color combinations to match your personal style. A monochromatic version in shades of blue would be stunning, or go bold with contrasting brights.
- Size adjustments: Add or subtract stitches in multiples of 15 to change the width while maintaining the grid pattern.
- Lining: Add a fabric lining to the interior for extra durability and a professional finish.
- Pockets: Crochet a simple interior pocket to keep smaller items organized.
We'd love to see your Urban Gridlock Tote creations! Share your finished projects on social media using the hashtag #UrbanGridlockTote and tag us so we can admire your handiwork. Happy crocheting!