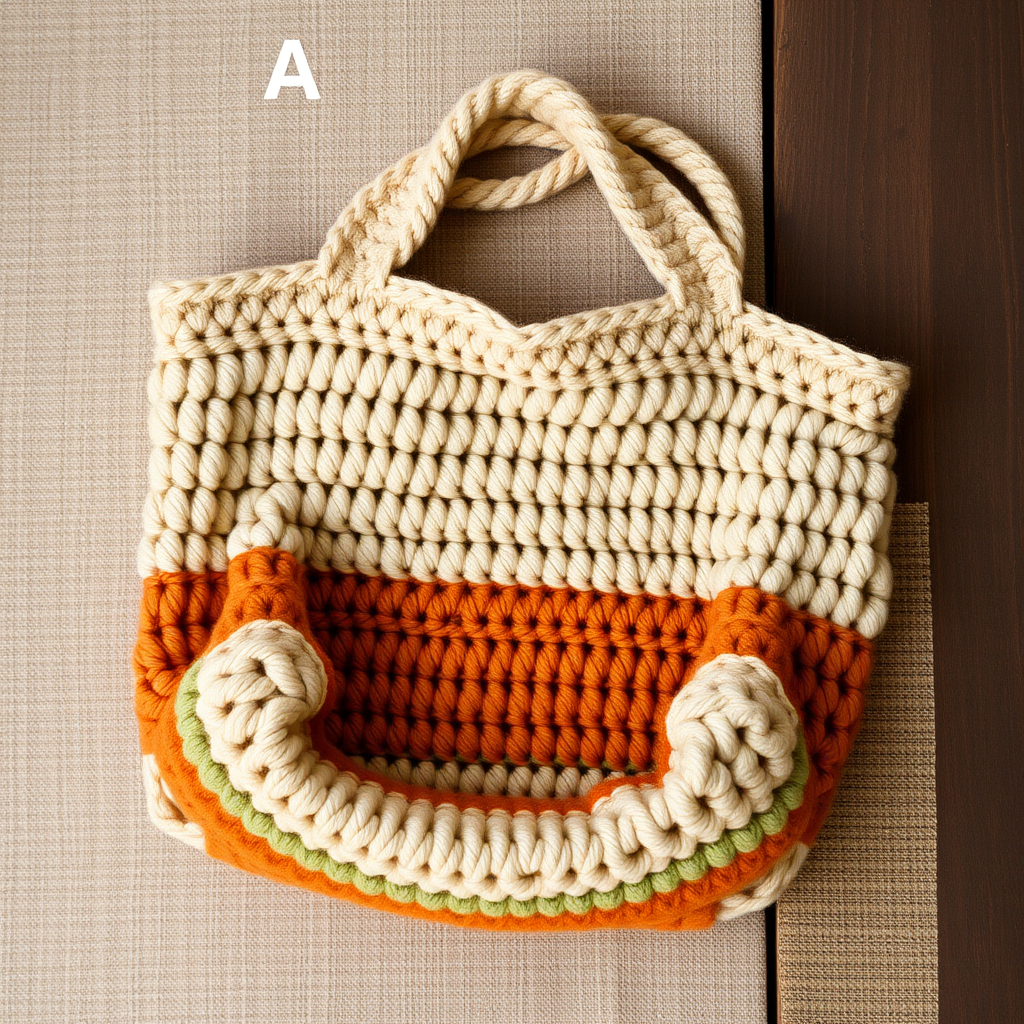
The Sun-Kissed Citrus Market Bag Free Pattern – A Crocheted Textured Tote with Woven Slice Accents

The Sun-Kissed Citrus Market Bag: A Free Crochet Pattern for Summer
Carry a slice of summer with you everywhere you go! This vibrant, textured market bag features a cheerful citrus slice motif and a sturdy, open-weave body that's perfect for farmers' market hauls, beach-day essentials, or everyday errands. The Sun-Kissed Citrus Market Bag blends bohemian charm with practical durability, making it a delightful project for crocheters of all skill levels. With its bright yellow, white, and orange color palette, this bag evokes the warmth of a summer citrus grove and is sure to become your go-to accessory for the season.
This free pattern is designed with beginners in mind, offering clear instructions and a simple mesh stitch that works up quickly. The result is a roomy, bucket-style tote with a flat bottom and two sturdy handle openings, adorned with handcrafted citrus slices that add a playful, handmade touch. Let's dive in and create something beautiful together!
Materials Needed
Before you begin, gather the following materials to ensure a smooth and enjoyable crocheting experience:
- Yarn: Worsted weight cotton yarn in three colors:
- MC (Main Color): Lemon Yellow – approximately 200g
- CC1 (Contrast Color 1): White – approximately 50g
- CC2 (Contrast Color 2): Orange – approximately 50g
- Crochet Hook: 5.0 mm (US H-8) crochet hook
- Tapestry Needle: For weaving in ends and sewing the citrus motifs
- Scissors: For cutting yarn
- Stitch Markers (optional): To help keep track of rounds
Gauge: 14 double crochet (dc) x 8 rows = 4 inches (10 cm) in mesh pattern. Be sure to check your gauge to ensure your bag turns out the correct size.
Step-by-Step Instructions
This pattern is worked in continuous rounds for the bag body, then the citrus motifs are made separately and sewn on. Follow each step carefully, and you'll have a beautiful, functional market bag in no time.
Bag Body (Worked in Rounds)
Round 1: With MC (Lemon Yellow), make a magic ring. Chain 3 (counts as first double crochet), then work 11 double crochet (dc) into the ring. Slip stitch (sl st) to the top of the beginning chain-3 to join. You should have 12 dc stitches.
Round 2: Chain 3 (counts as dc), work 1 dc in the same stitch (this creates an increase), then work 2 dc in each stitch around. Slip stitch to join. You should now have 24 dc stitches.
Round 3: Chain 3, work 1 dc in the same stitch, then 1 dc in the next stitch. Repeat the following sequence around: *2 dc in the next stitch, 1 dc in the next stitch*. Slip stitch to join. You should have 36 dc stitches.
Round 4: Chain 3, work 1 dc in the same stitch, then 1 dc in each of the next 2 stitches. Repeat the following sequence around: *2 dc in the next stitch, 1 dc in each of the next 2 stitches*. Slip stitch to join. You should have 48 dc stitches.
Round 5: Chain 3, work 1 dc in the same stitch, then 1 dc in each of the next 3 stitches. Repeat the following sequence around: *2 dc in the next stitch, 1 dc in each of the next 3 stitches*. Slip stitch to join. You should have 60 dc stitches. This completes the flat bottom of the bag.
Round 6 (Mesh Pattern): Chain 4 (counts as 1 dc + chain 1), skip the next stitch, work 1 dc in the next stitch. Repeat the following sequence around: *chain 1, skip the next stitch, work 1 dc in the next stitch*. Slip stitch to the 3rd chain of the beginning chain-4 to join. You should have 30 dc and 30 chain-1 spaces.
Rounds 7-20: Repeat Round 6, but work each dc into the dc of the previous round and chain 1 over the chain-1 spaces. This creates the beautiful, airy mesh body of the bag. Continue until you've completed Round 20.
Round 21: Chain 3, work 1 dc in the same stitch, then 1 dc in the next stitch. Repeat the following sequence around: *2 dc in the next stitch, 1 dc in the next stitch*. Slip stitch to join. You should now have 90 dc stitches. This round begins the top edge of the bag.
Round 22: Chain 3, work 1 dc in each stitch around. Slip stitch to join. You should have 90 dc stitches.
Round 23 (Handle Openings): Chain 3, work 1 dc in each of the next 2 stitches, then chain 2, skip 2 stitches (this creates the first handle opening). Work 1 dc in each of the next 20 stitches, then chain 2, skip 2 stitches (this creates the second handle opening). Work 1 dc in each of the remaining stitches around. Slip stitch to join.
Round 24: Chain 3, work 1 dc in each stitch and in each chain around. Slip stitch to join. You should have 90 dc stitches again.
Round 25: Chain 1, work 1 single crochet (sc) in each stitch around. Slip stitch to join. Fasten off MC and weave in the end.
Citrus Slice Motif (Make 2)
Round 1: With CC1 (White), make a magic ring. Chain 3 (counts as dc), work 11 dc into the ring. Slip stitch to the top of the beginning chain-3 to join. You should have 12 dc stitches.
Round 2: Chain 3, work 1 dc in the same stitch, then work 2 dc in each stitch around. Slip stitch to join. You should have 24 dc stitches.
Round 3: Switch to CC2 (Orange). Chain 3, work 1 dc in the same stitch, then 1 dc in the next stitch. Repeat the following sequence around: *2 dc in the next stitch, 1 dc in the next stitch*. Slip stitch to join. You should have 36 dc stitches.
Round 4: Switch to MC (Lemon Yellow). Chain 1, work 1 sc in the same stitch, then 1 sc in the next stitch. Repeat the following sequence around: *chain 3, slip stitch in the next stitch, sc in each of the next 2 stitches*. End with a slip stitch to the first sc. Fasten off, leaving a long tail (approximately 12 inches) for sewing the motif onto the bag.
Seed Stitches: Using CC2 (Orange) and a tapestry needle, add small seed stitches in the center of the white section of each citrus slice. These represent the citrus seeds and add a lovely detail. Simply stitch small straight lines radiating from the center of the white circle.
Assembly
Step 1: Position one citrus slice motif on each side of the bag, centered between the two handle openings. The motifs should be placed so that the handle openings are on either side of each motif.
Step 2: Using the long tail left on each motif, sew the citrus slices securely onto the bag. Use a whip stitch or mattress stitch, working through both the motif and the bag body. Make sure the motif lies flat and is securely attached.
Step 3: Weave in all remaining ends using your tapestry needle. Trim any excess yarn.
Handles (Optional Reinforcement)
For extra durability, you can reinforce the handle openings with braided yarn:
Step 1: Cut two 30-inch lengths of MC (Lemon Yellow) yarn.
Step 2: For each handle, take one length of yarn and braid it. To braid, fold the yarn in half, then twist or braid the two strands together. Alternatively, you can create a simple three-strand braid by cutting three 10-inch pieces and braiding them together.
Step 3: Attach the braided yarn to the inside of the bag at each handle opening. Thread the braid through the stitches along the edge of the opening and tie securely on the inside. This adds strength and comfort to the handles.
Your Sun-Kissed Citrus Market Bag is now complete! Fill it with fresh produce, beach towels, or your favorite summer essentials, and enjoy the cheerful, handmade charm it brings to every outing.
Happy crocheting, and may your summer be as bright and beautiful as this bag!