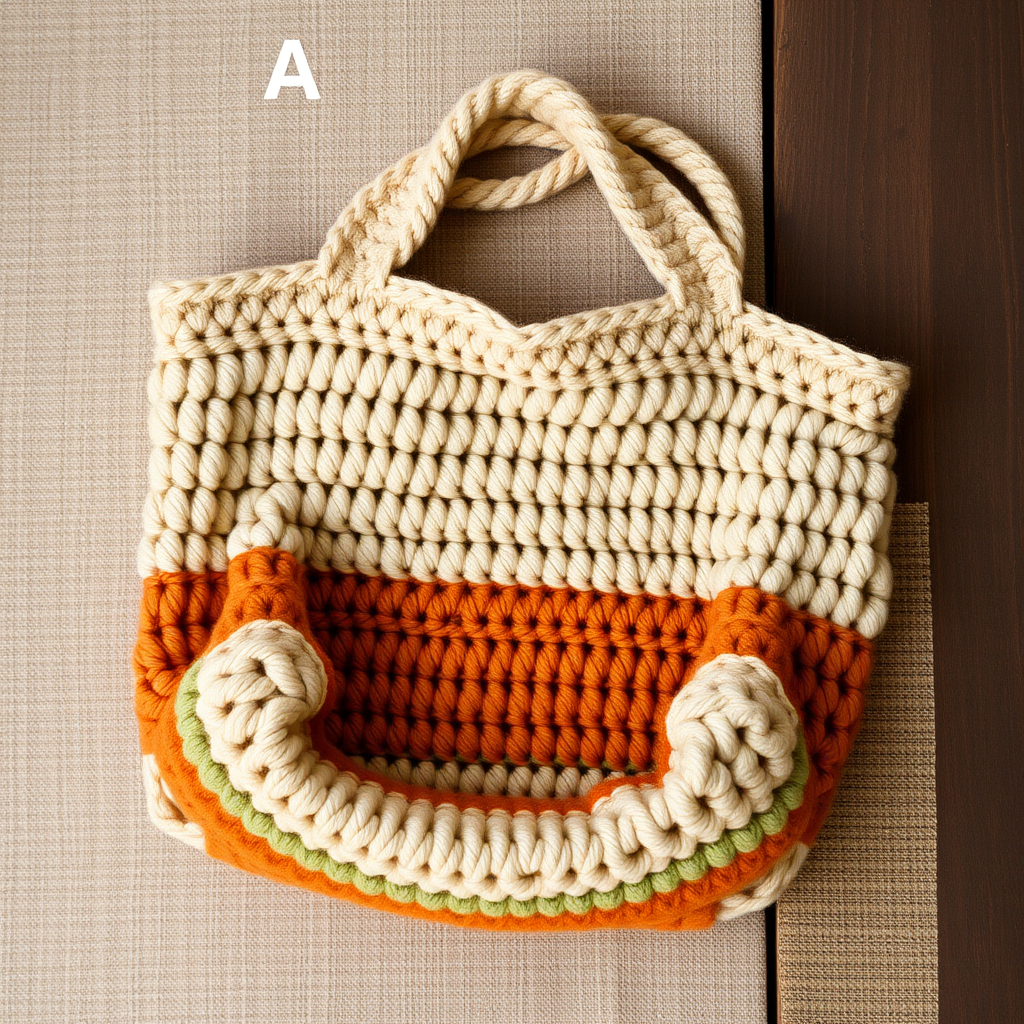
Sunlit Vine Market Bag Free Pattern – Textured Crochet with Leaf Motif

Sunlit Vine Market Bag Free Pattern – Textured Crochet with Leaf Motif
Imagine strolling through your local farmers market, toting fresh produce, artisan bread, and wildflowers in a bag that's as beautiful as it is functional. The Sunlit Vine Market Bag is exactly that—a charming, eco-friendly crochet project that combines a delicate leaf stitch pattern with sturdy twisted handles. Made with just a single skein of worsted weight cotton yarn, this roomy, slouchy tote is the perfect summer accessory for everyday errands, beach days, or weekend adventures.
Whether you're a seasoned crocheter looking for a quick weekend project or a beginner ready to tackle your first bag, this free pattern is designed to guide you through every step. The textured leaf motif creates a raised, organic texture reminiscent of climbing vines, while the scalloped top edge adds a touch of whimsy. Let's dive in and create something beautiful together!
Materials Needed
Before you begin, gather the following supplies. This project is wonderfully simple—just one skein of yarn and a hook—making it an affordable and satisfying make.
- Yarn: 1 skein (100g / 200m) worsted weight cotton yarn (e.g., Lion Brand 24/7 Cotton) in a warm terracotta or sage green. The sample shown uses a beautiful terracotta shade, but feel free to choose any color that speaks to you.
- Crochet Hook: 5.0 mm (H-8) crochet hook
- Other: Yarn needle for weaving in ends and sewing handles, scissors
Gauge: 16 dc x 9 rows = 4 inches (10 cm) in double crochet. Gauge is important for achieving the correct finished size, so be sure to check your tension before starting.
Step-by-Step Instructions
This pattern is worked in the round from the bottom up. The base is a simple circle of single crochet increases, followed by the stunning leaf stitch pattern that forms the body. Finally, you'll create the twisted handles and attach them for a polished finish. Let's get started!
Bag Body (Worked in the Round)
Round 1: Make a magic ring. Work 8 single crochet (sc) into the ring. Pull the tail to tighten the ring closed. (8 sts)
Round 2: Work 2 sc in each stitch around. (16 sts)
Round 3: *Sc in next st, 2 sc in next st* repeat around. (24 sts)
Round 4: *Sc in next 2 sts, 2 sc in next st* repeat around. (32 sts)
Round 5: *Sc in next 3 sts, 2 sc in next st* repeat around. (40 sts)
Round 6: *Sc in next 4 sts, 2 sc in next st* repeat around. (48 sts)
Round 7: *Sc in next 5 sts, 2 sc in next st* repeat around. (56 sts)
Round 8: *Sc in next 6 sts, 2 sc in next st* repeat around. (64 sts)
Round 9: *Sc in next 7 sts, 2 sc in next st* repeat around. (72 sts)
Round 10: *Sc in next 8 sts, 2 sc in next st* repeat around. (80 sts)
Round 11: *Sc in next 9 sts, 2 sc in next st* repeat around. (88 sts)
Round 12: *Sc in next 10 sts, 2 sc in next st* repeat around. (96 sts)
Rounds 13-14: Sc in each stitch around. (96 sts)
Your circular base is now complete. It should lie flat and measure approximately 8 inches in diameter. If it's curling, your tension may be too tight; if it's ruffling, too loose. Adjust accordingly and continue.
Leaf Stitch Pattern (Worked in the Round)
Now for the fun part—the textured leaf motif! This pattern builds up in layers, creating beautiful dimensional leaves that climb up the bag.
Round 15: *Chain 3 (ch 3), skip 2 sts, double crochet (dc) in next st, ch 3, skip 2 sts, sc in next st* repeat around. (32 leaf bases)
Round 16: *In the ch-3 space, work (dc, ch 2, dc) to form a V-stitch, skip the dc from the previous round, sc in the next ch-3 space* repeat around. (32 V-stitches)
Round 17: *In the ch-2 space of the V-stitch, work (2 dc, ch 2, 2 dc) to form a shell, skip the sc, sc in the next ch-2 space* repeat around. (32 shells)
Round 18: *In the ch-2 space of the shell, work (3 dc, ch 2, 3 dc) to form a larger shell, skip the sc, sc in the next ch-2 space* repeat around. (32 larger shells)
Round 19: *In the ch-2 space of the larger shell, work (4 dc, ch 2, 4 dc) to form a full leaf, skip the sc, sc in the next ch-2 space* repeat around. (32 full leaves)
Round 20: *In the ch-2 space of the full leaf, work (5 dc, ch 2, 5 dc) to form an extended leaf, skip the sc, sc in the next ch-2 space* repeat around. (32 extended leaves)
Rounds 21-22: Repeat Round 20 to add height to the leaf pattern. Your leaves are now beautifully elongated and textured.
Round 23: *Sc in each dc and ch-2 space around, working 1 sc in each st and 2 sc in each ch-2 space* to even out the edge. (approx. 160 sts)
Rounds 24-25: Sc in each stitch around. (160 sts)
The body of your bag is complete! The leaf pattern should now be clearly visible, creating a stunning raised texture that mimics climbing vines.
Bag Top Edging
Now we'll add a delicate scalloped trim to finish the top edge beautifully.
Round 26: *Ch 4, skip 3 sts, sc in next st* repeat around. (40 ch-4 loops)
Round 27: Slip stitch (sl st) into the first ch-4 loop, *ch 4, sc in next ch-4 loop* repeat around, ending with sl st to the first sl st. Fasten off and weave in the end.
Your scalloped edge is complete, adding a lovely feminine touch to the bag's opening.
Handles (Make 2)
These sturdy twisted handles are simple to make and provide a comfortable grip.
Row 1: Chain 80. Double crochet in the 4th chain from the hook and in each chain across. (78 dc)
Row 2: Chain 3, turn. Double crochet in each dc across. Fasten off, leaving a long tail (about 12 inches) for sewing.
Repeat to make a second handle. Each handle should measure approximately 12 inches long when finished.
Assembly
Now it's time to bring your bag together!
- Fold each handle in half to create a loop. The folded end will be the top of your handle, and the two raw ends will be sewn together.
- Sew the ends of each handle together securely using the long tail and your yarn needle. Make sure the seam is neat and sturdy, as this will bear the weight of your bag's contents.
- Attach the handles to the inside of the bag at opposite sides, positioning them about 2 inches down from the top edge. Use the long tails to sew firmly through both the handle and the bag fabric. Make several passes to ensure a strong attachment.
- Weave in all remaining ends using your yarn needle. Trim any excess yarn.
Congratulations! Your Sunlit Vine Market Bag is complete. Give it a gentle stretch to shape it, and it's ready for its first outing.
Tips for Success
- Mark your rounds: Use a stitch marker at the beginning of each round to keep track of your place, especially during the leaf pattern rounds.
- Check your tension: Cotton yarn has less give than wool, so maintaining consistent tension is key to achieving the correct gauge and a professional finish.
- Block your bag: If your bag looks a bit wobbly, you can gently block it by wetting it and laying it flat to dry, shaping it as needed.
- Customize it: Feel free to experiment with different yarn colors or even add a fabric lining for extra durability.
This pattern is perfect for using up a single skein of cotton yarn from your stash, and it makes a wonderful gift for eco-conscious friends and family. The textured leaf stitch is surprisingly easy once you get into the rhythm, and the result is a stunning, one-of-a-kind accessory you'll be proud to carry.
Happy crocheting, and enjoy your beautiful new market bag!