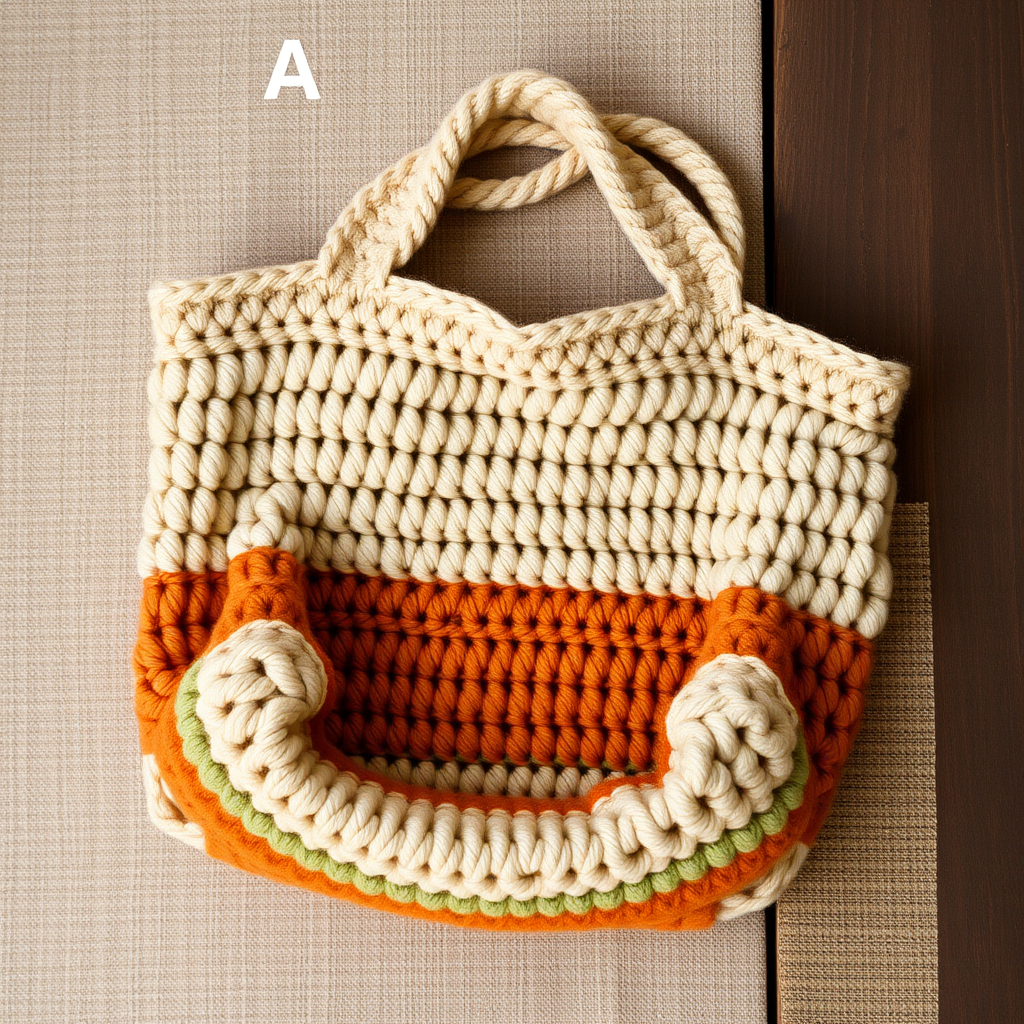
Sunlit Dune Hexagon Tote Free Pattern – Textured Crochet Carryall

Sunlit Dune Hexagon Tote Free Pattern – Textured Crochet Carryall
Carry a piece of summer with this stunning hexagonal tote, crocheted in warm sand and coral hues with a tactile, dense texture. This geometric carryall is as practical as it is beautiful—its roomy shape and sturdy straps make it perfect for beach days, farmers market runs, or everyday errands. The hexagon construction is surprisingly simple, worked in the round from a magic ring, and the color-blocked stripes add a modern, bohemian flair. Whether you're a seasoned crocheter or a confident beginner, this pattern is a rewarding project that yields a professional-looking, handmade bag you'll be proud to carry.
Materials Needed
Before you begin, gather the following supplies. This project uses readily available worsted-weight yarn and a standard hook, making it an accessible and affordable make.
- Yarn: Red Heart Super Saver (worsted weight, 100% acrylic) in 3 colors:
- Color A = Sand (334) – approximately 2 skeins
- Color B = Coral (254) – approximately 1 skein
- Color C = Turquoise (512) – approximately 1 skein
- Hook: 5.5 mm (I-9) crochet hook
- Notions: Stitch markers, tapestry needle for weaving in ends and seaming, scissors
- Optional: Fabric for lining (if desired, for extra durability)
Gauge: 14 sc x 16 rows = 4 x 4 inches (10 x 10 cm) in single crochet. Matching gauge is important for achieving the correct finished size, though this bag is forgiving.
Step-by-Step Instructions
This tote is worked in two identical hexagonal panels, then seamed together. Each panel is crocheted in the round, starting from a magic ring. Use stitch markers to keep track of the beginning of each round. The pattern uses basic single crochet increases to create the hexagonal shape.
Hexagon Panel (Make 2)
Note: Each round increases by 6 stitches. The color changes are noted in the instructions.
Round 1: With color A, make a magic ring. Work 6 sc into the ring. Pull the tail to tighten the ring closed. Join with a sl st to the first sc. (6 sts)
Round 2: Ch 1, 2 sc in each st around. Join with a sl st to the first sc. (12 sts)
Round 3: Ch 1, *sc in next st, 2 sc in next st*; repeat from * to * around. Join with a sl st. (18 sts)
Round 4: Ch 1, *sc in next 2 sts, 2 sc in next st*; repeat from * to * around. Join with a sl st. (24 sts)
Round 5: Ch 1, *sc in next 3 sts, 2 sc in next st*; repeat from * to * around. Join with a sl st. (30 sts)
Round 6: Ch 1, *sc in next 4 sts, 2 sc in next st*; repeat from * to * around. Join with a sl st. (36 sts)
Round 7: Change to color B. Ch 1, *sc in next 5 sts, 2 sc in next st*; repeat from * to * around. Join with a sl st. (42 sts)
Round 8: Ch 1, *sc in next 6 sts, 2 sc in next st*; repeat from * to * around. Join with a sl st. (48 sts)
Round 9: Ch 1, *sc in next 7 sts, 2 sc in next st*; repeat from * to * around. Join with a sl st. (54 sts)
Round 10: Change to color C. Ch 1, *sc in next 8 sts, 2 sc in next st*; repeat from * to * around. Join with a sl st. (60 sts)
Round 11: Ch 1, *sc in next 9 sts, 2 sc in next st*; repeat from * to * around. Join with a sl st. (66 sts)
Round 12: Ch 1, *sc in next 10 sts, 2 sc in next st*; repeat from * to * around. Join with a sl st. (72 sts)
Round 13: Change to color A. Ch 1, *sc in next 11 sts, 2 sc in next st*; repeat from * to * around. Join with a sl st. (78 sts)
Round 14: Ch 1, *sc in next 12 sts, 2 sc in next st*; repeat from * to * around. Join with a sl st. (84 sts)
Round 15: Ch 1, *sc in next 13 sts, 2 sc in next st*; repeat from * to * around. Join with a sl st. (90 sts)
Round 16: Change to color B. Ch 1, *sc in next 14 sts, 2 sc in next st*; repeat from * to * around. Join with a sl st. (96 sts)
Round 17: Ch 1, *sc in next 15 sts, 2 sc in next st*; repeat from * to * around. Join with a sl st. (102 sts)
Round 18: Ch 1, *sc in next 16 sts, 2 sc in next st*; repeat from * to * around. Join with a sl st. (108 sts)
Round 19: Change to color C. Ch 1, *sc in next 17 sts, 2 sc in next st*; repeat from * to * around. Join with a sl st. (114 sts)
Round 20: Ch 1, *sc in next 18 sts, 2 sc in next st*; repeat from * to * around. Join with a sl st. (120 sts)
Fasten off and weave in the yarn ends securely. Repeat the entire process to create a second identical hexagon panel.
Joining the Panels
Now it's time to transform your two flat hexagons into a three-dimensional bag. This is a simple seaming process that creates a deep, roomy tote.
- Place the two hexagons with their wrong sides together (the "right" side is the one you prefer the look of; the inside of the bag will be the back of the panels).
- Thread a tapestry needle with a long piece of color A yarn.
- Using a whip stitch, seam together three consecutive sides of the hexagon. This will form the bottom and two sides of the bag. The remaining three sides will be left open to form the top opening.
- When you reach the corners, take a couple of extra stitches in the same spot to reinforce the seam. This creates a sturdy, flat bottom for your tote.
Straps
These long, sturdy straps are crocheted flat and then sewn onto the bag. They are designed to be comfortable on the shoulder.
Make 2 Straps:
Row 1: With color A, ch 100. Sc in the 2nd ch from the hook and in each ch across. (99 sts)
Row 2: Ch 1, turn. Sc in each st across. (99 sts)
Row 3: Ch 1, turn. Sc in each st across. (99 sts)
Fasten off, leaving a long tail (at least 12 inches) for sewing. Repeat for the second strap.
Attaching the Straps
- Position the bag so the open top is facing you. Identify the three open sides.
- Center one strap on the top edge of the bag, aligning the ends of the strap with the corners of the open sides. The strap should span across the opening.
- Using the long tail and a tapestry needle, sew the strap securely to the top edge of the bag. Use a whip stitch or running stitch, going through both the strap and the bag fabric.
- Reinforce the attachment by sewing a few extra stitches in a small square or X pattern at each corner where the strap meets the bag. This is crucial for durability.
- Repeat the process to attach the second strap to the opposite side of the bag opening.
Finishing
Your Sunlit Dune Hexagon Tote is almost complete! Just a few final touches will make it perfect.
- Weave in all ends: Use your tapestry needle to carefully weave in any remaining yarn tails from the color changes and seaming. This gives your bag a clean, professional finish.
- Optional Lining: For extra durability and to prevent small items from slipping through the stitches, you can sew a fabric lining. Cut a piece of fabric to match the bag's interior dimensions, sew it into a bag shape, and hand-stitch it inside the tote.
- Blocking: Lightly block the bag to shape. You can mist it with water and gently shape it with your hands, then let it air dry. This helps the hexagons lie flat and the bag hold its form.
And there you have it—a beautiful, textured, and spacious hexagon tote that's ready for all your summer adventures. The combination of the warm sand, vibrant coral, and cool turquoise creates a striking visual, while the dense single crochet stitch ensures your bag is strong enough to carry all your essentials. Happy crocheting!