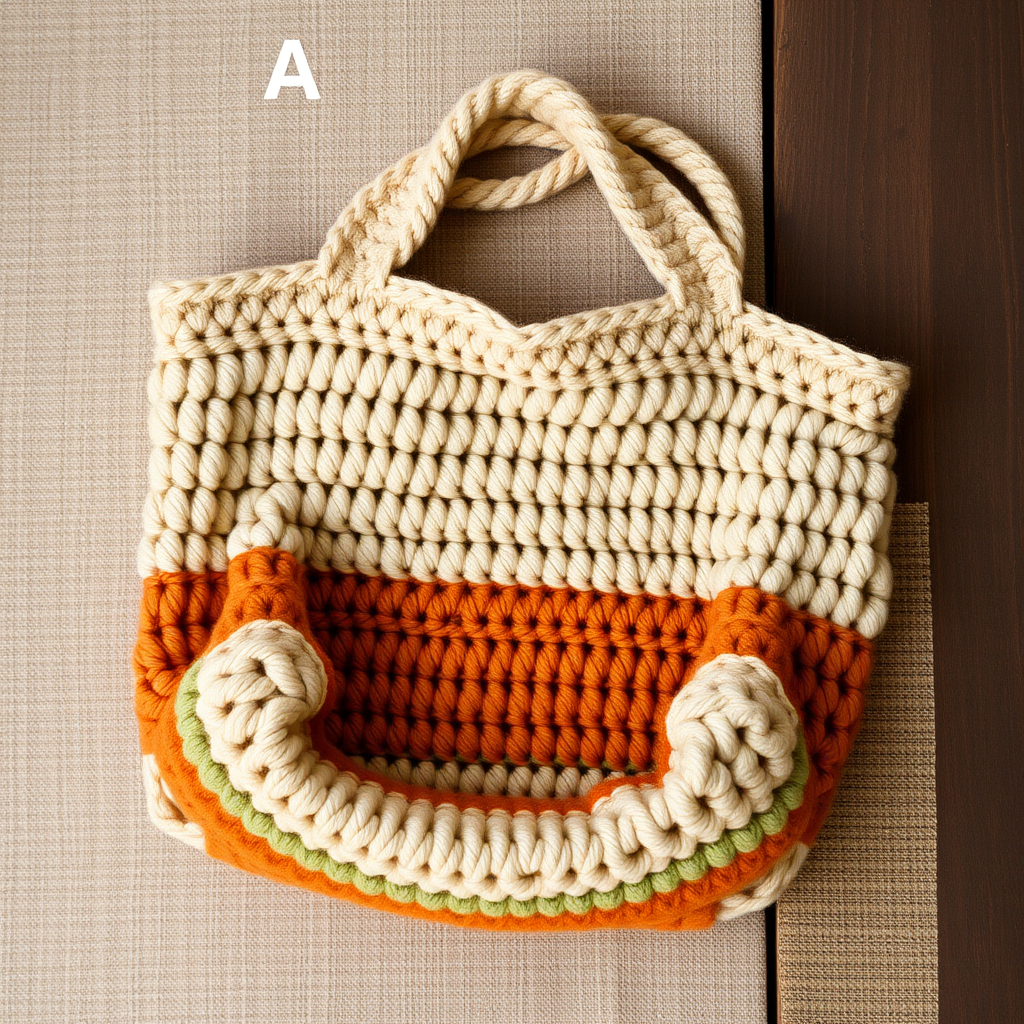
Groovy Berry Crochet Messenger Bag Free Pattern – A Boho Berry Tote

Groovy Berry Crochet Messenger Bag Free Pattern – A Boho Berry Tote
Are you ready to add a pop of color and a whole lot of handmade charm to your wardrobe? This Groovy Berry Crochet Messenger Bag is the perfect project for crocheters looking to create a functional, stylish accessory with a free-spirited boho vibe. The bag features a stunning textured berry stitch that mimics clusters of ripe berries, creating a tactile, eye-catching design that's sure to turn heads.
This pattern combines the sweetness of ripe berries with a free-spirited boho aesthetic, resulting in a vibrant messenger bag that's perfect for carrying your daily essentials. Whether you're heading to the farmer's market, a coffee shop, or a music festival, this bag adds a handmade touch that store-bought accessories simply can't match. The sturdy strap and roomy interior make it as practical as it is beautiful, and the color combination of Berry Red, Cream, and Forest Green creates a harmonious, nature-inspired palette.
Best of all, this pattern is beginner-friendly! With clear instructions, a simple special stitch, and straightforward assembly, you'll be able to create this gorgeous bag even if you're relatively new to crochet. Let's dive in and create something beautiful together.
Materials Needed
Before you begin, gather the following materials to ensure a smooth and enjoyable crochet experience:
- Yarn: Worsted weight cotton yarn in Berry Red, Cream, and Forest Green (approximately 300g total). Cotton yarn is ideal for this project because it's durable, holds its shape well, and provides excellent stitch definition for the textured berry stitch.
- Hook: 5.0 mm crochet hook (US H-8). This hook size works perfectly with worsted weight yarn to create a fabric that's sturdy yet supple.
- Gauge: 16 single crochet (sc) x 18 rows = 4 x 4 inches. Be sure to check your gauge before starting to ensure your bag comes out the right size.
- Additional Supplies: Yarn needle for weaving in ends and sewing pieces together, scissors, stitch markers (optional but helpful), and one large wooden button for the closure.
Having all your materials ready before you start will make the process much more enjoyable. Take a moment to organize your workspace and get comfortable – you're about to create something wonderful!
Step-by-Step Instructions
Special Stitch: The Berry Stitch
Before we begin, let's learn the special stitch that gives this bag its signature texture. The berry stitch creates a puffy, rounded cluster that resembles a ripe berry. Here's how to work it:
Berry Stitch: In the same stitch, work 5 double crochet (dc) together. To do this: yarn over (yo), insert hook into the stitch, pull up a loop, yo, pull through 2 loops on hook. Repeat this process 4 more times in the same stitch (you'll have 5 incomplete dc on your hook). Then, yo and pull through all 6 loops on your hook at once. This creates a beautiful puffy berry shape. Chain 1 to close the stitch if needed to keep it from puckering (though the pattern below doesn't require this).
Practice this stitch a few times on a scrap piece of yarn to get comfortable with the motion. Once you've mastered it, you're ready to create your bag!
Bag Body – Panel 1 (Front)
We'll start with the front panel of your bag, which features the beautiful berry stitch pattern in vibrant Berry Red.
Foundation: With Berry Red yarn, chain (ch) 31.
Row 1: Single crochet (sc) in the 2nd chain from the hook and in each chain across. You should have 30 sc total. Chain 1 and turn your work.
Row 2: Sc in each stitch across (30 sc). Chain 1 and turn.
Row 3 (berry stitch row): Sc in the first stitch, *work a berry stitch in the next stitch (see special stitch instructions above), sc in the next stitch*. Repeat from * to * across the row, ending with a sc in the last stitch. Chain 1 and turn.
Row 4: Sc in each stitch across (30 sc). Chain 1 and turn.
Repeat Rows 3-4 until your piece measures 12 inches from the starting edge. This will give you a nice, roomy panel for the front of your bag. When you reach the desired length, fasten off and weave in the yarn end.
Bag Body – Panel 2 (Back)
The back panel of your bag is worked exactly the same as the front, but in Cream yarn for a beautiful contrast.
Foundation: With Cream yarn, chain 31.
Row 1: Sc in the 2nd chain from the hook and in each chain across (30 sc). Chain 1 and turn.
Row 2: Sc in each stitch across (30 sc). Chain 1 and turn.
Row 3 (berry stitch row): Sc in the first stitch, *berry stitch in the next stitch, sc in the next stitch*. Repeat from * to * across, ending with sc in the last stitch. Chain 1 and turn.
Row 4: Sc in each stitch across (30 sc). Chain 1 and turn.
Repeat Rows 3-4 until the panel measures 12 inches from the start. Fasten off and weave in the end.
Assembly – Joining the Panels
Now it's time to bring your bag together! This is an exciting step where you'll see your creation take shape.
Place the two panels with their wrong sides together (the right sides should be facing outward). Using Berry Red yarn and a sc stitch, join the panels along the bottom edge and up both side edges. Leave the top edge open – this will be the opening of your bag.
To join: Insert your hook through both layers, pull up a loop, and work sc stitches evenly along the edges. Work 1 sc in each stitch along the bottom and sides. When you reach the corners, work 2-3 sc in the corner stitches to create a smooth turn.
Once you've joined the bottom and sides, turn the bag right side out. The berry stitch texture should now be visible on both the front (Berry Red) and back (Cream) panels.
Creating the Strap
The strap is what makes this a true messenger bag – long enough to wear across your body comfortably.
Foundation: With Forest Green yarn, chain 120. This will give you a strap that's approximately 60 inches long when worked up.
Row 1: Sc in the 2nd chain from the hook and in each chain across (119 sc). Chain 1 and turn.
Row 2: Sc in each stitch across (119 sc). Fasten off, leaving a long tail (at least 12 inches) for sewing.
This creates a sturdy, comfortable strap. The double-thickness of the sc rows makes it strong enough to hold your belongings securely.
Attaching the Strap: Using the long tail and a yarn needle, whip stitch the ends of the strap to the inside of the bag at the side seams. Position the strap so it's evenly balanced – attach one end to the top of one side seam and the other end to the top of the opposite side seam. Make sure the strap isn't twisted before you sew it in place!
Creating the Flap
The flap adds both style and function to your bag, keeping your belongings secure while adding to the boho aesthetic.
Foundation: With Berry Red yarn, chain 31.
Rows 1-8: Sc in each stitch across (30 sc). Chain 1 and turn after each row.
Row 9 (decrease row): Sc2tog (single crochet 2 together – insert hook in next stitch, pull up a loop, insert hook in next stitch, pull up a loop, yo and pull through all 3 loops on hook), sc in the next 26 stitches, sc2tog. You should have 28 sc. Chain 1 and turn.
Row 10: Sc2tog, sc in the next 24 stitches, sc2tog (26 sc). Chain 1 and turn.
Continue decreasing 2 stitches each row (one at each end) until you have 10 stitches remaining. This creates a rounded, tapered flap that's both attractive and functional.
Fasten off, leaving a long tail for sewing.
Attaching the Flap: Position the flap along the top edge of the back (Cream) panel, centered. Using Berry Red yarn and sc stitches, attach the flap to the back panel along the top edge. Work sc stitches through both layers to secure the flap in place.
Button Loop and Button Closure
Now for the finishing touch – the closure that keeps your bag secure.
Button Loop: With Berry Red yarn, chain 12. Slip stitch (sl st) to form a loop. Attach this loop to the center of the flap's edge (the pointed end of the flap). To attach, simply sew the ends of the chain loop securely to the flap using a yarn needle.
Button: Sew a large wooden button to the center of the front panel, approximately 2 inches from the top edge. Make sure it's positioned so that the button loop on the flap will reach it comfortably. Test the closure by bringing the flap over and checking that the loop fits over the button.
Finishing Touches
Your Groovy Berry Messenger Bag is almost complete! Here are the final steps to make it perfect:
Weave in all ends: Using your yarn needle, carefully weave in all loose ends on the inside of the bag. This ensures your bag looks neat and professional from every angle.
Block lightly: To give your bag a polished, professional shape, block it lightly. Wet block by gently misting the bag with water and shaping it to your desired dimensions. Allow it to dry completely before using. This helps the stitches settle and the bag to hold its shape beautifully.
Final inspection: Check all your seams and attachments to make sure everything is secure. Give your bag a gentle tug on the strap to test its strength.
Your Finished Groovy Berry Bag
Congratulations! You've created a stunning Groovy Berry Crochet Messenger Bag that's as functional as it is beautiful. The vibrant berry red front panel with its textured puffy berry stitch pattern, the cream back panel, and the forest green strap come together to create a truly unique accessory that reflects your handmade style.
This bag is perfect for carrying your daily essentials – books, wallet, phone, and more – with a pop of color and boho charm. The soft, slouchy rectangular shape gives it a relaxed, effortless look that pairs beautifully with jeans, sundresses, or anything in your wardrobe.
Don't be surprised if you receive compliments everywhere you go! This pattern is also wonderful for experimenting with different color combinations – try lavender and sage for a softer look, or mustard yellow and teal for a bold statement.
Happy crocheting, and enjoy your beautiful new handmade accessory!