Whispering Willow Macrame Wall Hanging Free Pattern
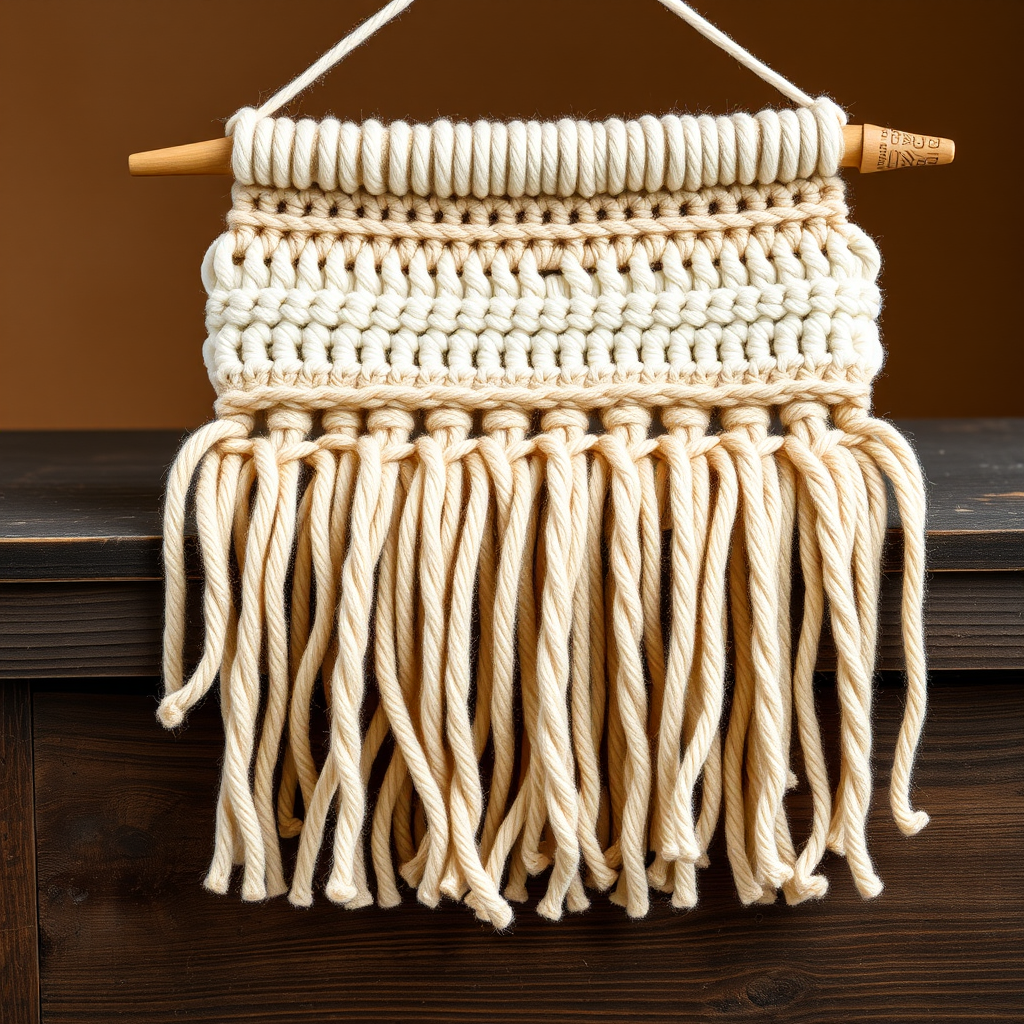
Whispering Willow Macrame Wall Hanging: A Free Beginner-Friendly Pattern
Bring the serene beauty of a weeping willow into your home with this textured, boho-chic wall hanging. The combination of chunky knotted fringe and soft, draped yarn creates a stunning, organic piece that adds warmth and depth to any room. This project is perfect for beginners who want to explore both knitting and crochet in one beautiful piece—no complicated techniques required, just simple stitches and a whole lot of charm.
Whether you're looking to add a natural focal point to your living room, bedroom, or entryway, this wall hanging delivers. The warm oatmeal and soft linen tones blend seamlessly with any decor, while the layered fringe mimics the graceful droop of willow branches. Best of all, you can complete this project in a single weekend, even if you're new to yarn crafts.
Materials Needed
Before you begin, gather the following supplies. All items are readily available at craft stores or online:
- Yarn: Lion Brand Wool-Ease Thick & Quick (super bulky weight, category 6) in 'Oatmeal' (MC) and 'Linen' (CC), 1 skein each. This chunky yarn ensures quick progress and a cozy, substantial texture.
- Knitting Needles: Size 15 (10 mm) straight knitting needles.
- Crochet Hook: Size P/Q (15 mm) crochet hook.
- Wooden Dowel or Branch: Approximately 14–16 inches long, 1 inch in diameter, for hanging.
- Yarn Needle: For weaving in ends and sewing the casing.
- Scissors: Sharp scissors for trimming fringe.
- Measuring Tape: To check panel length and strand lengths.
Gauge: Not critical for this project, but aim for a dense fabric with 8 stitches and 10 rows = 4 inches in stockinette stitch. This will ensure your panel is sturdy enough to support the fringe.
Step-by-Step Instructions
This wall hanging is created in two parts: a knitted top panel and a crocheted fringe bottom. The fringe is made using a combination of chain stitches and loose yarn strands to mimic willow branches. Follow along carefully, and you'll have a gorgeous piece in no time.
Part 1: Knitted Top Panel
- Cast On: With your size 15 knitting needles and MC (Oatmeal) yarn, cast on 30 stitches using the long-tail cast-on method. Leave a 6-inch tail for weaving in later.
- Row 1 (Right Side): Knit all 30 stitches across. This creates a smooth, flat row.
- Row 2 (Wrong Side): Purl all 30 stitches across. This completes one full stockinette stitch pattern.
- Repeat: Continue alternating Row 1 and Row 2 (knit one row, purl one row) until the panel measures 12 inches from the cast-on edge. Use your measuring tape to check periodically—this ensures your hanging is the right size.
- Bind Off: Bind off all 30 stitches loosely. To do this, knit the first two stitches, then pass the first stitch over the second and off the needle. Knit the next stitch, pass the previous stitch over, and repeat until one stitch remains. Cut the yarn, leaving a 6-inch tail, and pull it through the last loop to secure.
- Weave in Ends: Thread the yarn needle with the cast-on and bind-off tails. Weave them vertically through the edge stitches on the wrong side of the panel. Trim any excess yarn.
Part 2: Crocheted Fringe (Bottom Section)
Now we'll add the textured crochet band that anchors the willow-like fringe.
- Attach Yarn: With the right side of the knitted panel facing you, attach CC (Linen) yarn with a slip stitch to the bottom right corner. Insert your crochet hook into the corner stitch, yarn over, and pull through both loops on the hook.
- Row 1 (Single Crochet Base): Chain 1 (this counts as your first stitch). Work 30 single crochet (sc) evenly across the bottom edge of the knitted panel. To do this, insert your hook into the edge stitch, yarn over, pull up a loop, yarn over again, and pull through both loops on the hook. Space them evenly—about one sc per knitted stitch. When you reach the end, turn your work.
- Row 2 (Chain Loops): Chain 1, then single crochet in the first stitch. *Chain 15, skip the next stitch, single crochet in the next stitch.* Repeat from * to * across the row, ending with a single crochet in the last stitch. Turn. You should have 15 chain loops total. These loops will become the foundation for the willow branches.
- Row 3 (Filling the Loops): Chain 1, single crochet in the first sc. *Work 15 single crochet into the chain-15 loop (insert hook into the loop, yarn over, pull up a loop, yarn over, pull through both loops—repeat 15 times), then single crochet in the next sc.* Repeat from * to * across the row. This fills each loop with a dense, textured band. Fasten off by cutting the yarn and pulling it through the last loop. Weave in the end with your yarn needle.
Part 3: Adding Willow Branch Strands
This is where the magic happens—the layered fringe that mimics willow branches.
- Cut CC Strands: Cut 30 strands of CC (Linen) yarn, each 20 inches long. To speed this up, wrap the yarn around a 20-inch piece of cardboard 30 times, then cut along one edge.
- Attach CC Strands (First Row): Fold each strand in half to create a loop at the fold. Insert your crochet hook through the bottom edge of the knitted panel, just above the crocheted fringe band (about 1 inch up from the crochet edge). Hook the folded loop and pull it through the fabric. Then, thread the two loose ends through the loop and pull tight to create a lark's head knot. Space these 30 strands evenly across the width of the panel—about one strand every inch.
- Cut MC Strands: Cut another 30 strands of MC (Oatmeal) yarn, each 20 inches long.
- Attach MC Strands (Second Row): Repeat the lark's head knot process with the MC strands, but attach them in a second row slightly above the first (about 2 inches up from the crochet edge). Stagger them so they sit between the CC strands below, creating a layered, organic effect. This mimics the natural droop of willow branches.
- Trim the Fringe: Use sharp scissors to trim the ends of all strands at varying lengths. Aim for a range of 8 to 14 inches from the bottom of the crochet band. This irregularity is key to the natural, willow-like drape. Don't worry about being precise—organic is the goal!
Part 4: Finishing and Hanging
- Create the Casing: Fold the top edge of the knitted panel over the wooden dowel or branch, leaving about 1 inch of fabric folded to the wrong side. Pin it in place. Using the yarn needle and a length of MC yarn, sew the folded edge down with a simple whip stitch, creating a casing for the dowel. Ensure the stitches are secure but not too tight, so the dowel slides in easily.
- Insert the Dowel: Slide the wooden dowel or branch through the casing. Center it so the panel hangs evenly.
- Add Hanging Cord: Cut a 24-inch piece of yarn or twine. Tie one end securely to each end of the dowel, creating a loop for hanging. Make sure the knot is tight and the loop is centered.
- Final Check: Hang your wall hanging and gently fluff the fringe. Adjust any strands that look out of place. Step back and admire your handiwork!
Tips for Success
- Keep Tension Even: When knitting, try to keep your tension consistent. If your stitches are too tight, the panel will curl; if too loose, it may stretch. Practice a few rows if needed.
- Count Your Stitches: In the crochet section, count your single crochets in Row 1 to ensure you have 30. This makes Row 2's chain loops line up perfectly.
- Customize the Length: Feel free to adjust the fringe lengths to your preference. Longer strands create a more dramatic willow effect; shorter strands give a tidier look.
- Blocking (Optional): If your knitted panel curls at the edges, lightly steam block it. Lay it flat, cover with a damp cloth, and press with a warm iron (avoid direct contact with acrylic yarn). Let it dry completely before adding the fringe.
Why You'll Love This Project
This Whispering Willow Wall Hanging is more than just a craft—it's a statement piece. The combination of knitting and crochet introduces you to both crafts in one project, while the chunky yarn ensures fast results. The natural color palette and organic texture make it versatile enough for any room, and the handmade quality adds a personal touch that store-bought decor can't match.
Plus, it's a fantastic gift idea. Create one for a housewarming, a wedding, or just because. The recipient will treasure the time and care you put into it.
So grab your yarn, settle into your favorite chair, and let the soothing rhythm of knitting and crochet transport you. Before you know it, you'll have a beautiful piece of art that brings a little bit of nature indoors—no green thumb required.
Happy crafting!


