Jardin des Tuileries Beret Free Pattern: A Parisian-Chic Knit in Sage and Cream
Jardin des Tuileries Beret: A Parisian-Chic Knit in Sage and Cream
Introduction
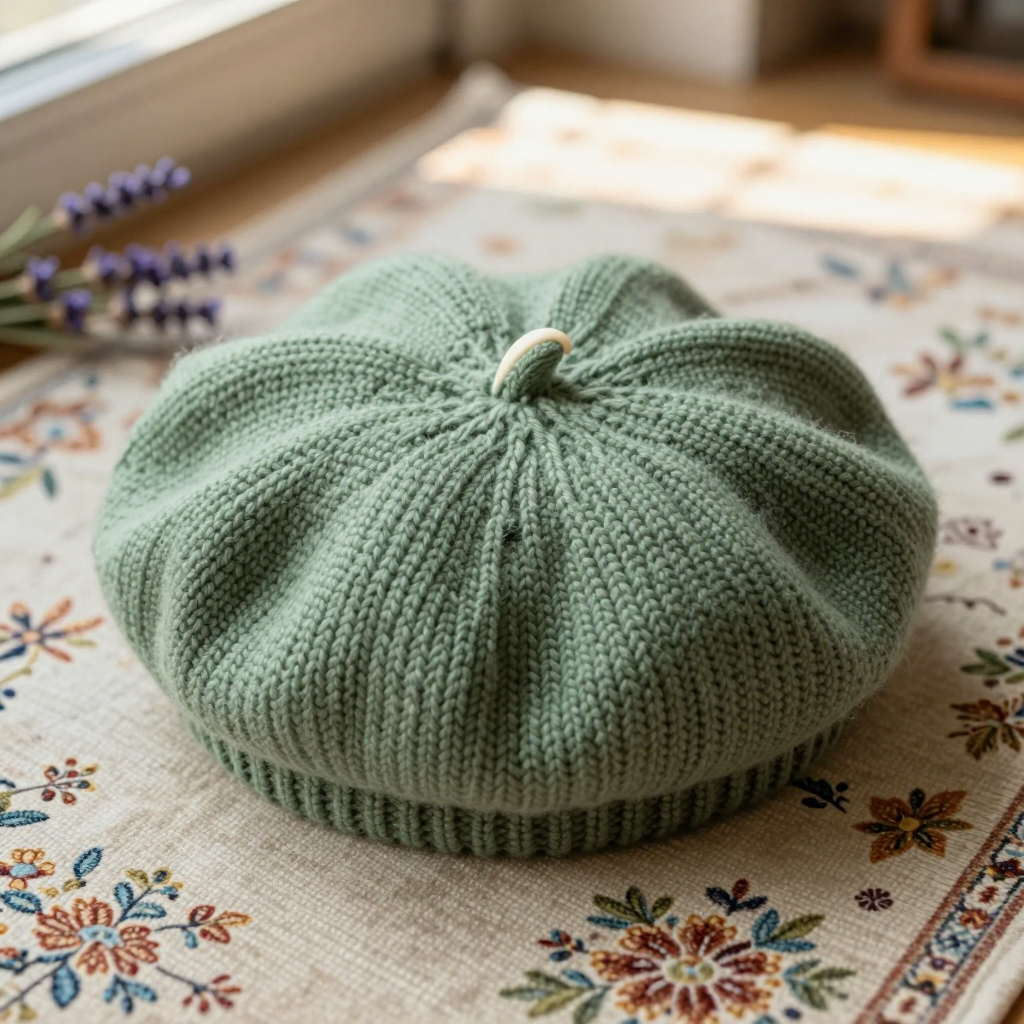
There is something quietly magical about a beret. It is the hat of poets and painters, of Sunday markets and long walks along the Seine, and now it can be the hat you made with your own two hands. The Jardin des Tuileries Beret is a flat, circular beret knit from a tiny center cast-on, growing outward in smooth stockinette stitch until it reaches a generous 11-inch (28 cm) crown, then finished with a narrow sage-green ribbed brim and a small cream "stem" button at the very top. It is perfect for a confident beginner who has learned to knit and purl and is ready for their first project worked in the round. The finished beret is soft, matte, and lightweight, with a gentle drape that sits beautifully on the head, and the sage-and-cream palette gives it a calm, garden-fresh Parisian feel.
Materials Needed
- Yarn: DK weight yarn (approximately 125 yds / 115 m per 50 g skein). You will need 1 skein of sage green (MC) and 1 skein of cream (CC). The sample uses a soft wool-alpaca blend. Total yarn used is roughly 90–110 yds of MC and a small amount of CC for the stem button.
- Main needles: US 5 (3.75 mm) 16" (40 cm) circular needle, plus a set of 5 double-pointed needles (DPNs) in the same size — or whatever size you need to obtain gauge.
- Brim needles: US 4 (3.5 mm) 16" (40 cm) circular needle.
- Stitch marker: 1 removable or locking marker to mark the beginning of the round.
- Tapestry needle: a blunt-tipped needle with a large eye for weaving in ends and sewing on the button.
- Scissors: any small, sharp pair.
- Button: one 3/4" (2 cm) cream shank button (optional — the pattern also includes instructions to knit your own cream stem button).
- Finished size: To fit an average adult head circumference of 21–23" (53–58 cm). Finished beret circumference at the brim is approximately 19" (48 cm) unstretched, and the diameter across the crown is approximately 11" (28 cm).
Abbreviations and Beginner Glossary
- MC – main color (here, sage green).
- CC – contrast color (here, cream).
- st / sts – stitch / stitches. One "stitch" is one loop on your needle.
- K (knit) – insert the right needle into the front of the stitch from left to right, wrap the yarn around, and pull a new loop through. This is the basic flat "V" stitch.
- P (purl) – insert the right needle into the front of the stitch from right to left, wrap the yarn around the front, and pull a new loop through. This makes a bumpy stitch.
- K2, P2 ribbing – a repeating pattern of two knit stitches followed by two purl stitches. It makes a stretchy, textured band.
- M1L (make one left) – lift the horizontal strand of yarn between the two needles from front to back, then knit into the back loop of that strand. This adds one new stitch and leans left.
- M1R (make one right) – lift the strand between the needles from back to front, then knit into the front loop. This adds one new stitch and leans right.
- K2tog (knit two together) – insert the needle into the next two stitches at once and knit them as one. This decreases by one stitch and leans right.
- SSK (slip, slip, knit) – slip the next two stitches one at a time as if to knit, then knit both slipped stitches together through their back loops. This decreases by one stitch and leans left.
- Stockinette stitch in the round – when knitting in a circle, you knit every single round. The smooth "V" side always faces you.
- Round – one complete pass all the way around the circle of stitches (the in-the-round version of a "row").
- Join in the round – after casting on, bring the first and last stitches together and begin knitting so the work forms a tube instead of a flat piece.
- Cast on – the very first step: creating the starting loops on your needle.
- Bind off – the final step: securing the live stitches so they cannot unravel.
- Pick up and knit – inserting your needle into the edge of the finished fabric and knitting a new stitch out of it, to start a new section (here, the brim).
- WS / RS – wrong side / right side (the inside / the outside of the fabric).
Gauge
22 sts and 30 rounds = 4" (10 cm) in stockinette stitch on the larger needles, blocked.
Gauge simply means how big your stitches are. It matters enormously here: the beret's fit and its lovely flat 11-inch crown both depend on your stitches matching this number. If your stitches are too big, the hat will be loose and floppy; too small, and it will be tight. To check, cast on about 30 stitches on the larger needles and knit in stockinette (knit one row, purl one row) for about 4 inches. Lay the swatch flat, place a ruler across the middle, and count how many stitches fit in 4 inches. If you have more than 22, go up a needle size; if fewer, go down. Wash and dry your swatch flat before measuring, because wool relaxes when wet.
Beginner Tips Before You Start
- Use a stitch marker. Place it at the join so you always know where each round begins. Without it, it is very easy to lose your place.
- Do not pull the yarn too tight when you join in the round or when you switch from one double-pointed needle to the next. A gentle, even tension keeps the fabric smooth and prevents ladders (gaps).
- Switch to double-pointed needles gradually. As the circle grows, the 16" circular needle will feel crowded. When the stitches no longer stretch comfortably around it, divide them over four DPNs and continue, keeping the marker at the start.
- Count your stitches at the end of every increase round. Each increase round adds exactly 8 stitches. If your count is off, fix it right away before the error multiplies.
- Keep the center hole tidy. The tiny 8-stitch cast-on can look messy at first. Do not worry — the cream stem button is designed to cover it completely.
- Trust the process. The crown will look like a strange ruffled bowl for a while. It only becomes a beret after blocking, so keep going!
Step-by-Step Instructions
Set-Up
With the larger needles and MC (sage green), cast on 8 sts using the Emily Ocker circular cast-on (or a magic ring cast-on). Distribute the stitches evenly over 4 double-pointed needles (2 sts per needle). Place your marker and join for working in the round, being careful not to twist the stitches. (8 sts)
Crown (Increase Section)
Every increase round adds 8 stitches, and every increase round is followed by a plain knit round. Work as follows:
- Round 1: Knit. (8 sts)
- Round 2: [K1, M1L] around. (16 sts)
- Round 3: Knit. (16 sts)
- Round 4: [K2, M1L] around. (24 sts)
- Round 5: Knit. (24 sts)
- Round 6: [K3, M1L] around. (32 sts)
- Round 7: Knit. (32 sts)
- Round 8: [K4, M1L] around. (40 sts)
- Round 9: Knit. (40 sts)
- Round 10: [K5, M1L] around. (48 sts)
- Round 11: Knit. (48 sts)
- Round 12: [K6, M1L] around. (56 sts)
- Round 13: Knit. (56 sts)
- Round 14: [K7, M1L] around. (64 sts)
- Round 15: Knit. (64 sts)
- Round 16: [K8, M1L] around. (72 sts)
- Round 17: Knit. (72 sts)
- Round 18: [K9, M1L] around. (80 sts)
- Round 19: Knit. (80 sts)
- Round 20: [K10, M1L] around. (88 sts)
- Round 21: Knit. (88 sts)
- Round 22: [K11, M1L] around. (96 sts)
- Round 23: Knit. (96 sts)
- Round 24: [K12, M1L] around. (104 sts)
- Round 25: Knit. (104 sts)
- Round 26: [K13, M1L] around. (112 sts)
- Round 27: Knit. (112 sts)
- Round 28: [K14, M1L] around. (120 sts)
- Round 29: Knit. (120 sts)
- Round 30: [K15, M1L] around. (128 sts)
- Round 31: Knit. (128 sts)
- Round 32: [K16, M1L] around. (136 sts)
- Round 33: Knit. (136 sts)
- Round 34: [K17, M1L] around. (144 sts)
- Round 35: Knit. (144 sts)
- Round 36: [K18, M1L] around. (152 sts)
- Round 37: Knit. (152 sts)
- Round 38: [K19, M1L] around. (160 sts)
- Round 39: Knit. (160 sts)
- Round 40: [K20, M1L] around. (168 sts)
- Round 41: Knit. (168 sts)
- Round 42: [K21, M1L] around. (176 sts)
- Round 43: Knit. (176 sts)
- Round 44: [K22, M1L] around. (184 sts)
- Round 45: Knit. (184 sts)
- Round 46: [K23, M1L] around. (192 sts)
- Round 47: Knit. (192 sts)
- Round 48: [K24, M1L] around. (200 sts)
- Round 49: Knit. (200 sts)
- Round 50: [K25, M1L] around. (208 sts)
- Round 51: Knit. (208 sts)
- Round 52: [K26, M1L] around. (216 sts)
- Round 53: Knit. (216 sts)
- Round 54: [K27, M1L] around. (224 sts)
- Round 55: Knit. (224 sts)
- Round 56: [K28, M1L] around. (232 sts)
- Round 57: Knit. (232 sts)
- Round 58: [K29, M1L] around. (240 sts)
- Round 59: Knit. (240 sts)
- Round 60: [K30, M1L] around. (248 sts)
- Round 61: Knit. (248 sts)
- Round 62: [K31, M1L] around. (256 sts)
Crown Flat Section
- Rounds 63–90: Knit even in stockinette (28 rounds). (256 sts)
At this point the crown diameter should measure approximately 11" (28 cm) across, lightly stretched. If it is much smaller, your gauge is tight; check your swatch before continuing.
Decrease Section
Each decrease round removes 8 stitches and is followed by a plain knit round. Work as follows:
- Round 91: [K30, K2tog] around. (248 sts)
- Round 92: Knit. (248 sts)
- Round 93: [K29, K2tog] around. (240 sts)
- Round 94: Knit. (240 sts)
- Round 95: [K28, K2tog] around. (232 sts)
- Round 96: Knit. (232 sts)
- Round 97: [K27, K2tog] around. (224 sts)
- Round 98: Knit. (224 sts)
- Round 99: [K26, K2tog] around. (216 sts)
- Round 100: Knit. (216 sts)
- Round 101: [K25, K2tog] around. (208 sts)
- Round 102: Knit. (208 sts)
- Round 103: [K24, K2tog] around. (200 sts)
- Round 104: Knit. (200 sts)
- Round 105: [K23, K2tog] around. (192 sts)
- Round 106: Knit. (192 sts)
- Round 107: [K22, K2tog] around. (184 sts)
- Round 108: Knit. (184 sts)
- Round 109: [K21, K2tog] around. (176 sts)
- Round 110: Knit. (176 sts)
- Round 111: [K20, K2tog] around. (168 sts)
- Round 112: Knit. (168 sts)
- Round 113: [K19, K2tog] around. (160 sts)
- Round 114: Knit. (160 sts)
- Round 115: [K18, K2tog] around. (152 sts)
- Round 116: Knit. (152 sts)
- Round 117: [K17, K2tog] around. (144 sts)
- Round 118: Knit. (144 sts)
- Round 119: [K16, K2tog] around. (136 sts)
- Round 120: Knit. (136 sts)
- Round 121: [K15, K2tog] around. (128 sts)
- Round 122: Knit. (128 sts)
- Round 123: [K14, K2tog] around. (120 sts)
- Round 124: Knit. (120 sts)
- Round 125: [K13, K2tog] around. (112 sts)
- Round 126: Knit. (112 sts)
- Round 127: [K12, K2tog] around. (104 sts)
- Round 128: Knit. (104 sts)
- Round 129: [K11, K2tog] around. (96 sts)
- Round 130: Knit. (96 sts)
- Round 131: [K10, K2tog] around. (88 sts)
- Round 132: Knit. (88 sts)
- Round 133: [K9, K2tog] around. (80 sts)
- Round 134: Knit. (80 sts)
- Round 135: [K8, K2tog] around. (72 sts)
- Round 136: Knit. (72 sts)
- Round 137: [K7, K2tog] around. (64 sts)
- Round 138: Knit. (64 sts)
- Round 139: [K6, K2tog] around. (56 sts)
- Round 140: Knit. (56 sts)
- Round 141: [K5, K2tog] around. (48 sts)
- Round 142: Knit. (48 sts)
- Round 143: [K4, K2tog] around. (40 sts)
- Round 144: Knit. (40 sts)
- Round 145: [K3, K2tog] around. (32 sts)
- Round 146: Knit. (32 sts)
- Round 147: [K2, K2tog] around. (24 sts)
- Round 148: Knit. (24 sts)
- Round 149: [K1, K2tog] around. (16 sts)
- Round 150: [K2tog] around. (8 sts)
Finishing the Crown
Break the yarn, leaving a 6" (15 cm) tail. Thread the tail onto your tapestry needle and pass it through the remaining 8 stitches, slipping them off the needles as you go. Pull the tail tight to close the hole, then secure it on the inside of the beret. Weave in the end.
Brim
With the smaller needles and MC, pick up and knit 96 sts evenly around the lower edge of the beret (roughly every other stitch along the edge of the decrease section). Place your marker and join in the round.
- Rounds 1–8: [K2, P2] ribbing. (96 sts)
- Round 9: Knit. (96 sts)
Bind off all stitches loosely in pattern. The final plain knit round gives the brim a neat, rolled edge.
Stem Button
With CC (cream) and the larger needles, cast on 3 sts. Work 4 rows in stockinette (knit on the RS, purl on the WS). Bind off. Roll the small rectangle into a tight cylinder and stitch it to secure, forming a small cream stem button approximately 3/4" (2 cm) in diameter. Sew the stem button to the very center of the crown, covering the gathered cast-on hole.
Assembly and Finishing
Seaming: This beret is knit entirely in the round, so there are no seams to sew. The only "assembly" is attaching the stem button: thread your tapestry needle with a doubled length of matching yarn, pass it through the center of the rolled cylinder and down into the crown, and take two or three firm stitches to anchor it. Pull gently so the button sits snugly without denting the crown.
Weaving in ends: Thread each loose tail onto the tapestry needle and weave it in and out through the wrong side of the fabric for about 2 inches (5 cm), following the path of the stitches. Change direction once to lock it, then trim the tail close to the fabric.
Blocking: Soak the beret in cool water for 15 minutes. Gently squeeze out the excess water (never wring or twist) and roll it in a towel to remove more moisture. Place the beret over a 10–11" (25–28 cm) plate or blocking disc, smooth the crown flat and even, and allow it to dry completely. Lightly steam the brim to set the ribbing. Blocking is what transforms the ruffled bowl into a crisp, flat Parisian beret — do not skip it.
Care: Hand wash cold, reshape, and dry flat.
Pro Tips and Variations
- Play with color: Swap the sage for dusty rose, mustard, or classic black, and change the stem button to a contrasting shade. A single-row cream stripe worked every 10 rounds through the crown flat section adds a subtle Parisian touch.
- Adjust the size: For a smaller beret, stop the increase section at Round 54 (224 sts) and work 20 plain rounds instead of 28 before decreasing. For a larger, slouchier beret, continue increasing to Round 70 (320 sts) and work 32 plain rounds. Always re-check your gauge first.
- Substitute yarn: Any DK weight yarn will work, but choose one with a little softness and drape — merino, alpaca blends, or a cotton-wool mix. Avoid stiff, squeaky acrylics, which make the crown stand up rather than lie flat.
- Try a folded brim: For extra warmth, work the brim ribbing for 16 rounds instead of 8, then fold it up double. This adds about 1 inch (2.5 cm) of depth and a cozy, vintage feel.