Victorian Diamond Dickey Crochet Dog Sweater – Free Pattern
Victorian Diamond Dickey Crochet Dog Sweater – Free Beginner-Friendly Pattern
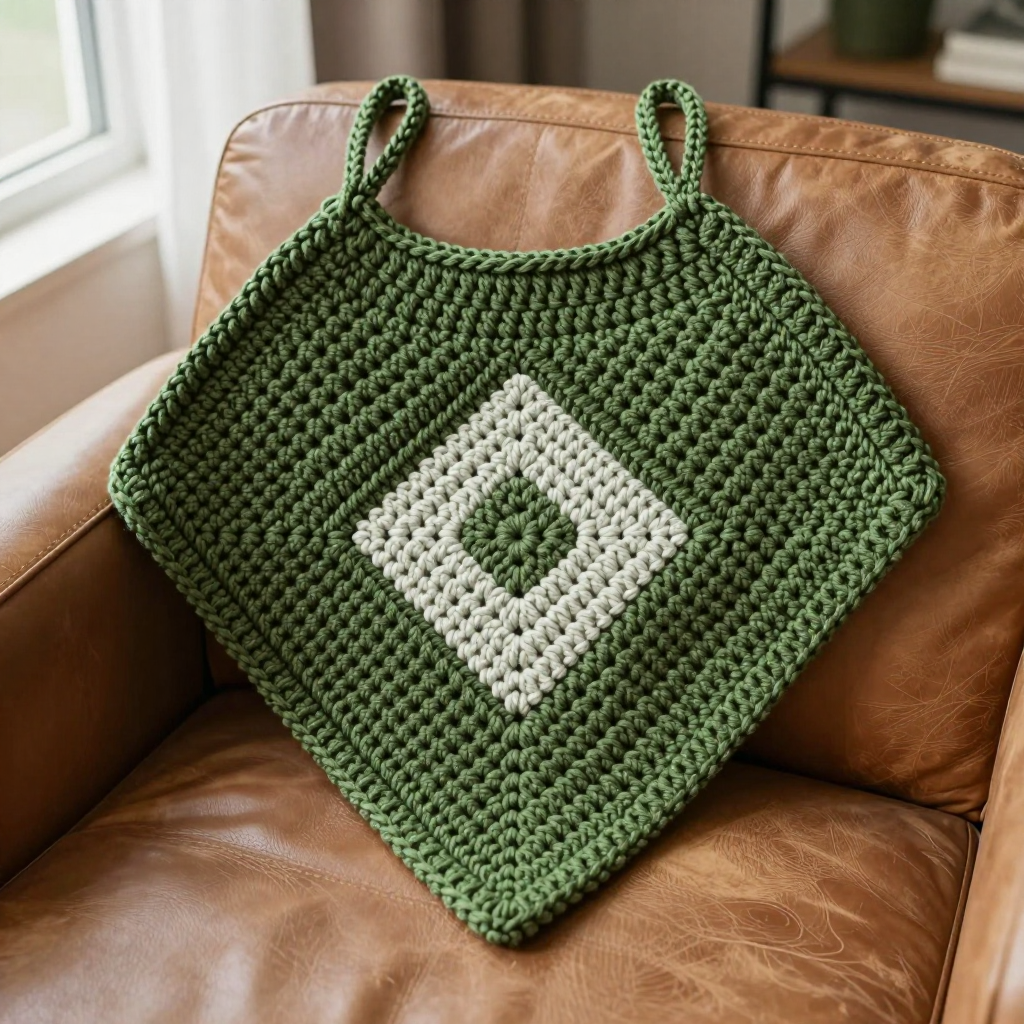
If you have never held a crochet hook before, this is the perfect first "real" project to fall in love with. The Victorian Diamond Dickey is a small triangular chest piece that slips over your dog's head and sits neatly under a plain harness, giving an elegant, layered Victorian look with almost no shaping to worry about. It is worked top-down in corner-to-corner (C2C) crochet, which simply means you build the piece one little square "block" at a time, growing wider with every row until you have a soft triangle. The finished dickey is about 13 inches wide across the top and 8 inches deep at the point, with a nubby, textured surface and one large diamond in pale sage against deep moss green. It feels light and cozy on the chest, and because it is small, you can finish it in a weekend of happy, unhurried crocheting.
Materials Needed
- Yarn: Aran weight wool blend (approx. 20% wool, 80% acrylic). Total approx. 110–130 yards: 1 skein in Moss (deep olive green — your Main Color, "MC") and 1 skein in Lichen (pale sage grey-green — your Contrast Color, "CC"). The sample used Drops Nepal or a similar aran.
- Hook: 5.0 mm (US H-8) crochet hook, or whatever size gets you the gauge below.
- Stitch markers: 2–4 (or use scrap yarn loops) to mark your corners and color changes.
- Tapestry needle: a blunt, large-eyed needle for weaving in ends and sewing on the ties.
- Scissors for cutting yarn.
- Finished size: Medium dog (neck circumference 12–14 in / 30–36 cm; chest depth approx. 8 in / 20 cm). Finished dickey: 13 in / 33 cm wide across the top edge, 8 in / 20 cm deep at the center point.
Abbreviations and Beginner Glossary
- ch – chain. Make a loop of yarn on your hook, then pull the yarn through the loop. Each loop you pull through is one chain. Chains are the foundation "ladder" you build on.
- dc – double crochet. Yarn over (wrap yarn around hook), insert hook into the stitch, yarn over, pull up a loop (3 loops on hook), yarn over, pull through 2 loops, yarn over, pull through the last 2 loops. One dc made.
- sl st – slip stitch. Insert hook into the stitch, yarn over, and pull that loop straight through the loop on your hook. It makes a tiny, flat joining stitch.
- sc – single crochet. Insert hook into stitch, yarn over, pull up a loop (2 loops on hook), yarn over, pull through both loops. One sc made.
- C2C – corner-to-corner. A crochet technique where you work little square "blocks" diagonally, growing the piece from one corner.
- block – one C2C square: a ch 3 plus 3 dc worked into the ch-3 space of the block below. Each block is about 1 inch square.
- MC – Main Color (Moss).
- CC – Contrast Color (Lichen).
- turn – flip your work over so you can work back along the row you just made.
- fasten off – cut the yarn a few inches from the work, pull the tail all the way through the last loop, and tug gently to lock it.
- weave in ends – thread a yarn tail onto the tapestry needle and run it back and forth through the fabric so it disappears.
Gauge
Gauge: 1 C2C block = 1 inch (2.5 cm) square, measured as one ch-3 + 3 dc block. 4 blocks = 4 inches across.
Why gauge matters: Gauge is how big your stitches turn out. If your blocks are bigger than 1 inch, the dickey will be too wide for your dog's neck; if smaller, it will be too tight. How to check: Work Rows 1–4 of this pattern (4 blocks wide). Lay it flat and measure one block from corner to corner. If it is bigger than 1 inch, try a smaller hook; if smaller, try a larger hook. Always check before you commit to the whole piece.
Beginner Tips Before You Start
- Count your blocks every row. Each row adds one block, so Row 1 has 1 block, Row 2 has 2, and so on up to Row 9 with 9. If your count drifts, the triangle will lean.
- Use stitch markers at the corners. Pop a marker in the ch-3 space at each end of the row so you always know exactly where the next block goes.
- Do not pull your yarn too tight. C2C blocks need a little breathing room. Keep your ch-3 spaces loose enough to slide your hook into easily.
- Change colors on the last dc. To switch from MC to CC, work the final yarn-over of the last dc with the new color. This keeps the color change clean.
- Carry the unused color loosely up the side edge rather than cutting it every row — it saves dozens of ends to weave in later.
- Relax and go slowly. This is a small project; there is no race. Enjoy the rhythm of the blocks.
Step-by-Step Instructions
Color Chart (read as a grid of blocks)
Each line below is one row, listing the blocks from left to right. The CC blocks form one large diamond centered in the piece; every other block is MC.
- Row 1: MC
- Row 2: MC, MC
- Row 3: MC, CC, MC
- Row 4: MC, CC, CC, MC
- Row 5: MC, CC, MC, CC, MC
- Row 6: MC, CC, MC, MC, CC, MC
- Row 7: MC, CC, MC, MC, MC, CC, MC
- Row 8: MC, CC, CC, CC, CC, CC, MC
- Row 9: MC, MC, MC, MC, MC, MC, MC, MC, MC
Body (the Triangle)
Set-up: With MC, ch 6.
Row 1 (increase row): Dc in 4th ch from hook and in each of the next 2 ch (first block made), ch 3, turn. (1 block)
Row 2 (increase row): Ch 6, dc in 4th ch from hook and next 2 ch (new block), sl st into the ch-3 space of Row 1, ch 3, 3 dc in same ch-3 space, ch 3, turn. (2 blocks)
Row 3 (increase row, begin CC): Ch 6, work new MC block, sl st to next ch-3 space, ch 3, 3 dc in CC, sl st to next ch-3 space, ch 3, 3 dc in MC, ch 3, turn. (3 blocks: MC, CC, MC)
Rows 4–8: Continue increasing 1 block at each end of every row, following the color chart above. Change color by working the final dc of the previous block with the new color (carry the unused color loosely up the side edge, or cut and rejoin if you prefer). At the end of Row 8 you will have 8 blocks across. (8 blocks)
Row 9 (final increase row): Ch 6, work new MC block, then work across all 8 blocks in MC as charted, ending with an extra MC block in the turning chain. (9 blocks across) Do not turn.
Top Edge / Neckband
Neckband Row 1: Do not fasten off. Working along the straight top edge of the triangle (the increase edge), work 1 row of sc evenly — about 2 sc per block edge, roughly 36 sc total in MC. Ch 1, turn. (36 sc)
Neckband Row 2: Sc in each sc across, working 1 sc in each st. (36 sc) Fasten off and weave in ends.
Neck Ties (optional, for the harness look)
Tie (make 2): With MC, ch 40; sl st in 2nd ch from hook and in each ch across. (39 sl sts) Fasten off, leaving a long tail. Sew one end of each tie securely to the top corners of the dickey at the neckband. Tie in a soft bow at the back of the neck.
Bottom Point Edging
Edging round: Join MC at the bottom point of the triangle. Work 1 round of sc evenly around the two lower diagonal edges (about 2 sc per block edge), working 3 sc in the bottom point to keep it sharp. Sl st to first sc. Fasten off.
Assembly and Finishing
Weaving in ends: Thread each yarn tail onto your tapestry needle. Run the needle back and forth through the back of the fabric for about 1 inch, changing direction once so it locks in place, then trim close to the work. Do this for every tail, including the carried colors at the side edge.
Sewing the ties: Using the long tail on each tie, stitch the flat end firmly to the top corner of the neckband with 4–5 small stitches, going through the tie and the neckband so it cannot pull loose.
Blocking: Lightly mist the finished dickey with cool water and lay it flat, shaping the triangle and gently opening the C2C texture so the diamond sits even and crisp. Pin the bottom point sharp if needed. Let it dry completely before use. Blocking is what makes the blocks look neat and even.
Wearing: Slip the dickey over the dog's head so the point rests on the chest; fasten the neck ties, or leave them untied if you are wearing it under a harness.
Pro Tips and Variations
- Change the colors: Swap Moss and Lichen for any two aran-weight colors you love — a cream diamond on charcoal, or a burgundy diamond on oatmeal, both look beautifully Victorian.
- Adjust the size: For a smaller dog, stop increasing at Row 7 (7 blocks wide). For a larger dog, add one more increase row (10 blocks wide) and extend the chart by one MC row at each side of the diamond.
- Substitute yarn: Any aran-weight yarn will work — just check your gauge again, because a different fiber may change your block size.
- Make it reversible-looking: If you dislike carrying yarn, cut and rejoin the CC for each color section instead; the side edge will be slightly thicker but the front stays perfectly neat.