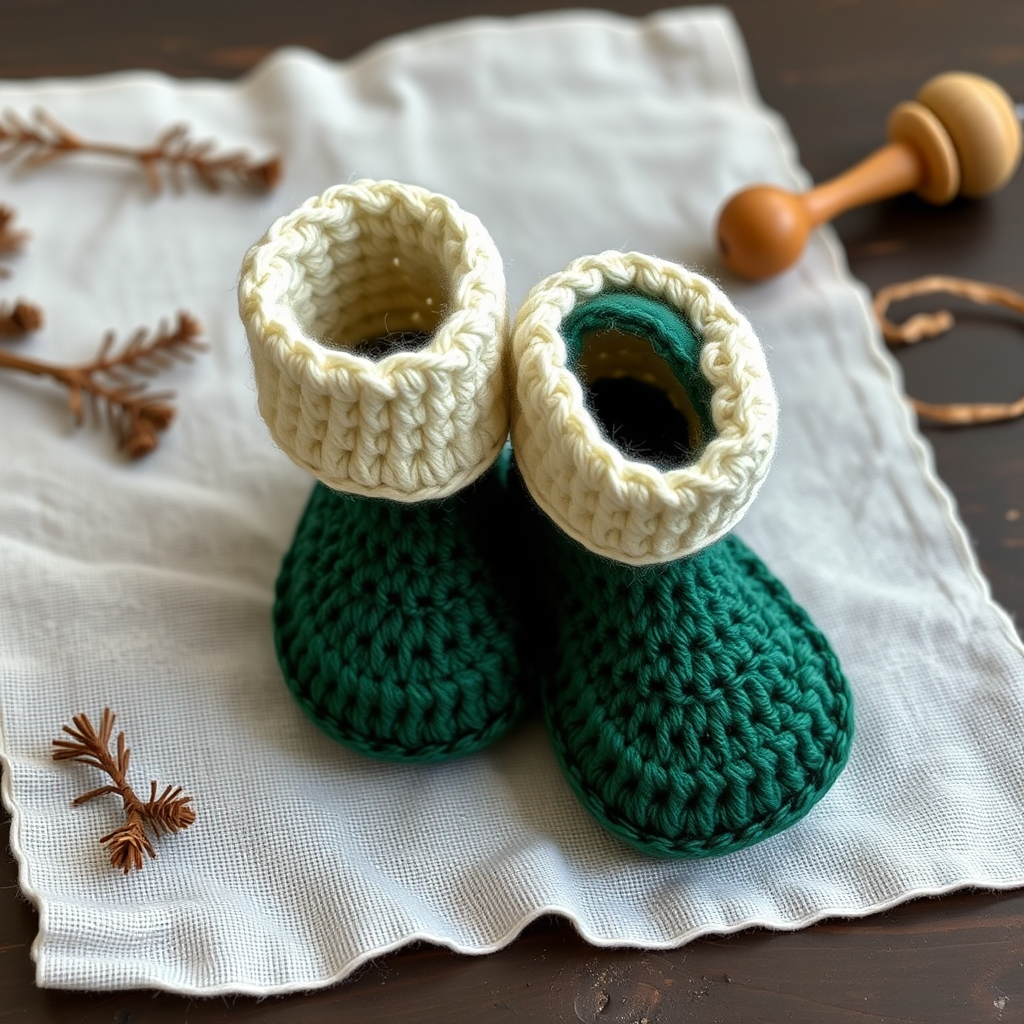
Whispering Pines Crochet Baby Booties Free Pattern – Forest Floor Moccasins

Whispering Pines Crochet Baby Booties: A Woodland Moccasin Free Pattern
Wrap tiny toes in woodland warmth with these absolutely adorable Whispering Pines Crochet Baby Booties! This free pattern creates textured, moccasin-style booties featuring a unique suede-like stitch and a charming leafy cuff. Inspired by the earthy tones of a forest floor, these booties are as cozy as they are beautiful—perfect for a nature-themed baby shower or a handmade heirloom gift.
Whether you're a seasoned crocheter or a beginner looking for a rewarding project, this pattern is designed to be approachable and thoroughly detailed. Let's gather our materials and create something magical for those precious little feet!
Materials Needed
Before we begin, let's ensure you have everything you need. This project is wonderfully portable and requires minimal supplies.
- Yarn: Worsted weight yarn in three colors:
- Moss Green (MC) – Main color for the bootie body
- Cream (CC1) – Contrast color for the cuff
- Walnut Brown (CC2) – Accent color for the leaf appliqués
- Crochet Hook: US G/6 (4.0 mm) hook
- Other: Yarn needle for weaving in ends, scissors, and optionally a small button or bead for the leaf center.
Gauge: 4 sc x 4 rows = 1 inch (in pattern stitch). Gauge is important for the correct finished size, so please check your tension!
Step-by-Step Instructions
Let's dive into the pattern! We'll work through this step-by-step, and I'll be here to guide you through every single stitch. The pattern includes sizes for 0-3 months (3-6 months, 6-12 months), with sole lengths of 3.5 (4, 4.5) inches. Instructions for different sizes are written in parentheses like this: 0-3 (3-6, 6-12).
Special Stitches You'll Need
This pattern uses two special stitches that give the booties their unique texture. Don't worry—they're easier than they look!
- Suede Stitch (SS): This stitch creates a dense, woven, suede-like texture. Here's how:
- Insert hook in the back loop only of the next stitch, yarn over, and pull through a loop.
- Insert hook in the front loop only of the next stitch, yarn over, and pull through a loop. You should now have 3 loops on your hook.
- Yarn over and pull through all 3 loops on your hook. That's your Suede Stitch complete!
- Leaf Stitch (LS): This creates a pretty, scalloped leaf edge for the cuff. It's simply: (sc, ch 2, sc) all in the same stitch.
Part 1: The Sole (Make 2 in Moss Green)
We'll start from the bottom and work our way up. The sole is worked in continuous rounds to create an oval shape.
Foundation: Chain 7 (8, 9).
Rnd 1: Work 2 sc in the 2nd chain from your hook. Then, sc in the next 4 (5, 6) chains. In the last chain, work 3 sc. Now, you'll work on the opposite side of the foundation chain: sc in the next 4 (5, 6) chains, and finally, sc in the very first chain again (where you made your first 2 sc). Join with a slip stitch to the first sc of the round. You should now have 14 (16, 18) stitches.
Rnd 2: Chain 1 (this counts as your first sc). Work 2 sc in the next 2 stitches. Then, sc in the next 4 (5, 6) stitches. Work 2 sc in the next 3 stitches. Sc in the next 4 (5, 6) stitches. Finally, work 2 sc in the last stitch. Join with a slip stitch. You now have 20 (22, 24) stitches.
Rnd 3: Chain 1. *Work 2 sc in the next stitch, then sc in the next stitch.* Repeat from * to * 2 times total. Sc in the next 4 (5, 6) stitches. *Work 2 sc in the next stitch, then sc in the next stitch.* Repeat from * to * 3 times total. Sc in the next 4 (5, 6) stitches. Work 2 sc in the next stitch, and sc in the last stitch. Join with a slip stitch. You now have 26 (28, 30) stitches.
Fasten off your yarn and weave in the end. Your sole is complete! Repeat this entire section to make the second sole.
Part 2: The Side Wall (Worked in Moss Green)
Now we'll build the sides of the bootie, creating a sturdy wall that will shape the foot.
Rnd 4: Join your Moss Green yarn in any stitch of the sole. Chain 1. This round is crucial for creating a crisp edge: work a single crochet in the back loop only of each stitch around. Join with a slip stitch. Stitch count remains 26 (28, 30).
Rnd 5-6: Chain 1. Work a single crochet in each stitch around (through both loops this time). Join with a slip stitch at the end of each round. Stitch count remains 26 (28, 30).
Part 3: Toe Shaping
This is where we create the rounded toe of the moccasin by decreasing stitches in the front of the bootie.
Rnd 7: Chain 1. Sc in the next 8 (9, 10) stitches. Now, we'll work 5 decreases: sc2tog (single crochet two together) 5 times. Then, sc in the next 8 (9, 10) stitches. Join with a slip stitch. You now have 21 (23, 25) stitches.
Rnd 8: Chain 1. Sc in the next 6 (7, 8) stitches. Work sc2tog 4 times. Then, sc in the next 7 (8, 9) stitches. Join with a slip stitch. You now have 17 (19, 21) stitches.
Rnd 9: Chain 1. Sc in the next 5 (6, 7) stitches. Work sc2tog 3 times. Then, sc in the next 6 (7, 8) stitches. Join with a slip stitch. You now have 14 (16, 18) stitches.
Fasten off, leaving a long tail (about 12 inches). Thread this tail onto your yarn needle. Weave the needle through the front loops of the remaining stitches and pull tight to cinch the toe closed. Weave in the end securely.
Part 4: The Leafy Cuff (Worked in Cream)
Time to add that beautiful, textured cuff! We'll be working around the opening of the bootie.
Rnd 1: Join your Cream yarn (CC1) to the back center of the bootie opening. Chain 1. Working in the back loops only, single crochet in each stitch around. Join with a slip stitch. Stitch count is 14 (16, 18).
Rnd 2: Chain 1. *Work a Suede Stitch (SS) in the next stitch, then sc in the next stitch.* Repeat from * to * around. Join with a slip stitch. Stitch count remains 14 (16, 18).
Rnd 3: Chain 1. *Work a Leaf Stitch (LS) in the next stitch, then skip the next stitch.* Repeat from * to * around. Join with a slip stitch. You will have 7 (8, 9) leaf stitches.
Fasten off and weave in your ends. The scalloped leaf edge is now complete!
Part 5: Leaf Appliqués (Make 2 in Walnut Brown)
These little leaves add the perfect woodland charm to the front of each bootie.
Foundation: Chain 5.
Row 1: Sc in the 2nd chain from your hook. Hdc (half double crochet) in the next chain. Dc (double crochet) in the next chain. Hdc in the last chain. Fasten off, leaving a long tail for sewing.
You've just made a simple, cute leaf shape! Repeat to make a second one.
Part 6: Finishing Touches
We're almost done! Let's put it all together.
- Sew the Leaves: Using the long tail from your leaf appliqué, sew one leaf to the front of each bootie, positioning it just below the cream cuff.
- Optional Embellishment: For an extra touch of charm, sew a small button or bead to the center of each leaf.
- Weave in Ends: Carefully weave in all remaining yarn ends with your yarn needle to ensure a clean, professional finish.
And there you have it! Your beautiful Whispering Pines Crochet Baby Booties are complete. These make a wonderful, heartfelt gift for a new baby, and the woodland-inspired design is sure to be treasured. Happy crocheting!