Whimsical Woodland Jingle Hare Free Pattern – A Knitted Forest Charm
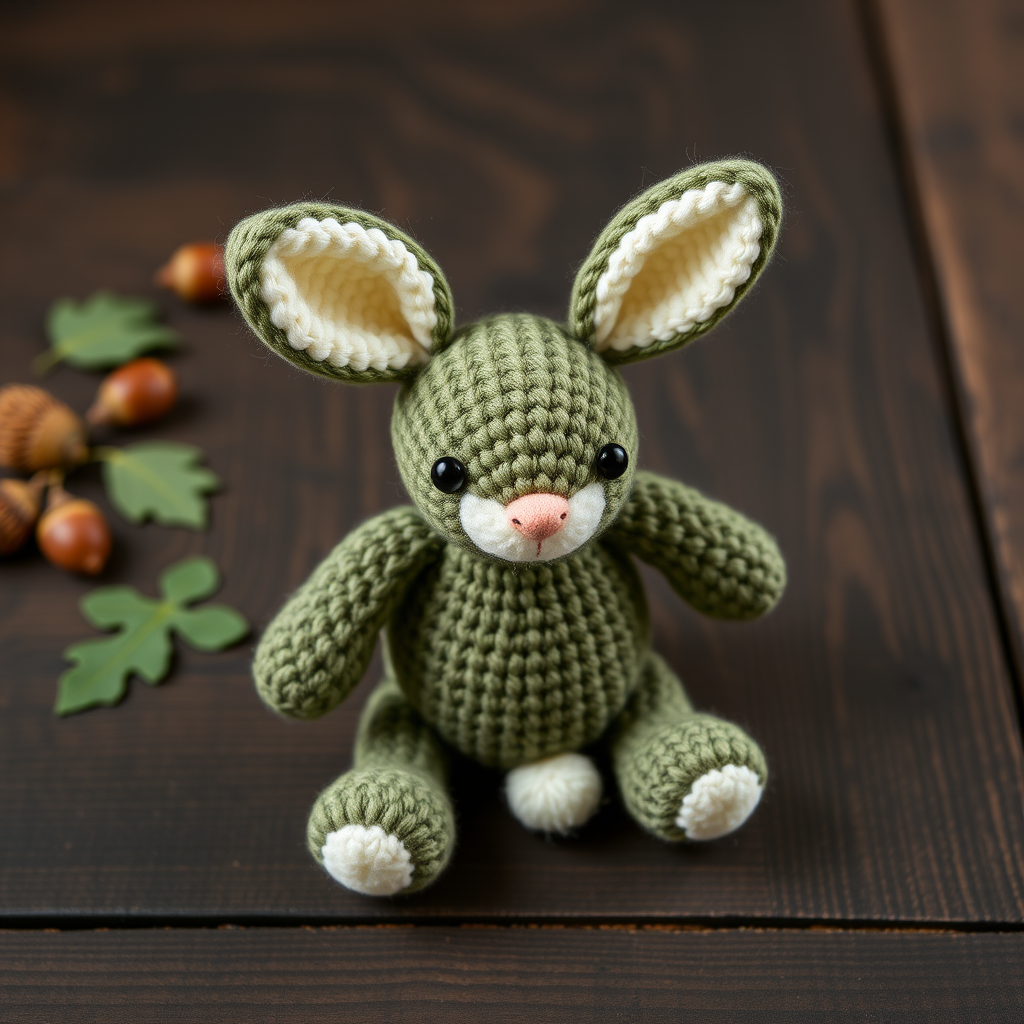
Whimsical Woodland Jingle Hare Free Pattern – A Knitted Forest Charm
Delight in crafting a soft, jingling hare that brings a touch of enchanted forest magic to any nursery or cozy corner. This knitted companion features a hidden bell inside, making every hop a gentle melody. Whether you're looking for a unique baby gift, a handmade heirloom, or simply a cozy weekend project, this Whimsical Woodland Jingle Hare is sure to steal hearts. With its rustic moss-green body, cream accents, and floppy ears, this amigurumi-style toy is as charming to make as it is to gift. Let's dive into this delightful pattern and create a forest friend that will be treasured for years to come.
Materials Needed
Before you begin, gather the following materials to ensure a smooth crafting experience. All items are readily available at your local craft store or online.
- Yarn: Worsted weight cotton or wool blend in earthy tones:
- Main color (e.g., moss green) – approximately 100 yards
- Accent color (e.g., cream) – approximately 50 yards
- Small amounts of black and pink yarn for facial details
- Knitting Needles: US 5 (3.75 mm) for body pieces, US 3 (3.25 mm) for small details
- Crochet Hook: US C/2 (2.75 mm) or size needed to match yarn for ears and tail
- Gauge: 20 stitches and 28 rows = 4 inches in stockinette stitch (on US 5 needles)
- Other Supplies:
- Jingle bell (approximately 1 inch in diameter)
- Small piece of cotton fabric for the bell pouch
- Fiberfill stuffing
- Tapestry needle for seaming and embroidery
- Stitch markers (optional)
- Scissors
Note: The gauge is important for achieving the correct size, but since this is a toy, slight variations are acceptable. The finished hare will be approximately 6 inches tall.
Step-by-Step Instructions
This pattern is knitted flat and seamed, with crocheted magic ring details for the ears and tail. The jingle bell is enclosed in a small fabric pouch to prevent damage and ensure safety. Follow each step carefully, and you'll have your very own woodland charm in no time.
Abbreviations
- K: Knit
- P: Purl
- M1: Make one (increase by lifting the bar between stitches and knitting into the back of it)
- K2tog: Knit two stitches together (decrease)
- sc: Single crochet
- sc2tog: Single crochet two stitches together (decrease)
- RS: Right side
- WS: Wrong side
- st(s): Stitch(es)
HEAD (Make 2 Pieces)
Using the main color yarn and US 5 needles, cast on 10 stitches.
- Row 1 (RS): Knit all stitches.
- Row 2: Purl all stitches.
- Row 3: K1, M1, K8, M1, K1 (12 sts)
- Row 4: Purl all stitches.
- Row 5: K1, M1, K10, M1, K1 (14 sts)
- Row 6: Purl all stitches.
- Row 7: K1, M1, K12, M1, K1 (16 sts)
- Row 8: Purl all stitches.
- Row 9: Knit all stitches.
- Row 10: Purl all stitches.
- Row 11: Knit all stitches.
- Row 12: Purl all stitches.
- Row 13: K2tog, K12, K2tog (14 sts)
- Row 14: Purl all stitches.
- Row 15: K2tog, K10, K2tog (12 sts)
- Row 16: Purl all stitches.
- Row 17: K2tog, K8, K2tog (10 sts)
- Row 18: Purl all stitches.
- Bind off all stitches. Leave a long tail (approximately 12 inches) for seaming.
Tip: Make both head pieces identically. The increases create a rounded shape that will form the hare's cheeks and forehead.
BODY (Make 2 Pieces)
Using the main color yarn and US 5 needles, cast on 8 stitches.
- Row 1 (RS): Knit all stitches.
- Row 2: Purl all stitches.
- Row 3: K1, M1, K6, M1, K1 (10 sts)
- Row 4: Purl all stitches.
- Row 5: K1, M1, K8, M1, K1 (12 sts)
- Row 6: Purl all stitches.
- Row 7: Knit all stitches.
- Row 8: Purl all stitches.
- Row 9: Knit all stitches.
- Row 10: Purl all stitches.
- Row 11: Knit all stitches.
- Row 12: Purl all stitches.
- Row 13: K1, M1, K10, M1, K1 (14 sts)
- Row 14: Purl all stitches.
- Row 15: Knit all stitches.
- Row 16: Purl all stitches.
- Row 17: Knit all stitches.
- Row 18: Purl all stitches.
- Row 19: K2tog, K10, K2tog (12 sts)
- Row 20: Purl all stitches.
- Row 21: K2tog, K8, K2tog (10 sts)
- Row 22: Purl all stitches.
- Row 23: K2tog, K6, K2tog (8 sts)
- Row 24: Purl all stitches.
- Bind off. Leave a long tail (approximately 12 inches) for seaming.
Tip: The body is slightly narrower than the head, giving the hare a cute, plump silhouette. The increases at Row 13 create a gentle belly curve.
EARS (Make 2)
Using the accent color yarn and a crochet hook, create a magic ring.
- Round 1: 6 sc in ring (6 sts)
- Round 2: (sc in next 2 sts, 2 sc in next st) twice (8 sts)
- Round 3: sc in each st around (8 sts)
- Round 4: (sc in next 3 sts, 2 sc in next st) twice (10 sts)
- Round 5-6: sc in each st around (10 sts)
- Round 7: (sc in next 3 sts, sc2tog) twice (8 sts)
- Round 8: sc in each st around (8 sts)
- Fasten off, leaving a long tail (approximately 10 inches). Flatten the ear and sew the base closed with a few stitches to create a neat, rounded shape.
Tip: The ears are crocheted in the round, creating a seamless tube. Flattening them before sewing gives the hare its characteristic floppy ear look.
LEGS (Make 2)
Using the main color yarn and US 5 needles, cast on 6 stitches.
- Row 1: Knit all stitches.
- Row 2: Purl all stitches.
- Row 3: K1, M1, K4, M1, K1 (8 sts)
- Row 4: Purl all stitches.
- Row 5: Knit all stitches.
- Row 6: Purl all stitches.
- Row 7: Knit all stitches.
- Row 8: Purl all stitches.
- Row 9: K2tog, K4, K2tog (6 sts)
- Row 10: Purl all stitches.
- Bind off. Leave a long tail (approximately 8 inches) for seaming.
Tip: The legs are small and simple, perfect for beginners. They'll be sewn to the front bottom of the body, giving the hare a seated posture.
TAIL
Using the accent color yarn and a crochet hook, create a magic ring.
- Round 1: 6 sc in ring (6 sts)
- Round 2: 2 sc in each st around (12 sts)
- Round 3: sc in each st around (12 sts)
- Round 4: sc2tog around (6 sts)
- Fasten off, leaving a long tail (approximately 8 inches). Stuff lightly with a small amount of fiberfill before closing.
Tip: The tail is a tiny crocheted ball. Stuffing it lightly gives it a fluffy, cloud-like appearance that contrasts beautifully with the knitted body.
ASSEMBLY
Now comes the fun part – bringing your hare to life! Follow these steps carefully for a polished finish.
- Prepare the bell pouch: Place the jingle bell inside a small piece of cotton fabric (about 3x3 inches). Fold the fabric over the bell, and sew it closed securely. This prevents the bell from being exposed and protects the yarn from wear. Ensure the pouch is snug so the bell doesn't shift too much.
- Sew the head: Place the two head pieces together with right sides facing. Using the long tail from one piece, sew along the edges using a whip stitch or mattress stitch, leaving a small opening (about 1.5 inches) at the bottom center. Turn the head right side out. Insert the bell pouch into the head, positioning it in the center. Finish seaming the opening closed. Gently shape the head, ensuring the bell is centered and can jingle freely.
- Sew the body: Place the two body pieces together with right sides facing. Using the long tail, sew along the edges, leaving a small opening (about 1.5 inches) at the top or bottom. Turn the body right side out. Stuff firmly with fiberfill, then close the opening with a ladder stitch or whip stitch.
- Attach the head to the body: Position the head on top of the body, aligning the seams. Using the yarn tail from the head or a separate piece of main color yarn, sew the head to the body with a sturdy whip stitch. Make several passes to ensure it's securely attached.
- Sew the ears: Position the ears on the top of the head, slightly back from the center. Using the long tails from the ears, sew them in place with a few firm stitches. Angle them slightly outward for a floppy, natural look.
- Sew the legs: Position the legs on the bottom front of the body, spacing them evenly (about 1 inch apart). Using the long tails, sew each leg securely to the body. The legs should hang down slightly, giving the hare a seated appearance.
- Sew the tail: Position the tail on the back bottom of the body, opposite the legs. Using the long tail, sew it securely in place. The tail should stick out slightly for a cute, fluffy effect.
- Embroider the face: Using a small amount of black yarn and a tapestry needle, embroider two French knots for the eyes. Place them about 1 inch apart, centered on the head, slightly above the midpoint. For the nose, use pink yarn to create a small satin stitch (a tiny triangle or vertical line) centered between and slightly below the eyes. Add a tiny pink stitch for the mouth – a small curved line or a simple "V" shape below the nose.
- Weave in all ends: Using the tapestry needle, carefully weave in any remaining yarn tails on the inside of the hare. Trim any excess yarn.
Final Touches and Tips
- Safety: If gifting to a baby or young child, ensure the bell pouch is securely sewn and the fiberfill is not accessible. Always supervise play with small children.
- Customization: Feel free to experiment with different color combinations! A grey hare with white accents or a warm brown with cream details would be equally charming.
- Gauge check: If your hare turns out larger or smaller than expected, adjust your needle size accordingly. The pattern is forgiving, so don't stress about perfection.
- Blocking: If desired, lightly block the knitted pieces before assembly to even out the stitches. This is optional but can give a more polished look.
Your Whimsical Woodland Jingle Hare is now complete! This charming forest friend is perfect for snuggling, gifting, or simply displaying as a cozy decoration. The gentle jingle of the bell adds a magical touch that will delight both children and adults alike. Enjoy your handmade creation, and happy crafting!


