Free Pattern: Folk Duckling Pancake Lovie Crochet
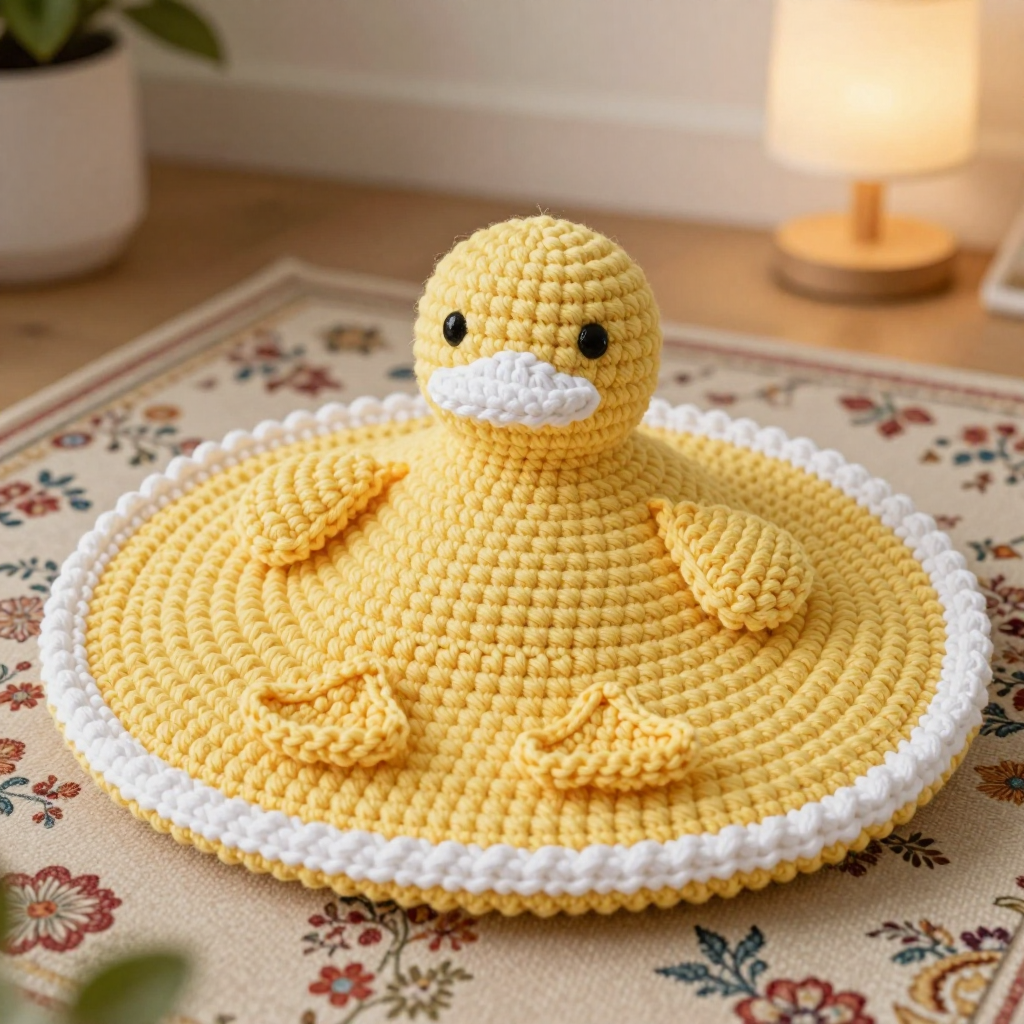
Free Pattern: Folk Duckling Pancake Lovie Crochet
Introduction
If you have ever wanted to make a sweet, handmade baby gift but felt intimidated by complicated patterns, this Folk Duckling Pancake Lovie is the perfect first "real" project for you. It is a flat, oval security blanket (the "pancake") worked back and forth in simple single crochet rows, topped with a stuffed butter-yellow duckling head and two tiny webbed foot appliqués. The finished lovie is soft, squishy, and about 12 inches wide by 9 inches tall — just the right size for little hands to grab and cuddle. With a crisp white stripe border and a charming folk-art look, it feels special enough to give as a gift, yet it is built almost entirely from one beginner-friendly stitch. If you can make a single crochet, you can make this lovie.
Materials Needed
- Yarn: DK / light worsted (Category 3) cotton or cotton-blend yarn — butter yellow (approx. 150 yds) and white (approx. 30 yds).
- Crochet hook: G/6 (4.0 mm).
- Stitch markers: at least 4 (to mark corners and the start of rounds).
- Tapestry needle: a blunt-tipped needle with a large eye for sewing pieces together and weaving in ends.
- Scissors.
- Polyester fiberfill: a small handful for stuffing the head and bill.
- Finished measurements: Lovie body approx. 12 inches (30 cm) wide x 9 inches (23 cm) tall; duck head approx. 3.5 inches (9 cm) tall; each webbed foot approx. 2 inches (5 cm).
Abbreviations and Beginner Glossary
- ch – chain: yarn over the hook, pull the loop through the loop on your hook. This creates a small "V" and is how you start a flat piece.
- sc – single crochet: insert hook into the stitch, yarn over, pull up a loop (2 loops on hook), yarn over, pull through both loops. This is the main stitch of the whole pattern.
- hdc – half double crochet: yarn over, insert hook into stitch, yarn over, pull up a loop (3 loops on hook), yarn over, pull through all 3 loops. (Listed for reference; not used in this pattern.)
- dc – double crochet: yarn over, insert hook, yarn over, pull up a loop (3 loops), yarn over and pull through 2 loops, yarn over and pull through last 2 loops. (Listed for reference; not used in this pattern.)
- sl st – slip stitch: insert hook into stitch, yarn over, pull the loop straight through the loop on your hook. Used to join rounds.
- sc2tog – single crochet 2 together (a decrease): insert hook into first stitch, yarn over, pull up a loop; insert hook into next stitch, yarn over, pull up a loop (3 loops on hook); yarn over and pull through all 3 loops. This turns two stitches into one.
- st(s) – stitch(es): one completed loop/unit of crochet.
- sk – skip: miss the next stitch and do not work into it.
- FO – fasten off: cut the yarn a few inches from the work, then pull the tail through the last loop and tighten to secure.
- Magic ring – an adjustable loop you crochet into, then pull closed so there is no hole in the center. Used to start the head and bill.
- Turn – flip your work over so you can work back across the row you just made.
- Round – one complete circle of stitches (worked in the round, not turned).
- Row – one straight line of stitches worked back and forth.
Gauge
18 sc x 20 rows = 4 inches (10 cm) in single crochet.
Gauge means how many stitches and rows fit into a set measurement. It matters because it controls the finished size — if your stitches are looser or tighter than the gauge, your lovie will come out bigger or smaller than 12 x 9 inches. To check: crochet a small square about 5 inches wide in single crochet, then lay a ruler across the middle and count how many stitches fit in 4 inches. If you have more than 18, your stitches are tight — try a larger hook. If you have fewer than 18, your stitches are loose — try a smaller hook. Gauge is not critical for this lovie, but it will affect the finished size.
Beginner Tips Before You Start
- Count every row. The lovie body is a long rectangle with a shaped oval end, so keep a tally on paper or use a row counter. Losing your place is the number-one beginner mistake.
- Use stitch markers. Place one in the first stitch of each row so you always know where the row begins, and mark the four corners of the border as you go.
- Do not pull your yarn too tight. Tension should feel relaxed. If your hook fights you, you are pulling too hard — loosen your grip and let the yarn flow.
- Work the chain loosely. The starting chain of 55 must be loose enough to crochet into on Row 1. If it feels tight, use a hook one size larger just for the chain.
- Stuff the head firmly but not rock-hard. Add fiberfill in small pinches so the head stays round and smooth, not lumpy.
- Keep your turning chain small. The "ch 1, turn" at the start of each row does not count as a stitch — do not work into it.
Step-by-Step Instructions
Part 1: Lovie Body (worked flat, back and forth in rows)
With butter yellow, ch 55.
Row 1: Sc in 2nd ch from hook and in each ch across. (54 sc)
Row 2: Ch 1, turn. Sc in each st across. (54 sc)
Rows 3–44: Repeat Row 2. (54 sc per row)
Do not fasten off. You now have a rectangle 54 stitches wide and 44 rows tall.
Shape the oval end (first short end): Each decrease row removes 2 stitches, and each plain row keeps the count the same. Work these rows exactly as written:
Row 45: Ch 1, turn. Sc2tog, sc in each st across to last 2 sts, sc2tog. (52 sc)
Row 46: Ch 1, turn. Sc in each st across. (52 sc)
Row 47: Ch 1, turn. Sc2tog, sc in each st across to last 2 sts, sc2tog. (50 sc)
Row 48: Ch 1, turn. Sc in each st across. (50 sc)
Row 49: Ch 1, turn. Sc2tog, sc in each st across to last 2 sts, sc2tog. (48 sc)
Row 50: Ch 1, turn. Sc in each st across. (48 sc)
Row 51: Ch 1, turn. Sc2tog, sc in each st across to last 2 sts, sc2tog. (46 sc)
Row 52: Ch 1, turn. Sc in each st across. (46 sc)
Row 53: Ch 1, turn. Sc2tog, sc in each st across to last 2 sts, sc2tog. (44 sc)
Row 54: Ch 1, turn. Sc in each st across. (44 sc)
Row 55: Ch 1, turn. Sc2tog, sc in each st across to last 2 sts, sc2tog. (42 sc)
Row 56: Ch 1, turn. Sc in each st across. (42 sc)
Row 57: Ch 1, turn. Sc2tog, sc in each st across to last 2 sts, sc2tog. (40 sc)
Row 58: Ch 1, turn. Sc in each st across. (40 sc)
Row 59: Ch 1, turn. Sc2tog, sc in each st across to last 2 sts, sc2tog. (38 sc)
Row 60: Ch 1, turn. Sc in each st across. (38 sc)
Row 61: Ch 1, turn. Sc2tog, sc in each st across to last 2 sts, sc2tog. (36 sc)
Row 62: Ch 1, turn. Sc in each st across. (36 sc)
Row 63: Ch 1, turn. Sc2tog, sc in each st across to last 2 sts, sc2tog. (34 sc)
Row 64: Ch 1, turn. Sc in each st across. (34 sc)
Row 65: Ch 1, turn. Sc2tog, sc in each st across to last 2 sts, sc2tog. (32 sc)
Row 66: Ch 1, turn. Sc in each st across. (32 sc)
Row 67: Ch 1, turn. Sc2tog, sc in each st across to last 2 sts, sc2tog. (30 sc)
Row 68: Ch 1, turn. Sc in each st across. (30 sc)
Row 69: Ch 1, turn. Sc2tog, sc in each st across to last 2 sts, sc2tog. (28 sc)
Row 70: Ch 1, turn. Sc in each st across. (28 sc)
Row 71: Ch 1, turn. Sc2tog, sc in each st across to last 2 sts, sc2tog. (26 sc)
Row 72: Ch 1, turn. Sc in each st across. (26 sc)
Row 73: Ch 1, turn. Sc2tog, sc in each st across to last 2 sts, sc2tog. (24 sc)
Row 74: Ch 1, turn. Sc in each st across. (24 sc)
Row 75: Ch 1, turn. Sc2tog, sc in each st across to last 2 sts, sc2tog. (22 sc)
Row 76: Ch 1, turn. Sc in each st across. (22 sc)
Row 77: Ch 1, turn. Sc2tog, sc in each st across to last 2 sts, sc2tog. (20 sc)
Row 78: Ch 1, turn. Sc in each st across. (20 sc)
Row 79: Ch 1, turn. Sc2tog, sc in each st across to last 2 sts, sc2tog. (18 sc)
Row 80: Ch 1, turn. Sc in each st across. (18 sc)
Row 81: Ch 1, turn. Sc2tog, sc in each st across to last 2 sts, sc2tog. (16 sc)
Row 82: Ch 1, turn. Sc in each st across. (16 sc)
Row 83: Ch 1, turn. Sc2tog, sc in each st across to last 2 sts, sc2tog. (14 sc)
Row 84: Ch 1, turn. Sc in each st across. (14 sc)
Row 85: Ch 1, turn. Sc2tog, sc in each st across to last 2 sts, sc2tog. (12 sc)
Row 86: Ch 1, turn. Sc in each st across. (12 sc)
Row 87: Ch 1, turn. Sc2tog, sc in each st across to last 2 sts, sc2tog. (10 sc)
Row 88: Ch 1, turn. Sc in each st across. (10 sc)
Row 89: Ch 1, turn. Sc2tog, sc in each st across to last 2 sts, sc2tog. (8 sc)
Row 90: Ch 1, turn. Sc in each st across. (8 sc)
Row 91: Ch 1, turn. Sc2tog, sc in each st across to last 2 sts, sc2tog. (6 sc)
Row 92: Ch 1, turn. Sc in each st across. (6 sc)
Row 93: Ch 1, turn. Sc2tog, sc in each st across to last 2 sts, sc2tog. (4 sc)
Row 94: Ch 1, turn. Sc in each st across. (4 sc)
Row 95: Ch 1, turn. Sc2tog twice. (2 sc)
Row 96: Ch 1, turn. Sc2tog. (1 sc)
FO, leaving a 6-inch tail.
Second short end: Repeat the same shaping on the opposite short end. Join butter yellow to the starting chain edge, and work Rows 45–96 in the same manner to create a matching oval end.
Part 2: White Stripe Border
With white, join yarn at any point on the edge of the lovie body.
Round 1: Ch 1, work sc evenly around the entire perimeter of the lovie, working 1 sc in each row-end along the sides and 1 sc in each st along the top and bottom edges, with 3 sc in each corner. Join with sl st to first sc.
Round 2: Ch 1, sc in each sc around, working 3 sc in each corner. Join with sl st to first sc.
FO and weave in ends.
Part 3: Duck Head (worked in the round, amigurumi style)
With butter yellow, make a magic ring.
Round 1: 6 sc into the ring. (6 sc)
Round 2: 2 sc in each st around. (12 sc)
Round 3: [Sc in next st, 2 sc in next st] around. (18 sc)
Round 4: [Sc in next 2 sts, 2 sc in next st] around. (24 sc)
Round 5: [Sc in next 3 sts, 2 sc in next st] around. (30 sc)
Rounds 6–12: Sc in each st around. (30 sc)
Round 13: [Sc in next 3 sts, sc2tog] around. (24 sc)
Round 14: [Sc in next 2 sts, sc2tog] around. (18 sc)
Round 15: [Sc in next st, sc2tog] around. (12 sc)
Stuff the head firmly with polyester fiberfill.
Round 16: Sc2tog around. (6 sc)
FO, leaving a long tail. Thread the tail through the remaining 6 sts and pull tight to close.
Part 4: Duck Bill
With white, make a magic ring.
Round 1: 6 sc into the ring. (6 sc)
Round 2: 2 sc in each st around. (12 sc)
Round 3: Sc in each st around. (12 sc)
Round 4: [Sc in next st, sc2tog] around. (8 sc)
FO, leaving a long tail for sewing. Lightly stuff the bill.
Part 5: Webbed Feet (make 2)
With butter yellow, ch 6.
Row 1: Sc in 2nd ch from hook and in each ch across. (5 sc)
Row 2: Ch 1, turn. Sc in each st across. (5 sc)
Row 3: Ch 1, turn. Sc2tog, sc in next st, sc2tog. (3 sc)
Row 4: Ch 1, turn. Sc in each st across. (3 sc)
Row 5: Ch 1, turn. Sc2tog, sc in next st. (2 sc)
Row 6: Ch 1, turn. Sc2tog. (1 sc)
FO, leaving a tail. Repeat for second foot.
Assembly and Finishing
- Attach the head. Position the duck head on the center of the lovie body, about 1 inch (2.5 cm) from the top edge. Pin it in place. Thread the long tail onto your tapestry needle and sew securely with small whipstitches (a simple over-and-over stitch catching both the head and the lovie) all around the base of the head.
- Attach the bill. Sew the white bill to the front of the duck head, centered horizontally and about 1 inch (2.5 cm) below the top of the head. Use the long tail and small stitches, going around the edge of the bill once or twice for security.
- Attach the feet. Position the two webbed feet on the lovie body below the head, spaced about 2 inches (5 cm) apart, with the toes pointing outward. Pin and sew securely around each foot's edge.
- Weave in ends. Thread each remaining yarn tail onto the tapestry needle and run it through the back of several stitches, then trim close to the work so it disappears.
- Block. Gently steam-block the lovie to shape the oval and smooth the border. Hold a steam iron a few inches above the fabric (do not press it down) and let the steam relax the stitches, then pat the oval into shape with your hands. Do not press heavily. Allow to dry completely before use.
Pro Tips and Variations
- Change the colors. Swap butter yellow for a soft mint, blush pink, or pale gray for a different folk-art palette. Keep the bill and border white for contrast, or try a mustard bill for a bolder look.
- Adjust the size. To make a larger lovie, add more plain rows in the middle (for example, work Rows 3–60 instead of 3–44) and add extra stitches to the starting chain in multiples of 2. To make a smaller one, remove rows and stitches. Keep the decrease shaping the same so the oval ends stay smooth.
- Substitute yarn. Any DK or light worsted (Category 3) yarn works — cotton gives crisp stitch definition, while a cotton-blend or acrylic feels softer and cuddlier. Always check your gauge with the new yarn.
- Add a hanging loop. Before finishing the border, chain 10 at one corner and slip stitch back down to create a small loop, perfect for attaching to a stroller or crib.


