Pinecone Pocket Basket Free Crochet Pattern
Pinecone Pocket Basket: A Free Beginner Crochet Pattern
Introduction
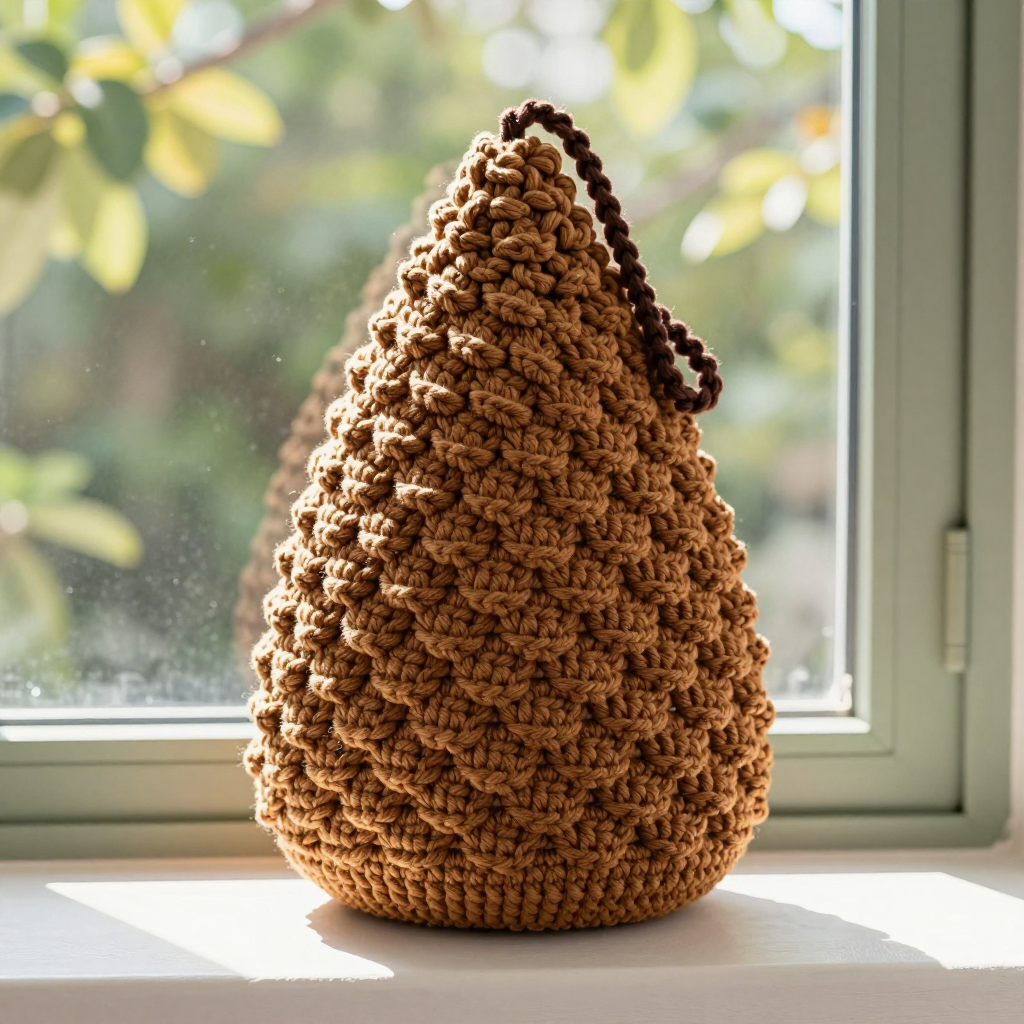
If you have never held a crochet hook before, this Pinecone Pocket Basket is the perfect first project to fall in love with. It is small, forgiving, and works up in just a few cozy evenings, so you get the thrill of finishing something beautiful fast. The finished basket is a soft teardrop shape, about 5 inches tall, covered in overlapping rounded "scales" that look exactly like a real pinecone's plates. Worked in toasted brown super bulky chenille yarn, it feels plush and matte in your hands, like a tiny woodland treasure. Hang it by its little dark brown loop to hold rings, crystals, keys, or other small treasures, and bring a touch of fairycore magic to your home.
Materials Needed
- Yarn (main color): Super bulky (weight 6) chenille-style yarn in toasted brown, approximately 90–100 yds (82–91 m).
- Yarn (loop): A small amount (about 1 yd / 1 m) of dark brown super bulky yarn.
- Hook: 9 mm crochet hook (US size M/13).
- Stitch marker: 1 removable stitch marker (or a scrap of contrasting yarn).
- Tapestry needle: A large-eye blunt needle for weaving in ends.
- Scissors: Any sharp pair.
- Optional: A small amount of fiberfill stuffing to help the base stand.
- Finished size: Approx. 5 in (12.5 cm) tall x 4 in (10 cm) wide at the widest point, with a 2 in (5 cm) hanging loop.
Abbreviations and Beginner Glossary
Every term below is explained as if you have never crocheted. Read this list once before you begin and refer back anytime.
- ch – chain: Yarn over the hook and pull that loop through the loop already on your hook. This makes a small linked loop.
- sc – single crochet: Insert your hook into the stitch, yarn over, pull up a loop (2 loops on hook), yarn over again, and pull through both loops. One sc made.
- sl st – slip stitch: Insert hook into the stitch, yarn over, and pull that loop straight through the loop on your hook and through the stitch. It joins without adding height.
- sc2tog – single crochet 2 together (a decrease): Insert hook into the first stitch, yarn over, pull up a loop (2 loops on hook). Insert hook into the next stitch, yarn over, pull up a loop (3 loops on hook). Yarn over and pull through all 3 loops. Two stitches become one.
- dc – double crochet: Yarn over, insert hook into the stitch, yarn over, pull up a loop (3 loops on hook), yarn over and pull through 2 loops, yarn over and pull through the last 2 loops.
- st(s) – stitch(es): One completed loop/unit of crochet.
- rnd – round: One full circle of stitches worked around.
- magic ring: An adjustable loop of yarn you crochet into, then pull closed so there is no hole in the center.
- Scale stitch (worked over 3 sts): Insert hook in the front loop only of the next st, yarn over, pull up a loop, yarn over, draw through 1 loop (this anchors the scale); sc in each of the next 2 sts; then work 3 dc around the post of the anchored sc just made, all into the same space, to form one overlapping scale.
- Front loop only: Each stitch has two top loops. The front loop is the one closest to you. Working into it only leaves the back loop free.
- Fasten off: Cut the yarn leaving a tail, then pull the tail all the way through the last loop to lock it.
Gauge
Gauge: 8 sc x 9 rounds = 4 in (10 cm) in single crochet worked in the round.
Gauge means how many stitches and rounds fit into a set measurement. It matters because it controls the final size: if your stitches are looser or tighter than mine, your basket will come out bigger or smaller than 5 inches tall. To check, crochet a small flat circle of about 12 sc for 5 rounds with your 9 mm hook and yarn. Lay a ruler across the middle and count how many single crochet stitches fit in 4 inches. If you have more than 8, your tension is tight, so try a slightly larger hook. If you have fewer than 8, your tension is loose, so try a smaller hook. Do not skip this step; it takes five minutes and saves your whole project.
Beginner Tips Before You Start
- Use your stitch marker every round. Because you work in a continuous spiral (no joining), the marker shows you where each new round begins. Move it up after every round.
- Do not pull the yarn too tight. Chenille yarn is fluffy and snaps easily. Keep an even, relaxed tension so the scales stay soft and puffy.
- Count your scales. Each scale round should give you exactly 8 scales. If you get 7 or 9, recount before moving on.
- Work the scales into the front loop only. This is what makes them stand up and overlap like pinecone plates. The back loops stay free and hidden.
- Keep the base flat. After Round 5 your circle should lie flat, about 3 inches across. If it cups upward, your tension is too tight; if it ruffles, it is too loose.
- Take breaks for your hands. Super bulky yarn and a big hook can tire your wrists. A few minutes of rest keeps your stitches even.
Step-by-Step Instructions
Notes: Work in continuous rounds; do not join unless told. Move the stitch marker up each round. The basket is worked from the base up. Scale rounds alternate with plain sc rounds so the scales overlap like pinecone plates. Keep tension firm so the scales stand out.
Base (flat oval bottom)
Rnd 1: Make a magic ring, ch 1, work 6 sc into the ring. Pull the ring closed. (6 sc)
Rnd 2: 2 sc in each st around. (12 sc)
Rnd 3: [Sc in next st, 2 sc in next st] around. (18 sc)
Rnd 4: [Sc in next 2 sts, 2 sc in next st] around. (24 sc)
Rnd 5: Sc in each st around. (24 sc) The base should measure approx. 3 in (7.5 cm) across.
Body (teardrop shape with pinecone scales)
Rnd 6: Sc in each st around. (24 sc)
Rnd 7 (Scale rnd 1): *Work 1 scale stitch over the next 3 sts (see glossary); repeat from * around. (8 scales)
Rnd 8: Sc in each st around. (24 sc)
Rnd 9 (Scale rnd 2): Sc in next st, then *work 1 scale stitch over the next 3 sts; repeat from * around, ending with sc in last st. (8 scales, offset from Rnd 7)
Rnd 10: Sc in each st around. (24 sc)
Rnd 11 (Scale rnd 3): Work as Rnd 7. (8 scales)
Rnd 12: Sc in each st around. (24 sc)
Rnd 13 (Scale rnd 4): Work as Rnd 9. (8 scales)
Rnd 14: Sc in each st around. (24 sc)
Rnd 15 (Scale rnd 5): Work as Rnd 7. (8 scales)
Rnd 16: Sc in each st around. (24 sc)
Rnd 17 (Scale rnd 6): Work as Rnd 9. (8 scales)
Rnd 18: Sc in each st around. (24 sc)
Rnd 19 (Scale rnd 7): Work as Rnd 7. (8 scales)
Rnd 20: Sc in each st around. (24 sc)
Rnd 21 (Scale rnd 8): Work as Rnd 9. (8 scales)
Rnd 22: Sc in each st around. (24 sc)
Rnd 23 (Scale rnd 9): Work as Rnd 7. (8 scales)
Rnd 24: Sc in each st around. (24 sc)
Rnd 25 (Scale rnd 10): Work as Rnd 9. (8 scales)
Rnd 26: Sc in each st around. (24 sc)
Shaping the Teardrop Top
Rnd 27: [Sc in next 2 sts, sc2tog] around. (18 sc)
Rnd 28: [Sc in next st, sc2tog] around. (12 sc)
Rnd 29: [Sc2tog] around. (6 sc)
Fasten off, leaving a 6 in (15 cm) tail. Thread the tail through the remaining 6 sts and pull tight to close the tip. Weave in the end.
Hanging Loop
With dark brown yarn, join to the top tip of the basket with a sl st. Ch 12, sl st back into the same st to form a loop. Fasten off and weave in ends. The loop should measure approx. 2 in (5 cm) when hanging.
Assembly and Finishing
This basket is worked in one piece, so there is no seaming to do. The finishing steps are what make it look polished:
- Shape the scales: Gently steam the basket (hold a steamer or iron a few inches above, never touching the yarn) or simply use your fingers to press each scale so it lies flat and overlaps the row below like a pinecone plate. Work from the base upward.
- Weave in ends: Thread each yarn tail onto the tapestry needle. Run the needle through the inside of several stitches, then back the other way through a few more to lock it, and trim close to the yarn. Never knot the tails; weaving hides them.
- Optional stuffing: Lightly stuff the base with a small amount of fiberfill so the basket stands on its own, or leave it open as a soft pocket.
- Blocking: Lightly mist the finished basket with water and reshape it with your hands. Let it air-dry completely, stuffed with a little tissue paper if you want it to hold its teardrop shape.
Pro Tips and Variations
- Change colors: Work the body in a warm cream or deep forest green for a different woodland look, and use a contrasting loop color to make it pop.
- Make it bigger or smaller: Add or remove scale rounds (each scale round plus its plain sc round adds about 1/2 inch of height). Keep the scale rounds alternating with plain rounds so the texture stays correct.
- Substitute yarn: Any super bulky (weight 6) yarn works. If you use a smooth yarn instead of chenille, go down one hook size (8 mm) and check your gauge again.
- Add a liner or handle: Sew a tiny fabric liner inside for holding small items, or replace the short loop with a longer ch 30 strap to wear it as a pouch.