Whimsical Woodland Gnome Home Free Pattern – Knit a Cozy Mushroom Cottage
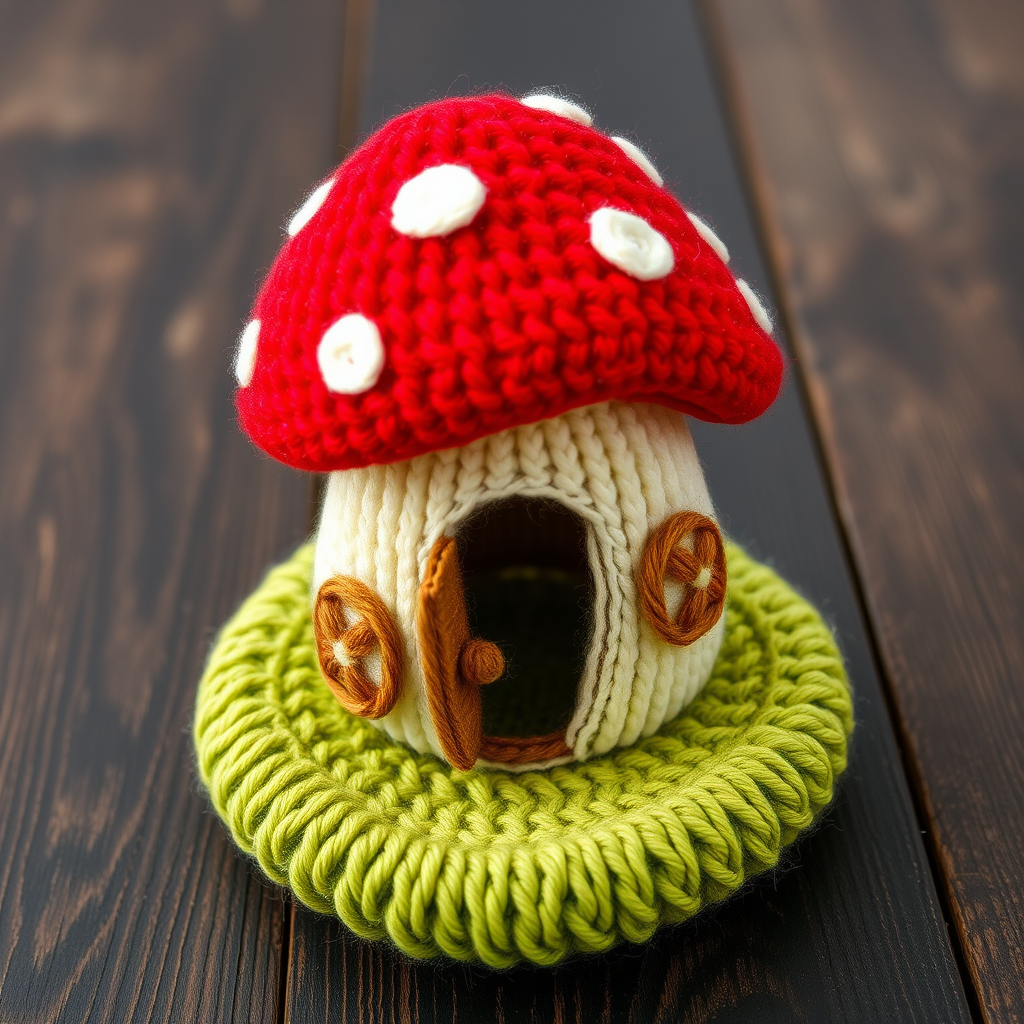
Whimsical Woodland Gnome Home: Knit a Cozy Mushroom Cottage
Bring a touch of enchanted forest charm to your shelf with this adorable knitted mushroom cottage. Complete with a tiny arched door and whimsical cross-pane windows, this plush amigurumi-style project is perfect for fairy garden lovers, woodland decor enthusiasts, and yarn crafters seeking a magical new challenge. Whether you're an experienced knitter or a confident beginner looking to level up, this pattern delivers a satisfying, storybook-worthy result that makes a wonderful handmade gift or a charming addition to your own cozy nook.
Materials Needed
Before you begin, gather the following supplies to ensure a smooth and enjoyable knitting experience:
- Yarn: Worsted weight yarn in four colors — red (for the cap), cream (for the stem and windows), brown (for the door), and green (for the base). Approximately 200g total.
- Knitting Needles: US size 6 (4.0 mm) straight needles.
- Tapestry Needle: For seaming and weaving in ends.
- Polyester Fiberfill Stuffing: For a plush, huggable finish.
- Stitch Markers: To help track your rows and ensure symmetry.
- Scissors: For cutting yarn.
Gauge & Abbreviations
Gauge: 20 stitches and 26 rows = 4 inches in stockinette stitch. (Gauge is important for achieving the correct size, but since this is a stuffed decor piece, slight variations are forgiving.)
Abbreviations:
- CO: Cast on
- K: Knit
- P: Purl
- K2tog: Knit two stitches together (decrease)
- Kfb: Knit front and back (increase)
- St(s): Stitch(es)
- Rnd: Round (not used here, but good to know)
Step-by-Step Instructions
Follow these detailed instructions carefully, and you'll have your very own mushroom cottage in no time. Work each piece separately, then assemble at the end.
Mushroom Cap (Make 1)
The cap is worked flat in stockinette stitch, starting from the top and increasing outward to form a dome.
- Cast On: CO 6 stitches in red.
- Row 1 (Increase): Kfb across — you will have 12 stitches.
- Row 2: Purl all stitches.
- Row 3: (K1, Kfb) across — 18 stitches.
- Row 4: Purl all stitches.
- Row 5: (K2, Kfb) across — 24 stitches.
- Row 6: Purl all stitches.
- Row 7: (K3, Kfb) across — 30 stitches.
- Row 8: Purl all stitches.
- Row 9: (K4, Kfb) across — 36 stitches.
- Row 10: Purl all stitches.
- Rows 11-20: Work even in stockinette stitch (knit odd rows, purl even rows) for 10 rows. This creates the height of the cap.
- Shape the Cap (Decreases):
- Row 21: (K4, K2tog) across — 30 stitches.
- Row 22: Purl all stitches.
- Row 23: (K3, K2tog) across — 24 stitches.
- Row 24: Purl all stitches.
- Row 25: (K2, K2tog) across — 18 stitches.
- Row 26: Purl all stitches.
- Row 27: (K1, K2tog) across — 12 stitches.
- Row 28: Purl all stitches.
- Row 29: K2tog across — 6 stitches.
- Finish: Cut the yarn, leaving a long tail (about 12 inches). Thread the tail through a tapestry needle, slide it through the remaining 6 stitches, and pull tight to close the top. Sew the side seam to form a dome shape. Stuff firmly with fiberfill, shaping it as you go.
Mushroom Stem (Make 1)
The stem is a simple cylinder that forms the body of the cottage.
- Cast On: CO 24 stitches in cream.
- Rows 1-30: Work in stockinette stitch (knit odd rows, purl even rows) for 30 rows. This creates the height of the stem.
- Shape the Bottom (Decreases):
- Row 31: (K2, K2tog) across — 18 stitches.
- Row 32: Purl all stitches.
- Row 33: (K1, K2tog) across — 12 stitches.
- Row 34: Purl all stitches.
- Row 35: K2tog across — 6 stitches.
- Finish: Cut the yarn, leaving a long tail. Thread through the remaining 6 stitches, pull tight, and sew the side seam to form a cylinder. Stuff firmly with fiberfill, ensuring the stem stands upright.
Door (Make 1)
The door is a small, flat piece with a rounded top, worked in brown.
- Cast On: CO 10 stitches in brown.
- Rows 1-12: Work in stockinette stitch (knit odd rows, purl even rows) for 12 rows.
- Shape the Top (Decreases):
- Row 13: K2tog, K6, K2tog — 8 stitches.
- Row 14: Purl all stitches.
- Row 15: K2tog, K4, K2tog — 6 stitches.
- Row 16: Purl all stitches.
- Row 17: K2tog, K2, K2tog — 4 stitches.
- Row 18: Purl all stitches.
- Row 19: K2tog, K2tog — 2 stitches.
- Row 20: K2tog — 1 stitch.
- Finish: Cut the yarn and pull through the last stitch. Sew the door onto the front of the stem, centering it vertically. Leave a small gap at the bottom edge to create a threshold effect.
Windows (Make 2)
These simple squares will become charming round windows with cross panes.
- Cast On: CO 6 stitches in cream.
- Rows 1-6: Work in stockinette stitch (knit odd rows, purl even rows) for 6 rows.
- Finish: Cut the yarn, leaving a tail for sewing. Sew each window onto the stem, positioning them on either side of the door at the same height. Using brown yarn, stitch a cross in the center of each window to create the panes.
Base (Make 1)
The base is a flat oval that serves as the grassy foundation.
- Cast On: CO 30 stitches in green.
- Rows 1-10: Work in stockinette stitch (knit odd rows, purl even rows) for 10 rows.
- Bind Off: Bind off all stitches loosely. This will be the grassy base.
Assembly
Now it's time to bring all the pieces together to create your whimsical cottage.
- Attach Stem to Base: Place the stem on top of the green base, centering it. Using a whip stitch and the cream or green yarn, sew the stem securely to the base. Ensure it's firmly attached so it stands upright.
- Attach Cap to Stem: Place the cap on top of the stem, slightly overlapping the top edge. Sew the cap to the stem using a whip stitch. Leave a small opening to add extra stuffing if needed to achieve the perfect shape, then close the opening securely.
- Embellish (Optional): If desired, knit or crochet small leaves or flowers and sew them around the base for extra woodland charm. You can also add subtle white spots to the red cap using small stitches or felt circles for a classic mushroom look.
Finishing Touches
Weave in all loose ends using your tapestry needle. Use stitch markers during assembly to ensure the door and windows are perfectly aligned and symmetrical. Give your mushroom cottage a final gentle squeeze to shape it, and it's ready to display on a shelf, in a fairy garden, or as a delightful handmade gift.
Enjoy your magical creation! This whimsical woodland gnome home is sure to bring a smile to anyone who sees it.


