Whimsical Woodland Fox Amigurumi Free Pattern – Knit a Cozy Forest Friend
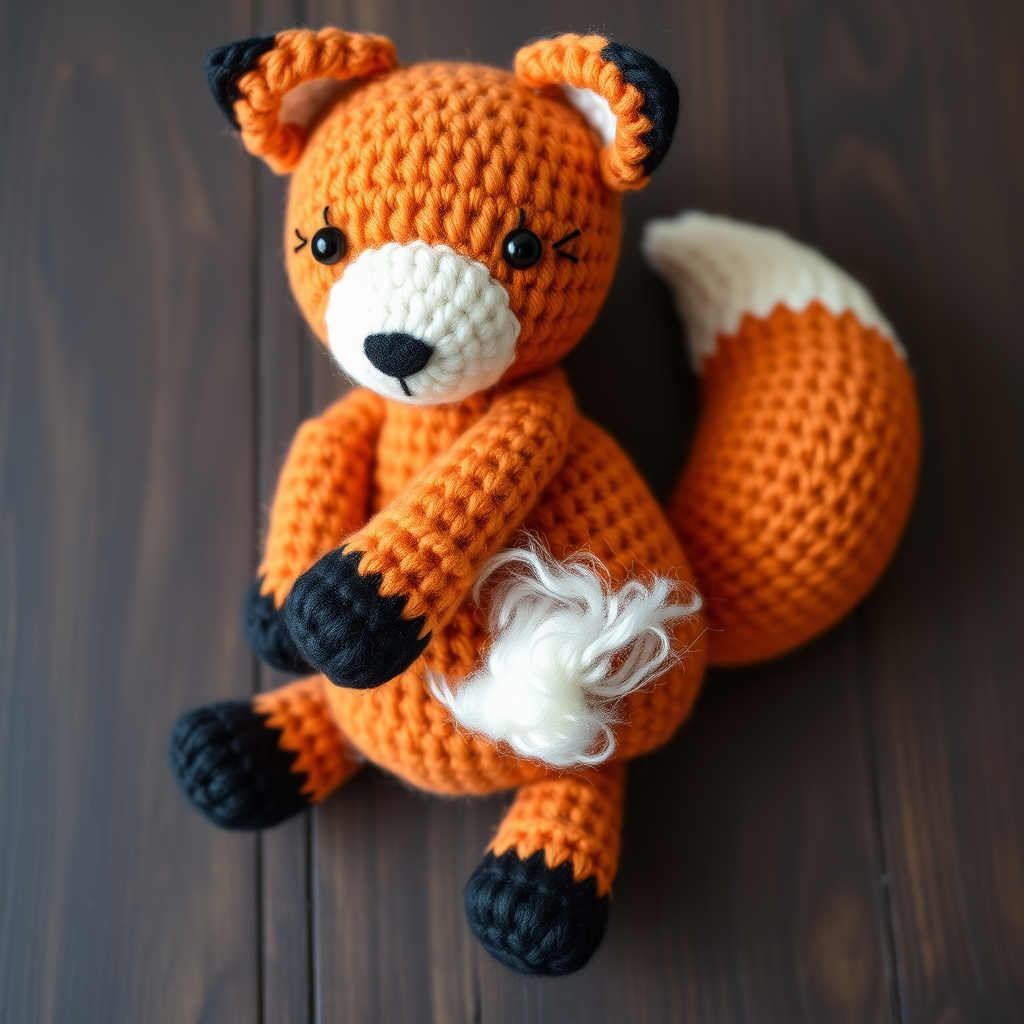
Bring the Magic of the Forest Home: Knit Your Own Whimsical Woodland Fox
There is something undeniably magical about bringing a creature from the forest into your living room. This Whimsical Woodland Fox Amigurumi pattern is the perfect project for knitters looking to create a soft, huggable companion. With its vibrant orange body, fluffy white-tipped tail, and gentle embroidered face, this little fox is designed to be cuddled and adored. Whether you are a seasoned crafter or a beginner ready to try amigurumi for the first time, this pattern uses simple knit and purl stitches to create a charming, cozy friend that measures approximately 8 inches tall. Let’s dive into the materials and steps to create your very own forest friend.
Materials Needed
Before you begin, gather the following supplies to ensure a smooth and enjoyable knitting experience. The gauge is important for achieving the correct size, so take a moment to knit a small swatch if you are unsure about your tension.
- Yarn: Worsted weight yarn in three colors:
- Orange (approx. 200g) – for the main body, head, and tail
- White (approx. 50g) – for the tail tip and muzzle patch
- Black (approx. 20g) – for the paws, eyes, and nose
- Needles: US 4 (3.5mm) knitting needles, or the size needed to obtain the correct gauge.
- Gauge: 22 stitches and 30 rows = 4 inches in stockinette stitch. (Knit one row, purl one row for stockinette.)
- Other Tools: Yarn needle for sewing and embroidery, polyester fiberfill for stuffing, scissors, and stitch markers (optional but helpful).
Step-by-Step Instructions
This pattern is worked flat (back and forth) on straight needles, then seamed together. Each piece is knitted separately and then assembled. Follow the instructions carefully, and don’t forget to stuff the pieces firmly to give your fox a nice, plush shape.
Knitting the Head
The head is worked from the top down, starting with a small cast-on and increasing to create a rounded shape.
- Cast On: Using orange yarn, cast on 6 stitches.
- Row 1: Knit all stitches. (6 sts)
- Row 2: Increase in every stitch. (Knit into the front and back of each stitch to make 12 sts)
- Row 3: *K1, inc* repeat to end. (18 sts) (Knit 1, then increase in the next stitch; repeat this pattern across the row.)
- Row 4: *K2, inc* repeat to end. (24 sts)
- Row 5: *K3, inc* repeat to end. (30 sts)
- Rows 6-10: Knit all stitches. (30 sts) (This creates the height of the head.)
- Row 11: *K3, k2tog* repeat to end. (24 sts) (Knit 3, then knit 2 together to decrease; repeat across.)
- Row 12: *K2, k2tog* repeat to end. (18 sts)
- Row 13: *K1, k2tog* repeat to end. (12 sts)
- Stuff the head firmly with fiberfill, shaping it into a round ball.
- Row 14: *K2tog* repeat to end. (6 sts) (Knit 2 together across the row.)
- Finish: Cut the yarn, leaving a long tail. Thread the tail through a yarn needle, pass it through the remaining 6 stitches, and pull tight to close the hole. Weave in the end securely.
Knitting the Body
The body is slightly larger than the head and follows a similar increase and decrease pattern.
- Cast On: Using orange yarn, cast on 6 stitches.
- Rows 1-5: Work the same increase rows as the head (Rows 1-5) until you have 30 stitches. (Row 1: K all, Row 2: inc in every st, Row 3: *K1, inc*, Row 4: *K2, inc*, Row 5: *K3, inc*)
- Rows 6-12: Knit all stitches. (30 sts) (This creates the length of the body.)
- Row 13: *K3, k2tog* repeat to end. (24 sts)
- Row 14: *K2, k2tog* repeat to end. (18 sts)
- Stuff the body firmly with fiberfill.
- Row 15: *K1, k2tog* repeat to end. (12 sts)
- Row 16: *K2tog* repeat to end. (6 sts)
- Finish: Cut yarn, thread through remaining stitches, pull tight, and weave in the end.
Knitting the Tail
The tail is a fun piece that changes color to create the classic fox look. It is knitted flat and then shaped into a slight curve when sewn on.
- Cast On: Using orange yarn, cast on 4 stitches.
- Row 1: Knit all stitches. (4 sts)
- Row 2: Increase in every stitch. (8 sts)
- Row 3: *K1, inc* repeat to end. (12 sts)
- Rows 4-8: Knit all stitches. (12 sts) (This is the orange base of the tail.)
- Switch to white yarn. (Simply tie the white yarn to the orange and continue knitting.)
- Rows 9-12: Knit all stitches. (12 sts) (This is the white tip of the tail.)
- Row 13: *K1, k2tog* repeat to end. (8 sts)
- Row 14: *K2tog* repeat to end. (4 sts)
- Finish: Cut yarn, thread through remaining stitches, pull tight, and weave in the end. When sewing the tail to the body, gently curve it to one side for a whimsical look.
Knitting the Ears (Make 2)
These small triangular ears are quick to knit and add so much personality to your fox.
- Cast On: Using orange yarn, cast on 4 stitches.
- Row 1: Knit all stitches. (4 sts)
- Row 2: Increase in every stitch. (8 sts)
- Rows 3-4: Knit all stitches. (8 sts)
- Row 5: *K2tog* repeat to end. (4 sts) (Knit 2 together twice.)
- Finish: Cut yarn, thread through remaining stitches, pull tight, and weave in the end. Fold each ear in half at the base and sew the folded edge to the top of the head, positioning them slightly to the sides.
Knitting the Legs (Make 4)
These simple legs have black paws and orange tops, perfect for a fox that’s ready to sit upright.
- Cast On: Using black yarn, cast on 5 stitches.
- Rows 1-2: Knit all stitches. (5 sts) (This is the paw.)
- Switch to orange yarn.
- Rows 3-6: Knit all stitches. (5 sts) (This is the upper leg.)
- Finish: Cut yarn, thread through remaining stitches, pull tight, and weave in the end. Sew the legs evenly spaced to the bottom of the body so the fox can sit upright.
Assembling Your Fox
Now comes the fun part—bringing all the pieces together to create your woodland friend.
- Attach the Head to the Body: Using a yarn needle and orange yarn, sew the head securely to the top of the body. Make sure it is centered and firmly attached.
- Attach the Tail: Sew the tail to the back of the body, positioning it so it curls around the side for a playful look.
- Embroider the Face: Using black yarn, embroider two small eyes on the head. You can also use safety eyes if you prefer, but embroidery is safer for young children. Create a small black nose just below the eyes.
- Add the Muzzle Patch: Using white yarn, embroider a small oval shape on the lower part of the face to create the fox’s charming muzzle. This adds a lovely detail to the expression.
- Weave in All Ends: Carefully weave in any remaining yarn ends to ensure your fox is neat and durable.
Your Whimsical Woodland Fox is now complete! This cozy, handmade companion is perfect for snuggling, gifting, or displaying as a charming piece of forest-inspired decor. The simple stockinette stitch and straightforward shaping make this an ideal project for beginners, while the adorable result will delight crafters of all levels. Enjoy your new forest friend!


