The Whimsical Woodland Snail: A Free Crochet Pattern for a Cozy, Textured Garden Friend
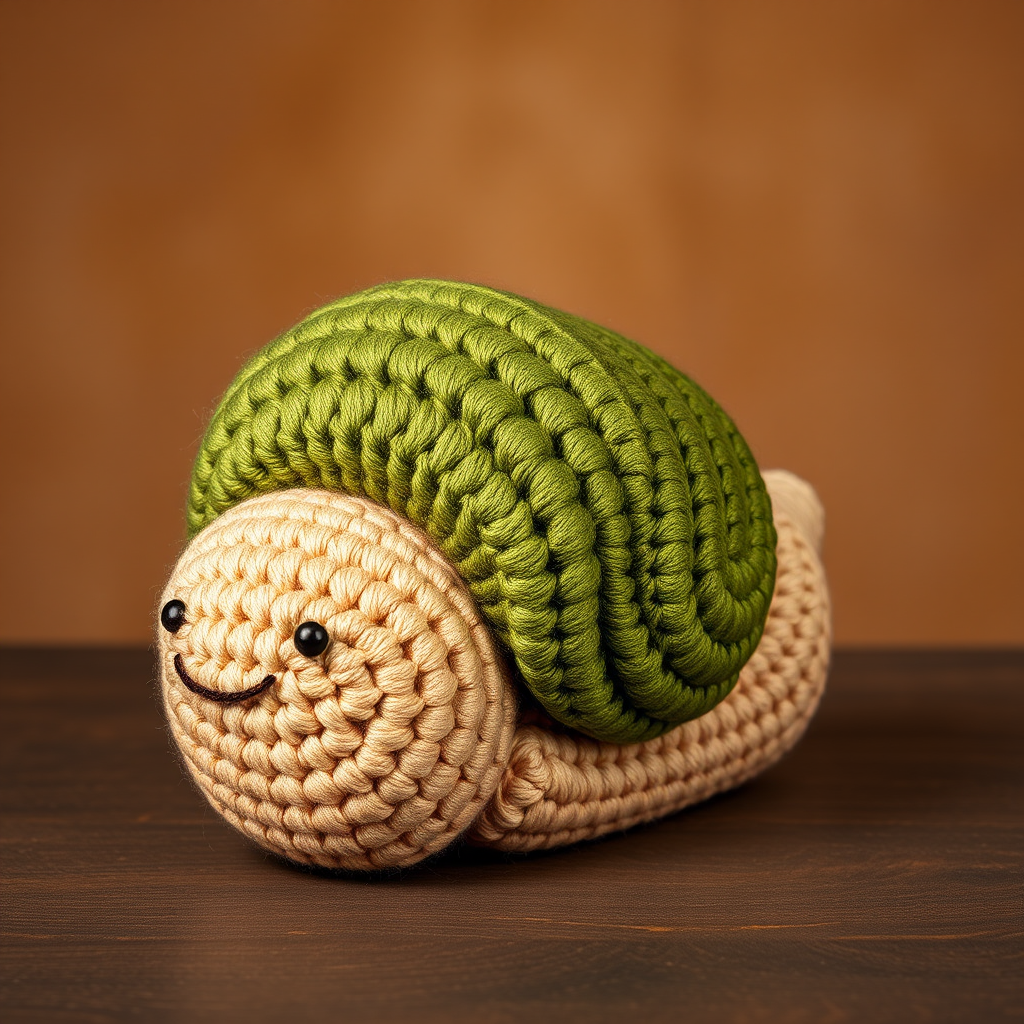
Introducing the Whimsical Woodland Snail
Bring a touch of cozy woodland charm into your home with this delightful oversized snail amigurumi. Designed with thick, plush super bulky yarn and textured single crochet stitches, this pattern creates a soft, inviting garden friend that doubles as a decorative cushion. The spiraling moss-green shell sits slightly tilted on a warm taupe body, giving the snail a natural, whimsical look. Perfect for nature lovers and crochet enthusiasts alike, this free pattern is beginner-friendly and results in a unique, huggable decor piece.
Materials Needed
- Yarn: Super bulky weight yarn (size 6) in two colors:
- 150 yards of warm taupe (for body and head)
- 200 yards of moss green (for shell)
- Small amount of dark brown (for eyes and smile embroidery)
- Hook: Size K (6.5 mm) crochet hook
- Gauge: 4 sc and 4 rows = 4 inches in single crochet (gauge is not critical for this project)
- Other: Yarn needle, stitch marker, polyester fiberfill stuffing, scissors
Step-by-Step Instructions
Body (make 1)
Work in continuous rounds. Use a stitch marker to keep track of rounds.
- Round 1: Make a magic ring. Work 6 single crochet (sc) into the ring. Pull the ring closed. (6 stitches)
- Round 2: Increase (inc) in each stitch around. Work 2 sc into each stitch. (12 stitches)
- Round 3: *Sc in the next stitch, inc in the next stitch.* Repeat from * to * around. (18 stitches)
- Round 4: *Sc in the next 2 stitches, inc in the next stitch.* Repeat from * to * around. (24 stitches)
- Rounds 5-8: Sc in each stitch around. (24 stitches each round)
- Round 9: *Sc in the next 2 stitches, decrease (dec) over the next 2 stitches.* Repeat from * to * around. (18 stitches)
- Round 10: *Sc in the next stitch, dec over the next 2 stitches.* Repeat from * to * around. (12 stitches)
- Stuff firmly: Fill the body with polyester fiberfill, making sure it is dense and rounded.
- Round 11: Dec over the next 2 stitches around. (6 stitches)
- Fasten off: Cut the yarn, leaving a 6-inch tail. Thread the tail through the remaining 6 stitches and pull tight to close. Weave in the end.
Head (make 1)
- Round 1: Magic ring, 6 sc into ring. (6 stitches)
- Round 2: Inc in each stitch around. (12 stitches)
- Round 3: *Sc in the next stitch, inc in the next stitch.* Repeat from * to * around. (18 stitches)
- Rounds 4-6: Sc in each stitch around. (18 stitches each round)
- Round 7: *Sc in the next 2 stitches, dec over the next 2 stitches.* Repeat from * to * around. (12 stitches)
- Stuff lightly: Fill the head with a small amount of stuffing, enough to give it shape but not too firm.
- Round 8: Dec over the next 2 stitches around. (6 stitches)
- Fasten off: Cut the yarn, leaving a long tail (about 12 inches) for sewing. Close the opening as you did for the body.
Shell (make 1)
The shell is worked in a spiral, increasing each round until it reaches the desired width, then working even, then decreasing to close.
- Round 1: Magic ring, 6 sc into ring. (6 stitches)
- Round 2: Inc in each stitch around. (12 stitches)
- Round 3: *Sc in the next stitch, inc in the next stitch.* Repeat from * to * around. (18 stitches)
- Round 4: *Sc in the next 2 stitches, inc in the next stitch.* Repeat from * to * around. (24 stitches)
- Round 5: *Sc in the next 3 stitches, inc in the next stitch.* Repeat from * to * around. (30 stitches)
- Round 6: *Sc in the next 4 stitches, inc in the next stitch.* Repeat from * to * around. (36 stitches)
- Round 7: *Sc in the next 5 stitches, inc in the next stitch.* Repeat from * to * around. (42 stitches)
- Round 8: *Sc in the next 6 stitches, inc in the next stitch.* Repeat from * to * around. (48 stitches)
- Rounds 9-12: Sc in each stitch around. (48 stitches each round)
- Round 13: *Sc in the next 6 stitches, dec over the next 2 stitches.* Repeat from * to * around. (42 stitches)
- Round 14: *Sc in the next 5 stitches, dec over the next 2 stitches.* Repeat from * to * around. (36 stitches)
- Round 15: *Sc in the next 4 stitches, dec over the next 2 stitches.* Repeat from * to * around. (30 stitches)
- Round 16: *Sc in the next 3 stitches, dec over the next 2 stitches.* Repeat from * to * around. (24 stitches)
- Round 17: *Sc in the next 2 stitches, dec over the next 2 stitches.* Repeat from * to * around. (18 stitches)
- Stuff firmly: Fill the shell with stuffing, making sure it is dense and holds its spiral shape.
- Round 18: *Sc in the next stitch, dec over the next 2 stitches.* Repeat from * to * around. (12 stitches)
- Round 19: Dec over the next 2 stitches around. (6 stitches)
- Fasten off: Cut the yarn, leaving a 6-inch tail. Close the opening and weave in the end.
Eyes (make 2)
- Round 1: Magic ring, 6 sc into ring. (6 stitches)
- Round 2: Inc in each stitch around. (12 stitches)
- Fasten off: Cut the yarn, leaving a long tail (about 8 inches) for sewing. Do not stuff the eyes.
Assembly
- Attach head to body: Position the head at the front of the body, centered. Using the long tail from the head, sew it securely to the body with a whip stitch. Make sure the seam is hidden on the underside.
- Attach eyes to head: Place the two flat eye circles on top of the head, slightly apart and facing forward. Using the long tails, sew each eye to the head with small, even stitches around the edge. The eyes should sit on the top of the head, not on the front.
- Attach shell to body: Position the shell on the back of the body, slightly tilted to one side for a natural look. Using a length of moss green yarn, sew the shell to the body with a whip stitch, working around the base of the shell. Make sure the shell is securely attached and the tilt is even.
- Embroider the face: Using dark brown yarn and a yarn needle, embroider a small, curved smile below the eyes. For the pupils, make a small French knot or a few straight stitches in the center of each eye. Alternatively, you can sew small dark brown circles onto the eyes.
Finishing
Weave in all remaining ends with a yarn needle, trimming any excess yarn close to the work. Gently shape the snail by adjusting the stuffing inside the body and shell, making sure the shell sits upright and the body is rounded. Your Whimsical Woodland Snail is now complete and ready to bring cozy charm to any room!


