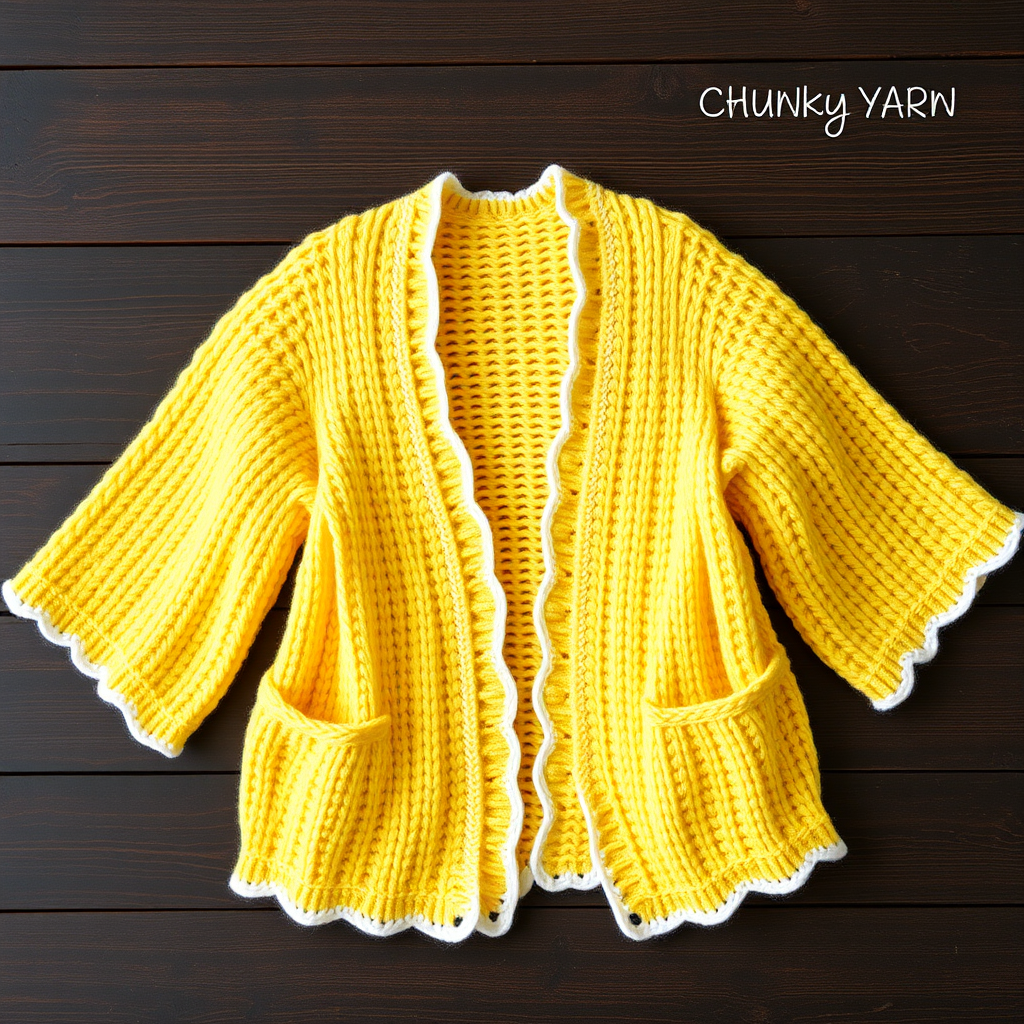
The Sunlit Bramble Cardigan Free Pattern – A Knitted Berry Stitch Cocoon with Ribbed Cuffs

The Sunlit Bramble Cardigan: A Free Knitting Pattern for a Cozy, Textured Cocoon
Wrap yourself in the warmth of a sun-drenched berry patch with this textured cocoon cardigan, featuring a unique bramble stitch that mimics clusters of ripe fruit. The relaxed, open-front silhouette and soft, heathered yarn make it the perfect layering piece for cool autumn days. This free knitting pattern is designed for intermediate beginners who are ready to explore a beautiful, dimensional stitch while creating a stunning, wearable garment. The rich, heathered berry-red body is beautifully offset by creamy vanilla ribbed edging, creating a crisp, cozy finish that looks like it came straight from a high-end boutique.
This cardigan is more than just a project; it's an experience. The bramble stitch, with its raised, bobble-like clusters, is incredibly satisfying to knit and creates a fabric that is dense, plush, and visually captivating. With its open-front design, dropped shoulders, and wide, three-quarter length sleeves, this cocoon cardigan is the ultimate in relaxed, stylish comfort. Whether you're curling up with a book or heading out for a crisp autumn walk, the Sunlit Bramble Cardigan will quickly become your go-to layer.
Materials Needed
Before you begin, gather all your materials to ensure a smooth and enjoyable knitting experience. This pattern calls for worsted weight yarn in two complementary colors to achieve that beautiful contrast between the body and the edging.
Yarn
- Main Color (MC) – Heathered Berry: Approximately 900-1100 yards of worsted weight (Aran) yarn. This will form the main body of the cardigan. Choose a soft, natural wool or wool blend for the best stitch definition and cozy feel.
- Contrast Color (CC) – Creamy Vanilla: Approximately 200-300 yards of the same worsted weight yarn. This is used for the ribbed edging on the front opening, bottom, and cuffs, adding a crisp, polished finish.
Needles & Notions
- US 9 (5.5 mm) circular knitting needles with a 32-inch cable for the main body panels.
- US 9 (5.5 mm) double-pointed needles for the sleeves, or a long circular needle if you prefer the magic loop method.
- Stitch markers (optional, but helpful for tracking pattern repeats).
- Tapestry needle for weaving in ends and seaming.
- Measuring tape to check gauge and measurements.
Gauge
Getting the correct gauge is crucial for achieving the right size and fit. 18 stitches and 24 rows = 4 inches in Berry Stitch pattern (blocked). Always knit a swatch and block it before measuring to ensure accuracy.
Step-by-Step Instructions
This pattern is worked in flat panels and seamed together. The bramble stitch creates a wonderfully textured fabric that is both beautiful and forgiving. Follow the instructions carefully, and you'll have a gorgeous cardigan in no time.
Sizes & Measurements
This pattern is written for sizes S (M, L, XL). The finished chest measurements are 40 (44, 48, 52) inches, and the length is 24 (25, 26, 27) inches. Choose the size that best fits your desired ease. The relaxed cocoon silhouette means it's meant to be worn with positive ease.
Stitch Abbreviations
- k = knit
- p = purl
- k2tog = knit two together (decrease)
- p2tog = purl two together (decrease)
- yo = yarn over (increase)
- sl1 = slip one stitch purlwise
- psso = pass slipped stitch over (decrease)
- RS = right side
- WS = wrong side
The Berry Stitch Pattern (Multiple of 4 + 2)
This is the signature stitch of the cardigan. It creates those beautiful, raised berry-like clusters. Practice this pattern on a swatch first to get comfortable with the rhythm.
- Row 1 (RS): *P1, k3; repeat from * to last 2 sts, p1, k1.
- Row 2 (WS): *P1, k1, p2; repeat from * to last 2 sts, p1, k1.
- Row 3 (RS): *P1, sl1, k2, psso; repeat from * to last 2 sts, p1, k1. (Note: This row creates the "berry" by decreasing two stitches. The slipped stitch is passed over the two knitted stitches, gathering them together.)
- Row 4 (WS): *P1, k1, p2; repeat from * to last 2 sts, p1, k1.
Repeat rows 1-4 for the pattern. You'll notice that the stitch count remains consistent because the decreases on Row 3 are balanced by the yarn overs implied in the pattern structure.
Back Panel
- With MC, cast on 90 (98, 106, 114) stitches.
- Work in the Berry Stitch pattern until the piece measures 24 (25, 26, 27) inches from the cast-on edge. This is the full length of the cardigan back.
- Bind off all stitches loosely. This prevents the top edge from being too tight and makes seaming easier.
Left Front Panel
- With MC, cast on 46 (50, 54, 58) stitches.
- Work in the Berry Stitch pattern until the piece measures 20 (21, 22, 23) inches from the cast-on edge, ending with a wrong-side row. This is where you'll begin shaping the neckline.
- Shape Neck: At the beginning of the next RS rows, bind off stitches as follows: bind off 6 stitches once, then 3 stitches once, then 2 stitches once, then 1 stitch once. This creates a gentle curve for the neckline.
- Continue in the pattern on the remaining 34 (38, 42, 46) stitches until the piece measures the same length as the back panel (24 (25, 26, 27) inches).
- Bind off all stitches loosely.
Right Front Panel
- Work the same as the left front panel, but mirror the neck shaping. This means you will bind off at the beginning of the WS rows instead of the RS rows.
- Continue in the pattern on the remaining stitches until the piece measures the same as the back panel.
- Bind off all stitches loosely.
Sleeves (Make 2)
- With MC, cast on 40 (44, 48, 52) stitches.
- Work in the Berry Stitch pattern, increasing 1 stitch at each side every 6 rows. To increase, simply knit into the front and back of the first and last stitch of the row. Continue increasing until you have 60 (66, 72, 78) stitches on your needle.
- Continue working straight (without increases) until the sleeve measures 18 (19, 20, 21) inches from the cast-on edge.
- Bind off all stitches loosely.
Ribbed Edging
This is where the Contrast Color (CC) comes in, adding that beautiful, crisp finish.
- With CC, pick up and knit stitches along the entire front opening of both front panels, the bottom edge of the cardigan, and the cuffs of both sleeves. The number of stitches you pick up should be an even number to work the ribbing correctly.
- Work in a k1, p1 rib for 2 inches. This creates a stretchy, neat edge.
- Bind off in rib pattern. This keeps the edge elastic and prevents it from flaring.
Assembly
- Sew Shoulder Seams: Place the front and back panels with right sides together. Sew the shoulder seams using a tapestry needle and a length of MC yarn.
- Set in Sleeves: With right sides together, pin the center of the sleeve cap to the shoulder seam. Pin the rest of the sleeve cap to the armhole opening. Sew the sleeve in place.
- Sew Side and Sleeve Seams: With right sides together, sew the side seams of the cardigan from the bottom edge up to the underarm. Then, continue sewing the sleeve seam from the underarm down to the cuff.
- Weave in Ends: Use your tapestry needle to weave in all loose yarn ends securely on the wrong side of the fabric.
- Block to Measurements: This is a crucial step. Soak the cardigan in lukewarm water with a gentle wool wash, then gently squeeze out excess water (do not wring). Lay it flat on a towel and roll it up to remove more water. Finally, lay it flat on a blocking mat or dry towel, shape it to the specified measurements, and pin it in place. Allow it to dry completely. Blocking will even out the stitches and give your cardigan a professional, polished look.
Congratulations! You've completed your Sunlit Bramble Cardigan. This beautiful, textured piece is a testament to your knitting skill and will be a cherished addition to your autumn wardrobe. The unique berry stitch and cozy cocoon silhouette are sure to turn heads and keep you warm for years to come. Enjoy wearing your handmade creation!