The Polka Dot Cocoon: A Free Knitting Pattern for a Textured, Ladybug-Inspired Baby Photography Prop
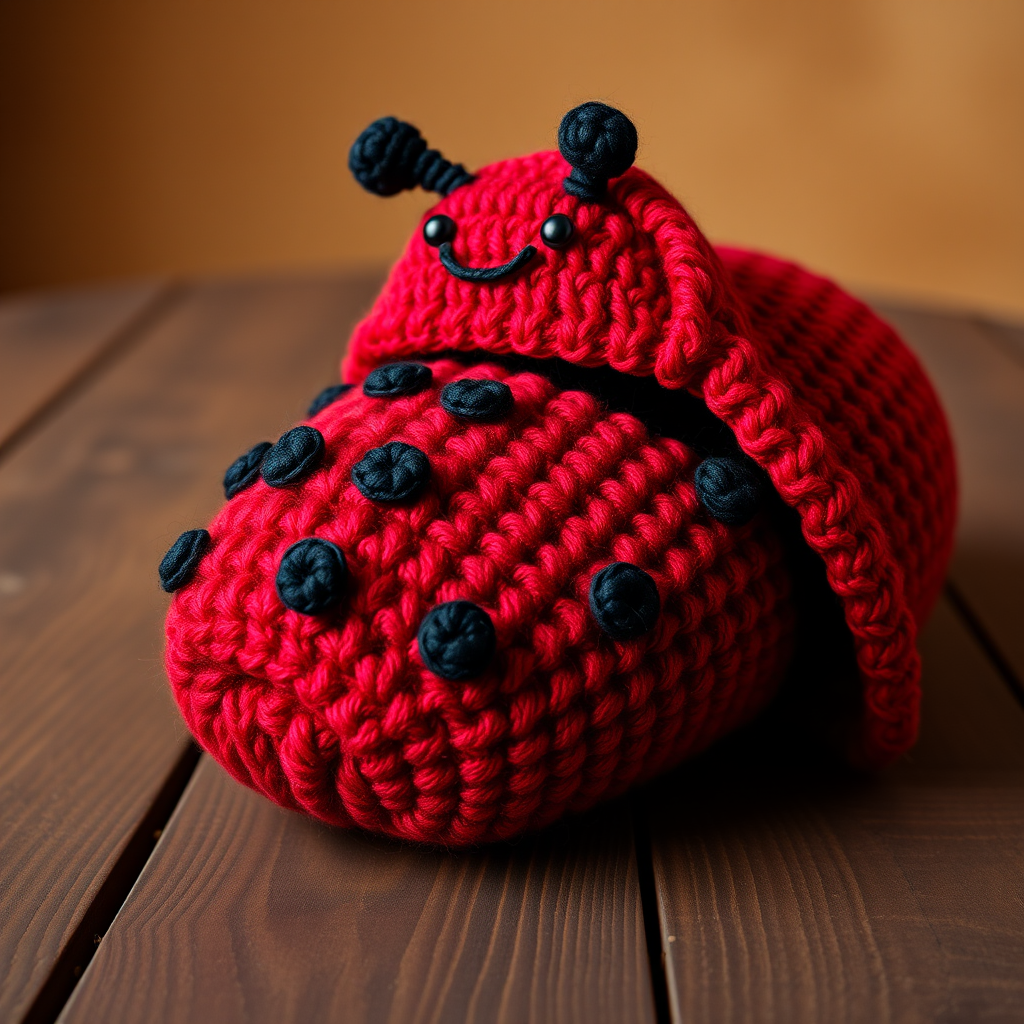
Introducing the Polka Dot Cocoon: A Ladybug-Inspired Baby Photography Prop
Transform your little one into the cutest little ladybug with this free, heirloom-quality knitting pattern. The Polka Dot Cocoon is a textured, cozy photography prop designed to fit newborns to 3-month-olds (approx. 20 inches long). Featuring a rich red body with scattered black speckles, a soft hood, and tiny crocheted antennae, this piece is perfect for capturing unforgettable baby photos. The stockinette stitch gives it a subtle, classic texture, while the seamless assembly creates a polished, professional look. Whether you're a seasoned knitter or a confident beginner, this pattern is clear, detailed, and designed for success.
Materials Needed
To recreate this exact prop, gather the following supplies. All yarn is worsted weight (Category 4).
- Yarn:
- Red: Approx. 250g (e.g., Lion Brand Vanna's Choice in Scarlet)
- Black: Approx. 50g (e.g., Lion Brand Vanna's Choice in Black)
- White: Approx. 10g (for optional face embroidery)
- Needles & Hook:
- US Size 7 (4.5mm) knitting needles (straight or circular for magic loop)
- US Size G/6 (4.0mm) crochet hook (for antennae and spots)
- Notions:
- Yarn needle for weaving ends and sewing
- Stitch markers (optional)
- Scissors
- Small amount of stuffing (for antennae)
- Gauge: 20 stitches and 26 rows = 4 inches in Stockinette stitch (knit on right side, purl on wrong side). Always check your gauge for accurate sizing.
Step-by-Step Instructions
Abbreviations: K = knit, P = purl, K2tog = knit two together, P2tog = purl two together, CO = cast on, BO = bind off, st(s) = stitch(es), RS = right side, WS = wrong side, sc = single crochet, ch = chain, sl st = slip stitch.
Cocoon Body (Make 2 pieces – Front and Back)
Using Red yarn and knitting needles.
- CO 40 sts.
- Work in Stockinette stitch (K on RS, P on WS) for 60 rows (approx. 9 inches).
- Shape the bottom (tail end):
- Row 61 (RS): K2, K2tog, K to last 4 sts, K2tog, K2. (38 sts)
- Row 62 (WS): P2, P2tog, P to last 4 sts, P2tog, P2. (36 sts)
- Repeat Rows 61-62 until 20 sts remain.
- Next RS row: K2tog across. (10 sts)
- Next WS row: P2tog across. (5 sts)
- Cut yarn, thread through remaining sts, and pull tight to close. Weave in end.
Hood (Make 1 piece)
Using Red yarn and knitting needles.
- CO 50 sts.
- Work in Stockinette stitch for 20 rows (approx. 3 inches).
- Shape the top:
- Row 21 (RS): K1, K2tog, K to last 3 sts, K2tog, K1. (48 sts)
- Row 22 (WS): Purl.
- Repeat Rows 21-22 until 20 sts remain.
- Next RS row: K2tog across. (10 sts)
- Next WS row: P2tog across. (5 sts)
- Cut yarn, thread through remaining sts, and pull tight. Weave in end.
Antennae (Make 2)
Using Black yarn and crochet hook.
- Make a magic ring, ch 1, work 6 sc into ring. Pull tight. (6 sts)
- Work 1 sc in each st around for 4 rounds. (6 sts) – This forms the stem.
- Shape the ball:
- Round 5: 2 sc in each st around. (12 sts)
- Round 6-7: 1 sc in each st around. (12 sts)
- Round 8: Sc2tog around. (6 sts)
- Stuff lightly with a small amount of fiberfill.
- Sc2tog around. (3 sts)
- Cut yarn, thread through remaining sts, and pull tight. Leave a long tail (approx. 8 inches) for sewing.
Ladybug Spots (Make 6-8)
Using Black yarn and crochet hook.
- Make a magic ring, ch 1, work 6 sc into ring. Pull tight. (6 sts)
- Round 2: 2 sc in each st around. (12 sts)
- Sl st to first st, cut yarn, leave a long tail (approx. 6 inches) for sewing.
Assembly
- Seam the cocoon: With RS together, sew the front and back pieces along the sides and bottom, leaving the top open. Turn RS out.
- Attach the hood: With RS together, sew the straight edge of the hood to the top edge of the cocoon (the open edge). Turn RS out.
- Sew on spots: Arrange the 6-8 black spots on the front of the cocoon in a random pattern (avoid placing them too close to the seam). Sew each spot securely using its long tail.
- Attach antennae: Sew the antennae to the top of the hood, about 2 inches apart. Position them so they stand upright.
- Add face (optional): Using White yarn, embroider two small eyes (French knots) on the hood, about 1 inch apart. Using Black yarn, embroider a curved smile (backstitch) below the eyes.
- Weave in all ends carefully to ensure a clean, professional finish.
Your Polka Dot Cocoon is now complete! This cozy, textured prop is sure to be a cherished keepsake for years to come. Happy knitting!


