The Jovial Jingle Snowman Ornament Free Pattern – A Knitted Ode to Frosty Cheer
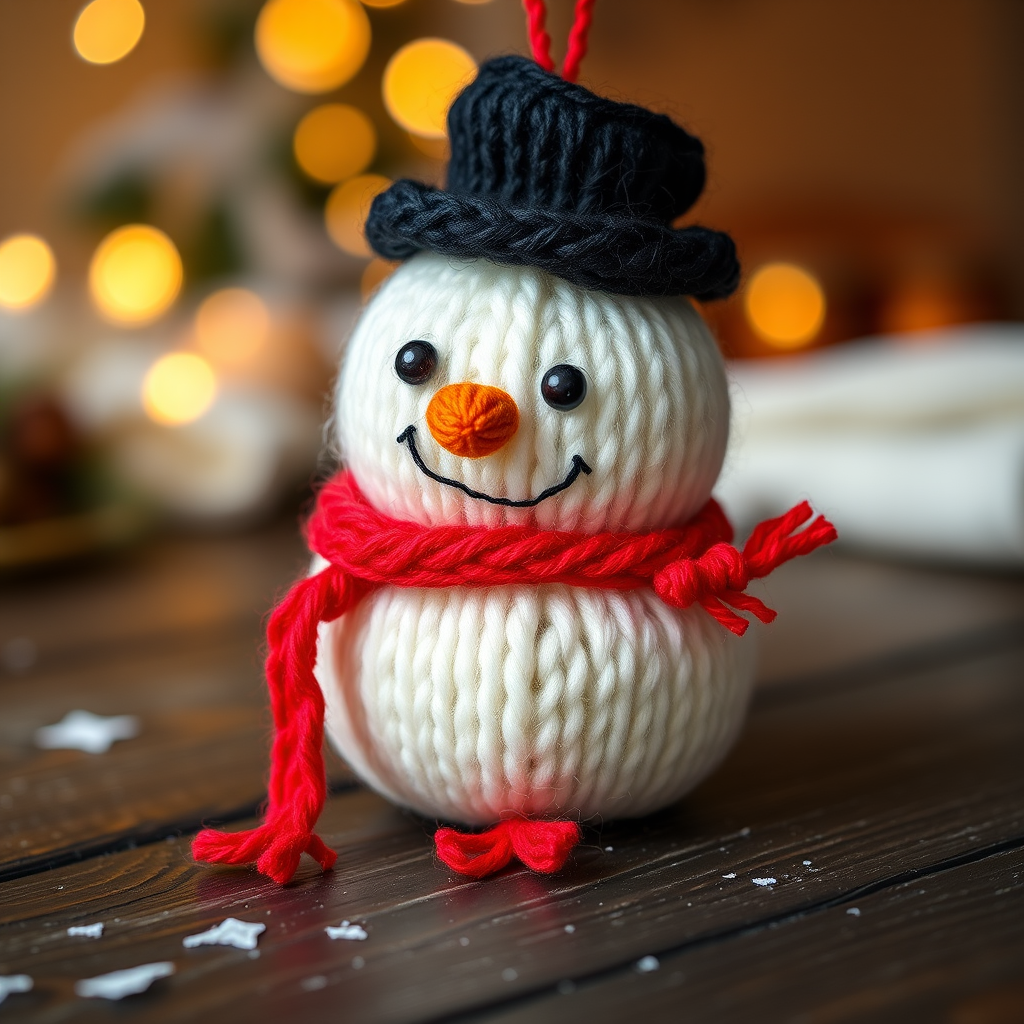
The Jovial Jingle Snowman Ornament: A Knitted Ode to Frosty Cheer
There's something undeniably magical about a handcrafted Christmas ornament. It carries warmth, memory, and a personal touch that store-bought decorations simply can't replicate. This whimsical snowman ornament, complete with a jaunty top hat and a hand-stitched carrot nose, brings a touch of vintage holiday charm to any tree. Knitted in the round with soft, chunky yarn, it's a quick and satisfying project for crafters seeking a cozy, heirloom-quality decoration. Whether you're a seasoned knitter or a brave beginner ready for a delightful challenge, this pattern will guide you to create a plump, cheerful snowman that will become a treasured part of your holiday traditions for years to come.
This project is perfectly scaled at about 3 inches tall, making it ideal for adorning a Christmas tree, tying onto a gift, or adding a handmade touch to a wreath. The combination of crisp white body, black top hat, and a bright red scarf creates a classic, nostalgic look that exudes handcrafted charm. Let's dive into this joyful knitting adventure!
Materials Needed
Before you begin, gather the following materials. Having everything ready will make your crafting session smooth and enjoyable.
Yarn
- Worsted weight yarn in white (MC) – for the snowman's body. A 100% wool or acrylic blend is recommended for excellent stitch definition.
- Worsted weight yarn in black (CC1) – for the top hat and facial features.
- Worsted weight yarn in orange (CC2) – for the carrot nose.
- Worsted weight yarn in red or green (CC3) – a small amount for the scarf.
Needles & Tools
- US Size 5 (3.75 mm) knitting needles – for the body. Use double-pointed needles (DPNs) or a circular needle for magic loop, as you'll be knitting in the round.
- US Size 3 (3.25 mm) knitting needles – for the hat and details. Again, DPNs or a circular needle for small circumference knitting.
- Tapestry needle – for weaving in ends and assembling the pieces.
- Stitch markers – to mark the beginning of rounds.
- Polyester fiberfill – for stuffing the body.
- Scissors
Gauge
20 stitches and 28 rows = 4 inches in stockinette stitch with larger needles. While gauge isn't critical for an ornament, matching it will ensure your snowman is the intended size. If you tend to knit loosely or tightly, adjust your needle size accordingly.
Step-by-Step Instructions
Follow these detailed instructions carefully. The pattern is worked in the round, which creates a seamless, plump body. Take your time, count your stitches, and enjoy the process!
Body (Make 1)
Using MC (white) yarn and larger needles (US 5), cast on 6 stitches. Distribute evenly across your DPNs or set up for magic loop. Join in the round, being careful not to twist your stitches. Place a stitch marker to mark the beginning of the round.
- Round 1: Knit front and back (kfb) into each stitch around – you will now have 12 stitches.
- Round 2: *Kfb, k1* repeat around – 18 stitches.
- Round 3: *Kfb, k2* repeat around – 24 stitches.
- Round 4: *Kfb, k3* repeat around – 30 stitches.
- Round 5: *Kfb, k4* repeat around – 36 stitches.
- Rounds 6-12: Knit all stitches (7 rounds even). This creates the smooth, round belly of the snowman.
- Round 13: *K2tog (knit two together), k4* repeat around – 30 stitches.
- Round 14: Knit all stitches.
- Round 15: *K2tog, k3* repeat around – 24 stitches.
- Round 16: Knit all stitches.
- Round 17: *K2tog, k2* repeat around – 18 stitches.
Important: Now is the time to stuff your snowman firmly with polyester fiberfill. Use a blunt tool like a pencil eraser or the end of a knitting needle to push the stuffing into the corners, creating a nice, round shape. Don't overstuff to the point of stretching the stitches, but make it plump and firm.
- Round 18: *K2tog, k1* repeat around – 12 stitches.
- Round 19: K2tog around – 6 stitches.
Cut the yarn, leaving a long tail (about 8 inches). Thread the tail onto a tapestry needle, pass it through the remaining 6 stitches, and pull tight to close the hole. Weave in the end securely inside the body.
Hat (Make 1)
Using CC1 (black) yarn and smaller needles (US 3), cast on 24 stitches. Join in the round, being careful not to twist. Place a marker.
- Rounds 1-6: Knit all stitches. This forms the brim of the hat.
- Round 7: *K2tog* repeat around – 12 stitches. This decreases to shape the crown.
- Rounds 8-12: Knit all stitches (5 rounds even). This is the top part of the hat.
- Round 13: *K2tog* repeat around – 6 stitches.
Cut the yarn, leaving a tail. Thread it through the remaining 6 stitches, pull tight, and weave in the end. To finish, fold the bottom edge (the brim) up to create a rolled edge. This gives the hat its jaunty, classic look.
Scarf (Make 1)
Using CC3 (red or green) yarn and smaller needles (US 3), cast on 6 stitches.
- Work in garter stitch (knit every row) for 20 rows. This creates a textured, cozy fabric.
- Bind off all stitches. Cut the yarn, leaving a tail for fringe.
To create the fringe, simply tie the scarf around the snowman's neck and trim the ends to your desired length. The garter stitch naturally curls slightly, adding to the charm.
Assembly
Now for the fun part – bringing your snowman to life! Follow these steps carefully for a polished finish.
- Embroider the Carrot Nose: Using CC2 (orange) yarn and a tapestry needle, embroider a small carrot nose on the front of the body. Position it about 2/3 up from the bottom. Use a satin stitch (working parallel stitches closely together to fill a shape) or a duplicate stitch (following the knit stitch pattern) to create a small triangle shape. Keep it compact – about 1/2 inch long.
- Stitch the Eyes: Using black yarn or embroidery floss, create two small French knots for eyes. Place them just above and slightly to the sides of the carrot nose. To make a French knot: bring the needle up through the fabric, wrap the yarn around the needle twice, then insert the needle back down close to where it came up, pulling gently to form a small knot.
- Stitch the Smile: Using black yarn, create a gentle curved smile using a backstitch. Start at one side of the face, just below the nose, and work small, even stitches in a curve to the other side. This adds a cheerful, friendly expression.
- Attach the Hat: Place the hat on top of the snowman's head, slightly tilted for a jaunty look. Sew it in place using a few small, discreet stitches with black yarn, catching the bottom of the hat to the body.
- Add the Scarf: Wrap the scarf around the snowman's neck, just below the head. Tie it in a simple knot at the side. Trim the fringe ends to your desired length, creating a neat, finished look.
- Create a Hanging Loop: Thread a length of yarn (about 6 inches) through the top of the head, at the very center. Tie the ends together in a secure knot to form a loop. This will allow you to hang your ornament on the tree.
Finishing
Weave in all remaining ends securely using your tapestry needle. Ensure no loose threads are visible. If desired, you can block the ornament lightly by misting it with water and shaping it gently, then allowing it to dry completely. This helps even out the stitches and gives a professional finish.
And there you have it – your very own Jovial Jingle Snowman Ornament! This delightful project is perfect for gifting, decorating, or adding a personal touch to your holiday home. The combination of simple techniques and charming details makes it a rewarding knit that you'll be proud to display year after year. Happy knitting, and may your holidays be filled with frosty cheer!


