The Blossom Burrow Bunny Free Pattern – A Knitted Garden of Sleeping Hares
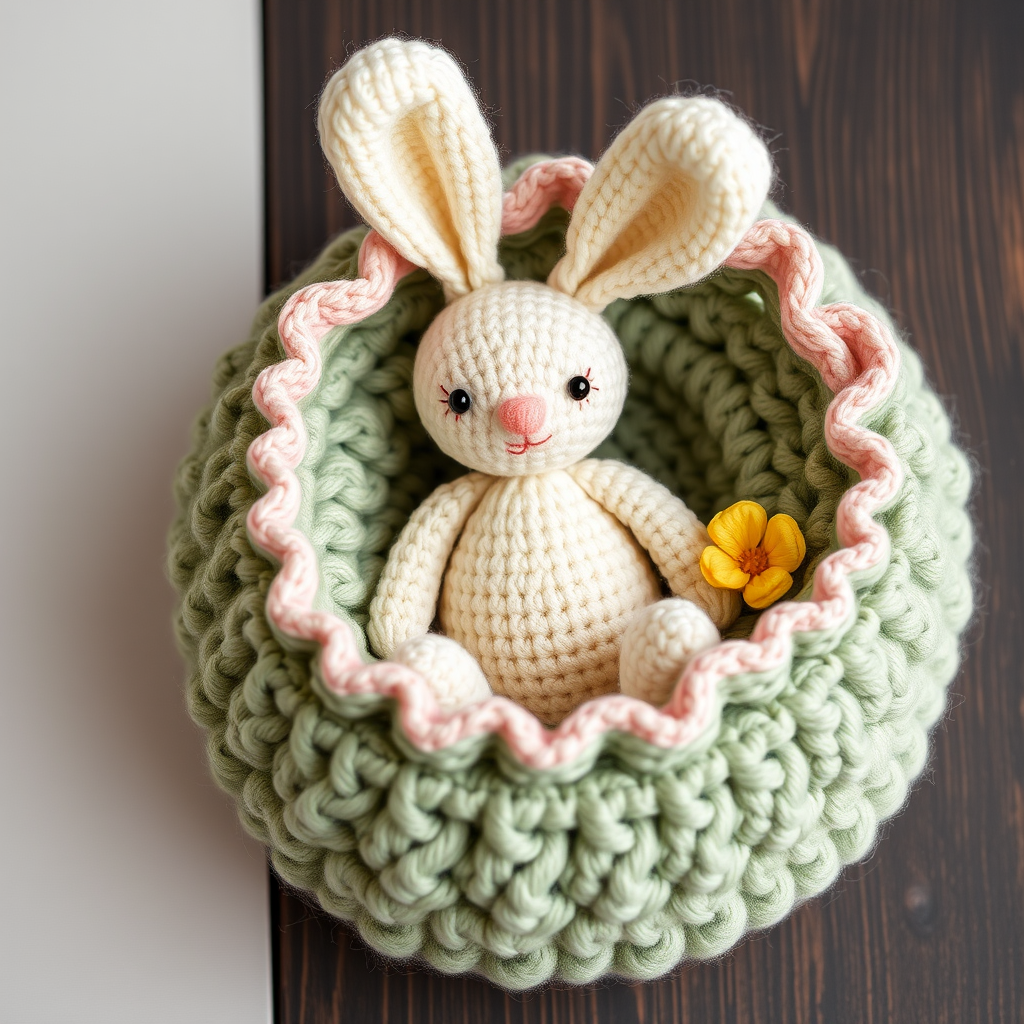
The Blossom Burrow Bunny: A Free Knitted & Crocheted Garden of Sleeping Hares
There is something undeniably magical about tucking a tiny, handcrafted bunny into its own flower-shaped nest. The Blossom Burrow Bunny is more than just an amigurumi pattern—it's a blooming springtime scene that captures the cozy charm of a garden in full bloom. This delightful set pairs a soft, cream-colored knitted bunny with a crocheted sage green nest, finished with a delicate blush pink petal edging. Whether you're crafting a handmade heirloom gift for a new baby, a whimsical Easter decoration, or a heartfelt present for a loved one, this pattern is designed to bring joy to both the maker and the recipient. The combination of knitting and crochet techniques makes this a wonderfully versatile project that celebrates the best of both crafts.
In this comprehensive guide, we'll walk you through every step, from casting on the bunny's first stitch to adding the final crocheted flower accents. Designed with beginners in mind, this pattern is broken down into clear, manageable sections. So, gather your yarn, find a cozy spot, and let's create a little burrow of our own.
Materials Needed
Before you begin, it's essential to gather all your supplies. Having everything at hand ensures a smooth, uninterrupted crafting session. Here’s what you'll need to bring your Blossom Burrow Bunny to life:
Yarn
- Worsted weight cotton or acrylic blend (e.g., Lion Brand 24/7 Cotton) in the following colors:
- Cream (for the bunny's body)
- Blush Pink (for the nest edging and bunny's nose)
- Sage Green (for the nest base and walls)
- Butter Yellow (for the decorative flowers)
Tools & Notions
- US Size 5 (3.75 mm) knitting needles – for the bunny
- US Size G/6 (4.0 mm) crochet hook – for the flower nest
- Fiberfill stuffing – for a plump, huggable bunny
- Black embroidery floss – for the eyes
- Tapestry needle – for seaming and embroidery
- Stitch markers (optional, but helpful for crochet rounds)
- Scissors
Gauge
- Knitting (Bunny): 20 stitches and 28 rows = 4 inches in stockinette stitch
- Crochet (Nest): 16 sc and 18 rows = 4 inches
Note: Gauge is important for achieving the correct size, but for a toy, slight variations are acceptable. The key is to create a tight fabric so the stuffing doesn't show through.
Step-by-Step Instructions
This project is divided into two main parts: the knitted bunny and the crocheted flower nest. We'll tackle the bunny first, as it's the star of the show. Follow each step carefully, and you'll have a beautiful finished piece in no time.
Part 1: The Knitted Bunny (Worked Flat, Then Seamed)
The bunny is worked in one flat piece for the head and body, then seamed and stuffed. The ears are knitted separately and attached. This method is perfect for beginners as it avoids complex circular knitting.
Head & Body (One Piece)
- Cast On: With cream yarn and your US Size 5 needles, cast on 10 stitches.
- Row 1 (Right Side): Knit all stitches. (10 sts)
- Row 2 (Wrong Side): Purl all stitches. (10 sts)
- Row 3 (Increase Row): Kfb (knit into the front and back of the next stitch), knit 8, kfb. (12 sts)
- Row 4: Purl all stitches. (12 sts)
- Row 5 (Increase Row): Kfb, knit 10, kfb. (14 sts)
- Row 6: Purl all stitches. (14 sts)
- Rows 7-14: Work even in stockinette stitch (knit on the right side, purl on the wrong side) for 8 rows. (14 sts)
- Row 15 (Decrease Row): K2tog (knit two together), knit 10, k2tog. (12 sts)
- Row 16: Purl all stitches. (12 sts)
- Row 17 (Decrease Row): K2tog, knit 8, k2tog. (10 sts)
- Row 18: Purl all stitches. (10 sts)
- Row 19 (Decrease Row): K2tog, knit 6, k2tog. (8 sts)
- Row 20: Purl all stitches. (8 sts)
- Finishing the Top: Cut the yarn, leaving a long tail (about 12 inches). Thread the tail onto a tapestry needle and slide it through the remaining 8 stitches on the knitting needle. Gently pull tight to gather the top of the head closed. Secure with a knot.
- Seaming: With the same tail, sew the side seam from the top of the head down to the bottom edge, using a mattress stitch or whip stitch. Leave the bottom edge open.
- Stuffing: Turn the bunny right side out. Firmly stuff the head and body with fiberfill. Make sure the head is nicely rounded and the body is plump.
- Closing the Bottom: Thread the tail through the bottom edge stitches and pull tight to cinch the bottom closed. Secure with a knot and weave in the end.
Ears (Make 2)
- Cast On: With cream yarn, cast on 6 stitches.
- Row 1: Knit all stitches. (6 sts)
- Row 2: Purl all stitches. (6 sts)
- Row 3 (Increase Row): Kfb, knit 4, kfb. (8 sts)
- Rows 4-10: Work even in stockinette stitch for 7 rows. (8 sts)
- Row 11 (Decrease Row): K2tog, knit 4, k2tog. (6 sts)
- Row 12: Purl all stitches. (6 sts)
- Bind Off: Bind off all stitches. Leave a long tail for sewing.
- Shaping: Fold each ear in half lengthwise, with the right sides together. Sew the long edges together using the tail, creating a tube. Leave the cast-on edge open. Turn the ear right side out.
- Attachment: Position the ears on the top of the bunny's head, spacing them about 1 inch apart. Using the tail, sew each ear securely to the head, stitching through the base of the ear and into the bunny's head. Weave in the ends.
Embroidering the Face
- Nose: Using blush pink yarn and a tapestry needle, embroider a small triangle nose at the center of the face, about 1 inch below the top of the head. Use a satin stitch to fill in the triangle.
- Eyes: With black embroidery floss, create two small French knots for eyes. Place them 0.5 inches apart on either side of the nose, slightly above it. To make a French knot, bring the needle up through the fabric, wrap the floss around the needle twice, and insert the needle back down close to where it came up. Pull gently to form a knot.
- Mouth: Add a tiny pink stitch for the mouth—a small vertical line directly below the nose. Use the blush pink yarn and a single straight stitch.
Part 2: The Crocheted Flower Nest (Worked in Continuous Rounds)
Now that your bunny is complete, it's time to create its cozy home. The nest is crocheted in a spiral, starting from the base and working up the walls. The result is a sturdy, bowl-shaped nest perfect for cradling your bunny.
Base
- Magic Ring: With sage green yarn and your US Size G/6 hook, make a magic ring.
- Round 1: Work 6 single crochet (sc) into the ring. Pull the ring tight to close. (6 sts)
- Round 2 (Increase Round): Work 2 sc in each stitch around. (12 sts)
- Round 3 (Increase Round): *Sc in the next stitch, 2 sc in the next stitch*; repeat from * to * around. (18 sts)
- Round 4 (Increase Round): *Sc in the next 2 stitches, 2 sc in the next stitch*; repeat from * to * around. (24 sts)
- Round 5 (Increase Round): *Sc in the next 3 stitches, 2 sc in the next stitch*; repeat from * to * around. (30 sts)
- Round 6 (Increase Round): *Sc in the next 4 stitches, 2 sc in the next stitch*; repeat from * to * around. (36 sts)
- Round 7 (Increase Round): *Sc in the next 5 stitches, 2 sc in the next stitch*; repeat from * to * around. (42 sts)
- Round 8 (Increase Round): *Sc in the next 6 stitches, 2 sc in the next stitch*; repeat from * to * around. (48 sts)
- Round 9 (Creating the Edge): Working in the back loops only, sc in each stitch around. (48 sts) – This creates a crisp, defined edge where the base meets the walls of the nest.
Nest Walls
- Rounds 10-16: Sc in each stitch around for 7 rounds. (48 sts) – Work even without any increases. This will build up the walls of the nest.
- Finishing: After Round 16, fasten off and weave in the ends securely.
Petal Edging (Optional but Lovely)
- Joining Yarn: Join blush pink yarn to the top edge of the nest with a slip stitch.
- Creating Petals: *Chain 3, skip 1 stitch, single crochet in the next stitch*; repeat from * to * around the entire top edge. This creates a delicate, scalloped petal effect.
- Finishing: When you reach the starting point, slip stitch to the first chain to join. Fasten off and weave in the ends.
Part 3: Assembly & Decorative Touches
- Placing the Bunny: Gently place the knitted bunny inside the flower nest. Tuck its bottom into the nest so it sits upright, with its head and ears peeking out over the top edge. The nest is designed to be the perfect size for the bunny to sit snugly.
- Adding Crocheted Flowers (Optional): To add extra charm, create a few small flowers using the butter yellow yarn. You can make simple 5-petal flowers by working 5 sc into a magic ring, then chaining 2 and slip stitching in each sc to form petals. Attach these flowers to the outside of the nest using a tapestry needle and matching thread, spacing them evenly around the sides.
- Final Touches: Once everything is in place, give your bunny a gentle fluff and adjust its ears. Your Blossom Burrow Bunny is now complete and ready to bring springtime joy to any room!
This pattern is a labor of love, but the result is a truly special piece that will be treasured for years. Whether you keep it for yourself or gift it to someone special, the Blossom Burrow Bunny is a testament to the beauty of handmade crafts. Happy crafting!


