Strawberry Patch Motif Blanket Square Free Crochet Pattern
Strawberry Patch Motif Blanket Square — Free Beginner Crochet Pattern
Introduction
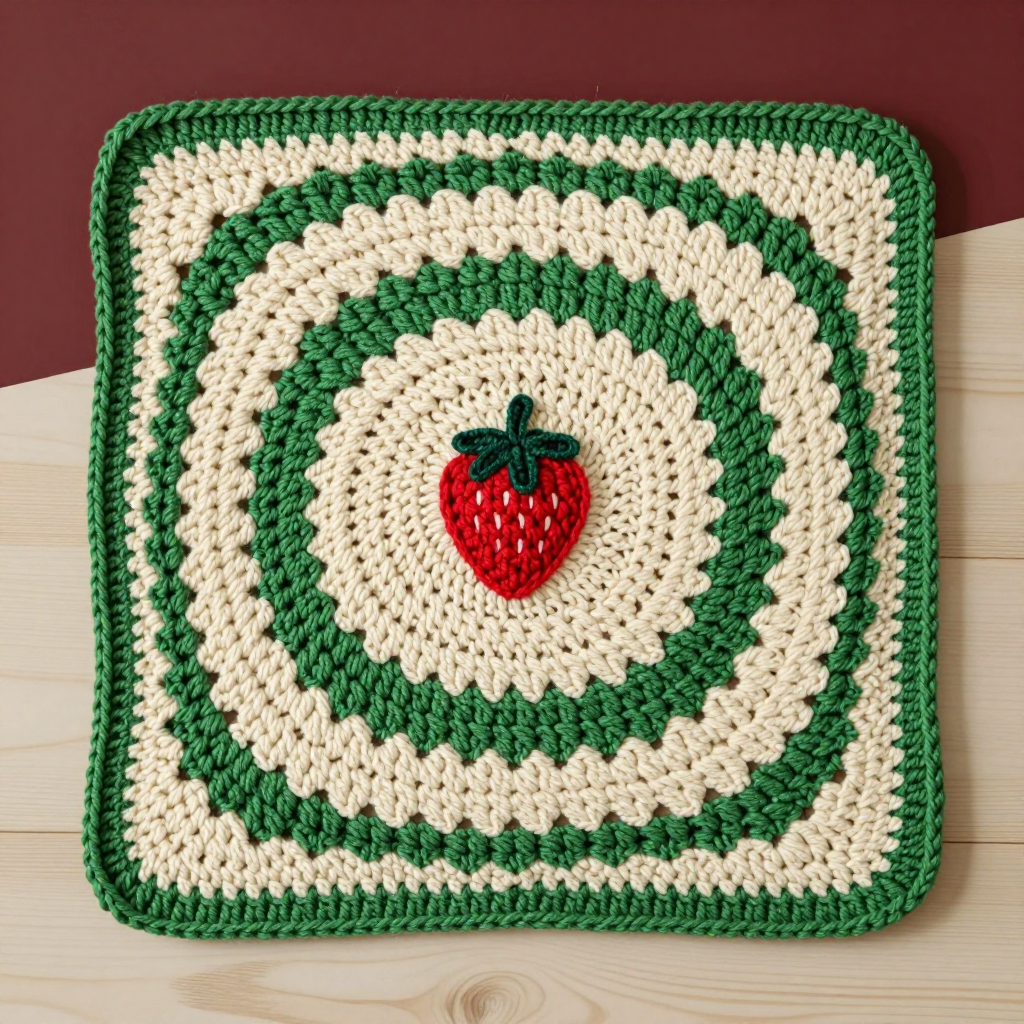
If you have ever wanted to make something that looks like it came straight out of a storybook cottage, this little square is your perfect first project. It is a 6 x 6 inch (15 x 15 cm) crochet block worked in soft cream and leaf-green rounds, with a tiny red strawberry appliqué stitched right in the middle. The finished square feels soft, slightly textured, and wonderfully cozy — and because it is small, you can finish one in a single evening. Make one to practice, then make a stack and join them into a cottagecore blanket that will make any chair or bed feel warmer. This pattern is written for complete beginners: every stitch, every abbreviation, and every step is explained in plain English, so you can pick up a hook today and have something beautiful by tonight.
Materials Needed
- Yarn: Worsted weight (#4) acrylic or cotton-blend yarn. Per square you will need approximately: Cream (main color) — 25 yards, Leaf Green — 8 yards, Strawberry Red — 3 yards, and a small amount of Dark Green for the berry cap.
- Crochet hook: US size H-8 (5.0 mm), or whatever size you need to match the gauge below.
- Stitch markers: at least 4 (to mark corners and the first stitch of each round).
- Tapestry needle: a blunt-tipped yarn needle for sewing the appliqué and weaving in ends.
- Scissors: small, sharp craft scissors.
- Finished size: Each square measures 6 x 6 in (15 x 15 cm). A grid of 5 x 6 squares (30 squares) makes a blanket approximately 30 x 36 in (76 x 91 cm).
Abbreviations and Beginner Glossary
- ch — chain. Wrap the yarn over your hook and pull it through the loop already on your hook. This makes a small link.
- sl st — slip stitch. Insert your hook into the stitch, wrap yarn over, and pull it through both the stitch and the loop on your hook at once. It joins things together without adding height.
- sc — single crochet. Insert hook into stitch, yarn over, pull up a loop (2 loops on hook), yarn over, pull through both loops. (1 loop remains.)
- hdc — half double crochet. Yarn over, insert hook into stitch, yarn over, pull up a loop (3 loops on hook), yarn over, pull through all 3 loops at once.
- dc — double crochet. Yarn over, insert hook into stitch, yarn over, pull up a loop (3 loops on hook), yarn over, pull through 2 loops, yarn over, pull through last 2 loops.
- st(s) — stitch(es). One completed loop or "V" in your fabric.
- sp — space. The gap made by a chain (for example, a "ch-2 sp" is the hole under two chains).
- beg — beginning. Used in "beg ch-2," meaning the chain you made at the start of the round.
- rep — repeat. Do the instructions again the number of times stated.
- MR — magic ring (also called magic circle). A loop of yarn you work stitches into, then pull tight so there is no hole in the center. To make one: wrap yarn twice around two fingers, slide it off, insert hook into the loop, pull up a loop, ch 1 to secure, then work your stitches into the ring and pull the tail tight.
- yarn over — wrap the working yarn over your hook from back to front.
- fasten off — cut the yarn leaving a tail, then pull the tail all the way through the last loop to lock it.
- whipstitch — a simple sewing stitch: bring the needle up through both layers, over the edge, and back down, making small slanted stitches all around.
Gauge
Gauge: the first 3 rounds of the square = 2 in (5 cm) square. The finished square should measure 6 x 6 in (15 x 15 cm).
Why gauge matters: Gauge is how big your stitches turn out. If your stitches are looser than the pattern, your square will be bigger than 6 inches and your blanket will not line up when you join the squares. If they are tighter, the square will be smaller. Matching gauge means every square comes out the same size.
How to check it: Work Rounds 1–3 of the square exactly as written. Lay it flat and measure across the widest part with a ruler. If it measures about 2 inches, you are on track. If it is bigger, switch to a smaller hook (US G-6 / 4.0 mm). If it is smaller, switch to a larger hook (US I-9 / 5.5 mm).
Beginner Tips Before You Start
- Use a stitch marker in the first stitch of every round. Because this square is worked in joined rounds, it is very easy to lose track of where a round began. Slip a marker into the first stitch, then move it up each round.
- Do not pull your yarn too tight. Tension is the number one beginner struggle. Hold the yarn gently — snug, not strangling. Tight stitches make a stiff, small square that is hard to sew.
- Count your stitches at the end of every round. The stitch counts in parentheses are there to save you. If a round does not match, fix it before moving on.
- Mark your four corners. In Rounds 6 and 7, place a marker in each corner chain space so you can find them easily.
- Keep your magic ring tail long. Leave a 6-inch tail so you can pull the center closed tightly and weave it in securely later.
- Work the appliqué after the square is finished. The strawberry is made separately and sewn on at the end, so do not worry about it while you crochet the square.
Step-by-Step Instructions
Note: The square is worked in joined rounds — you do not turn your work at the end of each round. The strawberry is a separate small appliqué made afterward and stitched to the center of the finished square.
Part 1: The Square (make one per motif, in Cream and Leaf Green)
Set-up: With Cream, make a magic ring (MR).
Round 1 (Cream): Ch 1 (this does not count as a stitch). Work 8 sc into the MR. Join with sl st to the first sc. (8 sc)
Round 2 (Cream): Ch 1. Work 2 sc in each st around. Join with sl st to the first sc. (16 sc)
Round 3 (Leaf Green): Ch 2 (counts as first hdc). Hdc in the same st. *Ch 1, skip next st, 2 hdc in next st; rep from * around, ending with ch 1, skip last st. Join with sl st to the top of the beg ch-2. (8 hdc-pairs, 8 ch-1 sps)
Round 4 (Cream): Ch 1. Sc in the same st. *Sc in next st, sc in ch-1 sp, sc in next 2 sts; rep from * around, ending with sc in the last ch-1 sp. Join with sl st to the first sc. (32 sc)
Round 5 (Cream): Ch 3 (counts as first dc). Dc in next 2 sts. *Ch 2, dc in next 4 sts; rep from * around, ending with ch 2. Join with sl st to the top of the beg ch-3. (8 groups of 4 dc, 8 ch-2 sps)
Round 6 (Leaf Green): Ch 1. Sc in the same st and in the next 3 sts. *In the next ch-2 sp work (sc, ch 2, sc) for a corner; sc in the next 4 sts; rep from * around, ending with a corner in the last ch-2 sp. Join with sl st to the first sc. (8 corners, 4 sc between each)
Round 7 (Cream): Ch 1. Sc in each st around, working (sc, ch 2, sc) in each corner ch-2 sp. Join with sl st to the first sc. Fasten off and weave in ends. Your square should now measure approximately 6 x 6 in (15 x 15 cm). Block lightly to square it up.
Part 2: The Strawberry Appliqué (make one per square, in Strawberry Red and Dark Green)
With Strawberry Red, make a MR.
Round 1: Ch 1. Work 6 sc into the MR. Join with sl st to the first sc. (6 sc)
Round 2: Ch 1. 2 sc in each st around. Join with sl st to the first sc. (12 sc)
Round 3: Ch 1. *Sc in next st, 2 sc in next st; rep from * around. Join with sl st to the first sc. (18 sc)
Round 4: Ch 1. Sc in each st around. Join with sl st to the first sc. Do not fasten off yet. (18 sc)
Shape the point: Ch 1. Sc in next 3 sts, hdc in next 2 sts, dc in next 2 sts, hdc in next 2 sts, sc in next 3 sts, sl st in next 2 sts. Fasten off, leaving a 10-in (25 cm) tail for sewing. The berry should be a rounded teardrop about 1.25 in (3 cm) tall.
Cap (Dark Green): With Dark Green, ch 4. Sl st in the 2nd ch from hook, then (ch 3, sl st in the same ch) twice more to make three small leaves. Fasten off, leaving a 6-in (15 cm) tail. This forms a tiny three-leaf calyx.
Part 3: Assembly of the Motif
Step 1: Pin the strawberry appliqué centered on the finished square, point facing down, and whipstitch it in place around its outer edge using the red tail.
Step 2: Sew the dark green cap to the top of the berry with a few small stitches, using the green tail.
Step 3: Weave in all remaining ends and block the square to 6 x 6 in (15 x 15 cm).
Part 4: Joining Squares into a Blanket
Arrange your finished squares in a grid — 5 x 6 squares for a small throw (30 squares total, making a blanket about 30 x 36 in / 76 x 91 cm).
Joining: With right sides facing, whipstitch or sc the squares together through the outer loops, working in Cream. Join all vertical seams first, then all horizontal seams.
Border Round 1: With Cream, work a single round of sc evenly around the entire blanket edge, working (sc, ch 2, sc) in each corner. Join with sl st to the first sc.
Border Round 2: Ch 1. *Sc in next st, ch 1, skip next st; rep from * around, working (sc, ch 2, sc) in each corner. Join with sl st to the first sc. Fasten off and weave in ends.
Assembly and Finishing
Seaming: Lay two squares right sides together (the pretty sides facing each other). Thread your tapestry needle with Cream yarn and whipstitch along the edge, catching the outer loops of both squares with each stitch. Keep your stitches small and even — about 1/4 inch apart — so the seam lies flat. Do not pull the yarn tight, or the blanket will pucker.
Weaving in ends: Thread each yarn tail onto the tapestry needle and run it through the back of several stitches (about 2 inches), then change direction and run it back through a few more stitches. This locks it in place. Trim the tail close to the fabric.
Blocking: Lightly mist each square with water (or soak it for a few minutes and gently squeeze out the excess in a towel). Pin it to a towel or blocking mat, stretching it gently into a perfect 6 x 6 inch square. Let it dry completely — usually overnight. Blocking makes the corners crisp and the squares uniform, which makes joining much easier.
Pro Tips and Variations
- Change the colors: Swap the cream for soft pink or pale yellow for a springtime look, or use a deep navy background to make the red strawberry pop. Any worsted weight (#4) yarn will work.
- Adjust the size: To make a larger blanket, simply add more squares — a 6 x 8 grid (48 squares) makes a generous throw. To make a smaller baby blanket, try a 4 x 5 grid (20 squares).
- Try a different join: Instead of whipstitching, join the squares with a single crochet seam in Leaf Green for a visible, textured grid that adds a lovely garden-trellis effect.
- Substitute yarn: Cotton-blend yarn gives crisp stitch definition and is machine washable; acrylic is soft, affordable, and great for blankets. Just check your gauge again whenever you change yarn, since every brand behaves a little differently.