Neon Rainbow Cat Ear Crochet Beanie Free Pattern
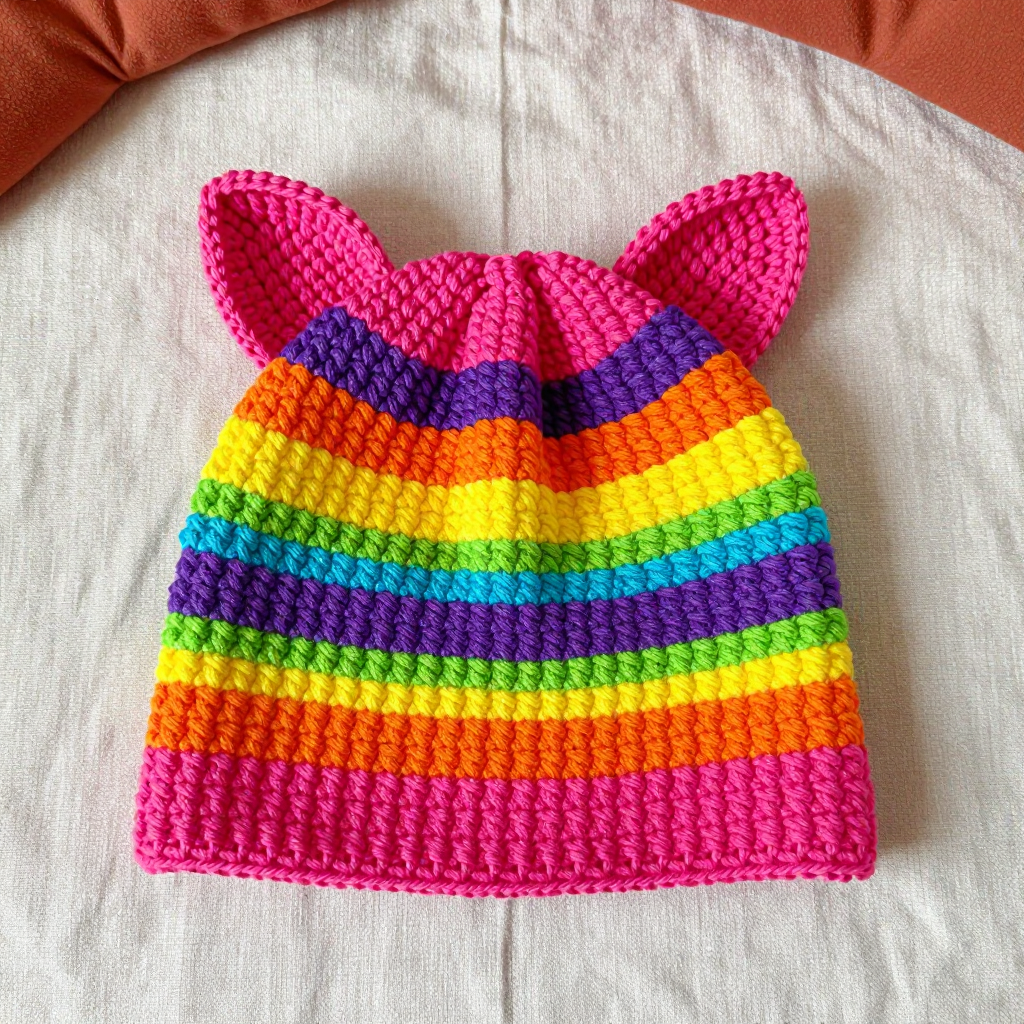
Neon Rainbow Cat Ear Crochet Beanie: A Beginner's First Project
If you have never held a crochet hook before, this is the perfect first project for you. This beanie is worked as a simple tube of half double crochet stitches, which means you only need to learn one main stitch to make the whole hat. The bold rainbow stripes give it that fun retro 90s energy, and the two little cat ears on top turn a basic beanie into something you will actually want to wear everywhere. The finished hat is soft, stretchy, and cozy, with a dense, slightly ribbed texture that hugs your head and keeps you warm. Best of all, there is no complicated shaping, no counting tiny stitches in a spiral, and no sewing until the very end, so you can relax and enjoy watching the colors grow.
Materials Needed
- Yarn: Worsted weight (category 4) acrylic yarn, approximately 30–40 yards each of 6 rainbow colors: hot pink, orange, sunshine yellow, lime green, turquoise blue, and violet purple (about 200–220 yards total).
- Crochet hook: H/8 (5.0 mm).
- Stitch marker: 1, to mark the first stitch of each round.
- Tapestry needle: A large blunt needle with a big eye, for sewing the ears and weaving in ends.
- Scissors: Any sharp pair for cutting yarn.
- Finished size: Fits an average adult head of 21–23 inches circumference. The finished hat measures about 20 inches around (unstretched) and 8.5 inches tall from brim to crown. The ears add about 2.5 inches.
Abbreviations and Beginner Glossary
Every term below is explained in plain English. Read through this list once before you start, and come back to it any time a word in the pattern confuses you.
- ch – chain: Make a loop with the yarn on your hook, then pull the yarn through that loop. Each loop you pull through is one chain. Chains are the foundation you build on.
- sl st – slip stitch: Insert your hook into the stitch, wrap the yarn over the hook, and pull it straight through both the stitch and the loop already on your hook. It makes a nearly invisible join.
- sc – single crochet: Insert your hook into the stitch, wrap the yarn over the hook and pull up a loop (you now have 2 loops on the hook), wrap the yarn over again, and pull it through both loops. You have 1 loop left on the hook.
- hdc – half double crochet: Wrap the yarn over your hook first, insert the hook into the stitch, wrap the yarn over and pull up a loop (3 loops on the hook), wrap the yarn over again, and pull it through all 3 loops at once. This is your main stitch for the hat.
- hdc2tog – half double crochet two together (a decrease): Wrap the yarn over, insert the hook into the first stitch, pull up a loop (3 loops on hook), wrap the yarn over, insert the hook into the next stitch, pull up a loop (4 loops on hook), wrap the yarn over, and pull through all 4 loops. Two stitches become one.
- dc – double crochet: Wrap the yarn over, insert the hook into the stitch, pull up a loop (3 loops on hook), wrap the yarn over and pull through 2 loops, wrap the yarn over again and pull through the last 2 loops.
- st(s) – stitch(es): One completed stitch, or several of them.
- rnd – round: One full circle of stitches worked all the way around the hat.
- BLO – back loop only: Every stitch has two loops at its top, a front one and a back one. Working in the back loop only means you insert your hook under just the loop farthest from you.
- turn: Flip your work over so you can work back in the other direction. Used only for the flat ears.
Gauge
Gauge: 14 hdc x 11 rounds = 4 inches (10 cm) in half double crochet.
Gauge simply means how big your stitches come out. If your stitches are too big, the hat will be too large; if they are too small, the hat will be too tight. That is why it matters: the whole pattern is built on the assumption that 14 half double crochet stitches fit into 4 inches. To check your gauge, make a small practice square: chain 20, then work half double crochet rows until the piece is about 4 inches tall. Lay a ruler across the middle and count how many stitches fit in 4 inches, then count how many rows fit in 4 inches. If you have more stitches than 14, your stitches are too tight, so try a larger hook. If you have fewer, your stitches are too loose, so try a smaller hook. Do this before you start the hat so you do not have to unravel hours of work.
Beginner Tips Before You Start
- Use a stitch marker. Place it in the first stitch of every round. When you reach the marker again, you know you have completed a full round and can join without losing your place.
- Do not pull the yarn too tight. Beginners often grip the yarn hard, which makes stiff, tiny stitches. Keep your tension relaxed so the hat stays soft and stretchy.
- Count your stitches at the end of every round. You should always have 70 stitches. If you have 69 or 71, fix it right away rather than discovering it later.
- Watch your chain does not twist. When you join the first chain into a ring, make sure the chain lies flat and untwisted, or your hat will have a permanent spiral twist.
- Carry your colors loosely. When you change colors, leave the old yarn hanging loosely on the inside of the hat. If you pull it tight, the hat will pucker.
- Try the hat on as you go. Because it is a simple tube, you can slip it on your head at any point to check the fit.
Step-by-Step Instructions
Note on Stripes
Change colors at the last yarn-over of the final stitch of a round. Carry colors loosely up the inside of the hat, or fasten off and rejoin each time. Each stripe is 3 rounds tall. Work the color sequence in this order: hot pink, orange, sunshine yellow, lime green, turquoise blue, violet purple, then repeat the sequence once more.
Hat Body (worked in the round from the bottom up as a tube)
With hot pink, ch 70. Being careful not to twist the chain, join with a sl st to the first ch to form a ring.
Rnd 1: Ch 1, hdc in each ch around. Join with a sl st to the first hdc. (70 hdc)
Rnd 2: Ch 1, hdc in each st around. Join with a sl st to the first hdc. (70 hdc)
Rnd 3: Ch 1, hdc in each st around. Join with a sl st to the first hdc. (70 hdc) Change to orange.
Rnds 4–6: Repeat Rnd 2 three times. (70 hdc) Change to sunshine yellow.
Rnds 7–9: Repeat Rnd 2 three times. (70 hdc) Change to lime green.
Rnds 10–12: Repeat Rnd 2 three times. (70 hdc) Change to turquoise blue.
Rnds 13–15: Repeat Rnd 2 three times. (70 hdc) Change to violet purple.
Rnds 16–18: Repeat Rnd 2 three times. (70 hdc) Change to hot pink.
Rnds 19–21: Repeat Rnd 2 three times. (70 hdc) Change to orange.
Rnds 22–24: Repeat Rnd 2 three times. (70 hdc) Change to sunshine yellow.
Rnds 25–27: Repeat Rnd 2 three times. (70 hdc) Change to lime green.
Rnds 28–30: Repeat Rnd 2 three times. (70 hdc) Change to turquoise blue.
Rnds 31–33: Repeat Rnd 2 three times. (70 hdc) Change to violet purple.
Rnds 34–36: Repeat Rnd 2 three times. (70 hdc) Do not fasten off.
At this point the tube measures about 8.5 inches tall. The top will be closed with a drawstring gather.
Crown Closure
Cut yarn leaving a 12-inch tail. Thread the tail onto a tapestry needle. Working through the front loop only of each stitch in the final round, pass the needle through all 70 stitches, then pull the tail tight to gather the top closed. Secure with a few small stitches and weave in the end.
Brim Edging
With hot pink, join yarn with a sl st to any stitch at the bottom edge of the hat. Ch 1, work 1 sc in each foundation chain around. Join with a sl st to the first sc. (70 sc) Fasten off and weave in ends.
Cat Ears (make 2)
The ears are small triangles worked flat in turned rows, then sewn to the top of the hat. With hot pink, ch 2.
Row 1: Work 2 sc in the second ch from hook. (2 sc)
Row 2: Ch 1, turn. 2 sc in each st across. (4 sc)
Row 3: Ch 1, turn. Sc in each st across. (4 sc)
Row 4: Ch 1, turn. 2 sc in first st, sc in next 2 sts, 2 sc in last st. (6 sc)
Row 5: Ch 1, turn. Sc in each st across. (6 sc)
Row 6: Ch 1, turn. 2 sc in first st, sc in next 4 sts, 2 sc in last st. (8 sc)
Row 7: Ch 1, turn. Sc in each st across. (8 sc)
Row 8: Ch 1, turn. Sc in first 2 sts, hdc in next st, dc in next 2 sts, hdc in next st, sc in last 2 sts. (8 sts)
Fasten off, leaving a long 18-inch tail for sewing. Make a second ear the same way.
Assembly and Finishing
- Shape the ears. Fold each ear in half with wrong sides together to create a slightly three-dimensional triangle. Using the long tail, whipstitch the two halves together along the side edges, leaving the bottom open. Whipstitch means passing the needle through both layers in small, even stitches, like sewing a seam.
- Pin the ears in place. Pin the ears to the top of the hat, about 3 inches apart and about 1.5 inches in from the gathered crown, with the points angled slightly outward. Try the hat on to check placement before sewing.
- Sew the ears on. Sew each ear securely to the hat using the remaining tail, working through both layers of the ear and into the hat fabric. Go around the base of each ear twice so it stays firmly attached.
- Weave in all ends. Thread each loose yarn tail onto the tapestry needle and run it through the inside of the hat for about 2 inches, then snip it close. This hides the ends so they never work loose.
- Block the hat. Gently steam the hat or mist it lightly with water and pat it into shape, then let it dry flat. This settles the stitches, evens out the stripes, and helps the ears stand up nicely.
Pro Tips and Variations
- Change the colors. Swap in any six colors you love, or work the whole hat in a single color and make the ears a contrasting shade. You can also use a self-striping yarn to get rainbow stripes without changing colors at all.
- Adjust the size. To make the hat smaller, start with a chain of 60 instead of 70 and work the same number of rounds. To make it larger, start with a chain of 80. The stripe height stays the same, so the hat simply gets wider or narrower.
- Substitute the yarn. Any worsted weight (category 4) yarn works here, including cotton or a wool blend. Just check your gauge again, because different fibers behave differently, and adjust your hook size if needed.
- Add a folded brim. Work 6 extra rounds in hot pink at the bottom of the hat before the sc edging, then fold the brim up for a cozy, extra-warm look.


