Mossy Acorn Fairy Lights Free Pattern – Knit a Forest Glow Garland
Mossy Acorn Fairy Lights Free Pattern – Knit a Forest Glow Garland
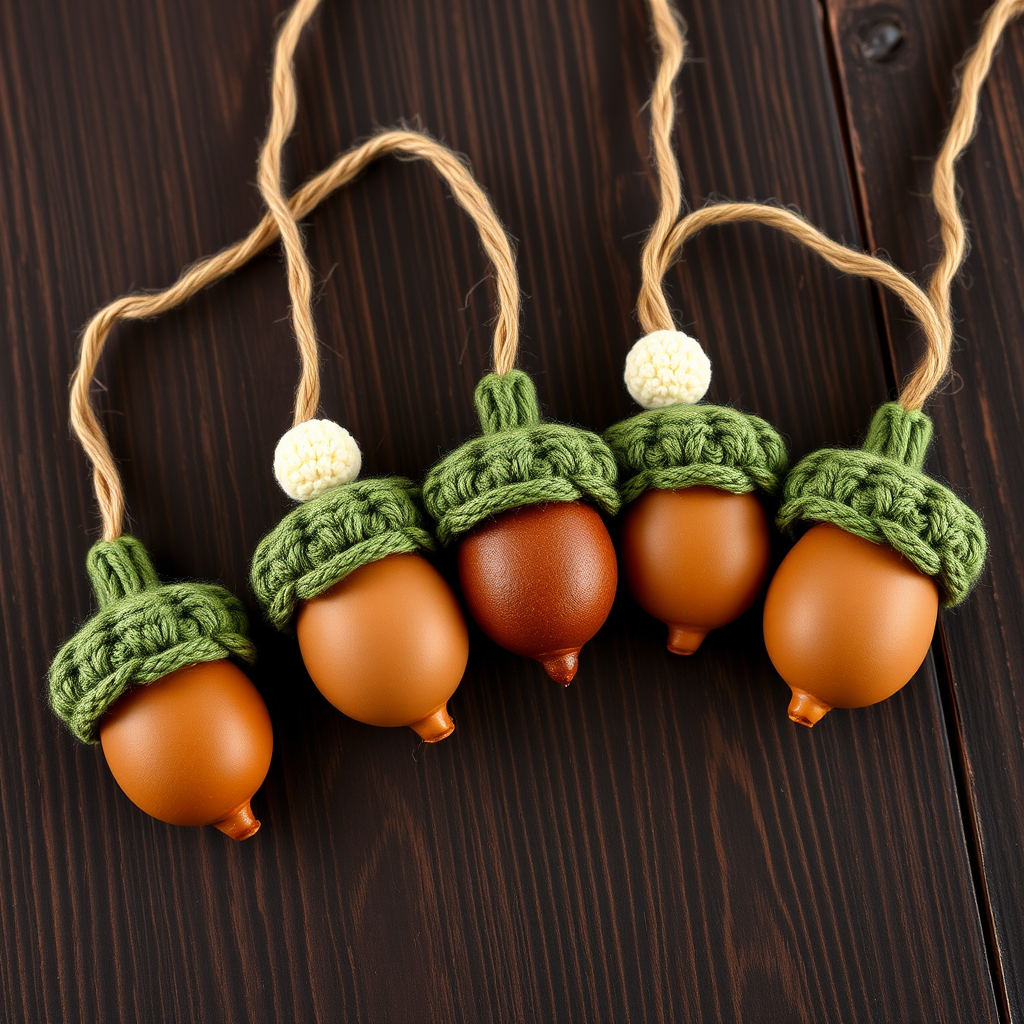
Bring the enchantment of a moonlit forest into your home with these knitted acorn fairy lights, each one a tiny, glowing treasure. This pattern guides you through creating a cozy, nature-inspired garland that casts a warm, magical glow. Perfect for adding a rustic, woodland touch to any room, this project is ideal for beginners and experienced knitters alike. The finished garland makes a thoughtful handmade gift or a delightful addition to your own seasonal decor.
Materials Needed
Before you begin, gather the following supplies. All items are readily available at craft stores or online.
- Yarn: Worsted weight yarn in earthy tones:
- Moss green (for acorn caps)
- Warm brown (for acorn bodies)
- Cream (for stems)
- Soft amber (optional, for a subtle glow accent)
- Knitting Needles: US Size 5 (3.75 mm) knitting needles
- Crochet Hook: US Size C/2 (2.75 mm) crochet hook for details
- Other Supplies:
- Yarn needle for seaming and weaving in ends
- Scissors
- 5 LED tea lights (battery-operated) or small fairy lights
- Natural twine or jute cord (about 3 feet for the garland)
Gauge: 5 stitches and 7 rows = 1 inch in stockinette stitch. Gauge is not critical for this project, but consistent tension is key to achieving uniform acorns.
Step-by-Step Instructions
This pattern creates a set of 5 knitted acorn covers, each with a removable LED tea light inside. The acorns are knitted flat and seamed, then embellished with crocheted details. Follow each section carefully for best results.
Acorn Cap (Make 5)
Using moss green yarn and knitting needles, cast on 12 stitches.
- Row 1 (RS): Knit all stitches.
- Row 2 (WS): Purl all stitches.
- Row 3: K2tog (knit two together), k8, k2tog — you now have 10 stitches.
- Row 4: Purl all stitches.
- Row 5: K2tog, k6, k2tog — you now have 8 stitches.
- Row 6: Purl all stitches.
- Row 7: K2tog, k4, k2tog — you now have 6 stitches.
- Row 8: Purl all stitches.
- Row 9: K2tog, k2, k2tog — you now have 4 stitches.
- Row 10: Purl all stitches.
Cut the yarn, leaving a long tail (about 8 inches). Thread the tail through the remaining 4 stitches on the needle, pull tight to gather, and secure with a knot. Sew the side seam to form a small, rounded cap. Weave in all loose ends.
Acorn Body (Make 5)
Using warm brown yarn, cast on 16 stitches.
- Row 1 (RS): Knit all stitches.
- Row 2 (WS): Purl all stitches.
- Row 3: K2tog, k12, k2tog — you now have 14 stitches.
- Row 4: Purl all stitches.
- Row 5: K2tog, k10, k2tog — you now have 12 stitches.
- Row 6: Purl all stitches.
- Row 7: K2tog, k8, k2tog — you now have 10 stitches.
- Row 8: Purl all stitches.
- Row 9: K2tog, k6, k2tog — you now have 8 stitches.
- Row 10: Purl all stitches.
- Row 11: K2tog, k4, k2tog — you now have 6 stitches.
- Row 12: Purl all stitches.
Cut the yarn, leaving a long tail (about 8 inches). Thread the tail through the remaining 6 stitches, pull tight to gather, and secure. Sew the side seam to form a rounded, plump body. Leave the top open (do not sew it closed). Weave in all loose ends.
Crocheted Stem (Make 5)
Using cream yarn and the crochet hook, make a magic ring.
- Round 1: Work 6 single crochet (sc) into the ring. Pull the ring tight to close.
- Round 2: Work 2 sc in each stitch around — you now have 12 sc.
- Round 3: Work 1 sc in each stitch around — you still have 12 sc.
Fasten off, leaving a long tail (about 6 inches) for sewing. This forms a small, flat disc that will sit on top of the acorn body, resembling a stem.
Assembly of Each Acorn
Follow these steps for each of the 5 acorns.
- Place a small LED tea light (or a battery-operated fairy light) inside the acorn body, with the light facing up. Ensure the light is centered and sits flat.
- Position the crocheted stem disc on top of the body, covering the opening. Sew it in place using the tail, stitching through the body's edge. Make sure the disc is secure but not too tight, so the light can still be removed if needed.
- Place the knitted acorn cap over the top of the body, covering the stem disc. The cap should fit snugly over the body. Sew the cap to the body with a few hidden stitches, using a matching green yarn thread. Ensure the stitches are not visible from the outside.
- Repeat for all 5 acorns.
Garland Assembly
Once all acorns are assembled, it's time to string them into a garland.
- Cut a length of natural twine or jute cord to your desired garland length (e.g., 3 feet). For a longer garland, adjust accordingly.
- Using a yarn needle, thread the twine through the top of each acorn cap, creating a small loop. Space the acorns evenly along the twine, about 6-8 inches apart.
- Tie a knot at each end of the twine to secure the acorns in place. Make sure the knots are tight so the acorns don't slide.
- Hang the garland along a shelf, mantel, or window. The warm light from the tea lights will shine through the knitted fabric, creating a cozy, magical glow.
Tips for Best Results
- Consistent Tension: Keep your knitting tension even throughout. This ensures all acorns are uniform in size and shape.
- Seaming: When sewing side seams, use a mattress stitch for an invisible finish. This will make your acorns look more polished.
- Light Placement: Test the LED tea light inside the body before sewing the stem disc. Make sure it fits comfortably and the light shines upward.
- Customization: Feel free to experiment with different yarn colors or add a small leaf shape to each acorn for extra charm.
Enjoy your handmade forest glow garland! It's a beautiful way to bring a touch of nature's magic into your home, and it makes a wonderful gift for loved ones who appreciate cozy, handmade decor.


