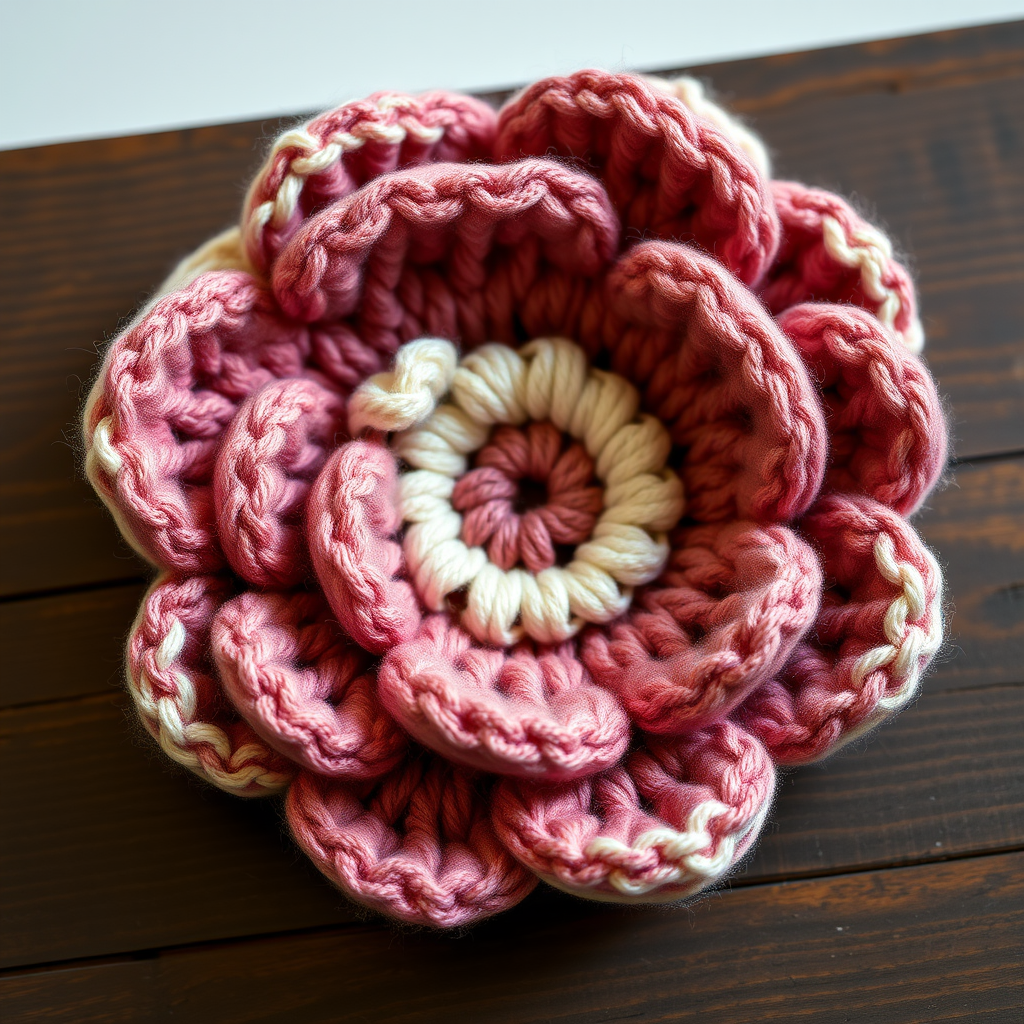
Luminous Lotus Bloom Pillow Free Pattern – Crochet a Plush Petal Cushion

Transform Your Space with the Luminous Lotus Bloom Pillow
Imagine sinking into a cloud of handcrafted petals, each one a testament to your creativity. The Luminous Lotus Bloom Pillow is more than just home decor—it's a statement piece that brings a serene, botanical elegance to any room. This oversized crochet cushion features the magical puff stitch, creating a tactile, dimensional surface that invites touch and admiration. Whether you're an experienced crocheter or a confident beginner ready for a rewarding project, this pattern will guide you through crafting a stunning centerpiece that looks like it belongs in a high-end boutique.
The beauty of this design lies in its construction: a soft cream center radiates outward into three layers of overlapping petals, transitioning from pale blush to deeper rose, all resting on a muted sage green base. The result is a gradient of color that mimics nature's own lotus flower, with each petal's pronounced, bumpy texture adding depth and visual interest. This pillow isn't just functional—it's a conversation starter, a cozy companion, and a daily reminder of the beauty you can create with your own hands.
Materials Needed for Your Lotus Pillow
Before diving into this delightful project, gather your supplies. The right materials make all the difference in achieving that plush, professional finish.
Yarn Requirements
- Main Color (MC) - Soft Blush Pink: Approximately 300g of bulky weight yarn for the outer petals
- Contrast Color 1 (CC1) - Warm Cream: Approximately 150g for the center and inner petals
- Contrast Color 2 (CC2) - Muted Sage Green: Approximately 150g for the base and backing
Total yarn needed: approximately 600g of bulky weight yarn. Choose a soft, matte-finish yarn for the best texture—acrylic or wool blends work beautifully.
Tools and Notions
- Crochet Hook: 6.0mm hook (or size needed to achieve gauge)
- Yarn Needle: For weaving in ends and sewing pieces together
- Stitch Markers: To track rounds and petal placement
- Stuffing: Polyester fiberfill or an 18-inch round pillow insert
Gauge Information
Gauge: 4 puff stitches x 4 rows = 4 inches in puff stitch pattern. While exact gauge isn't critical for this project, maintaining consistency ensures your petals are evenly shaped and your pillow lies flat. If your tension is tighter or looser, adjust your hook size accordingly.
Step-by-Step Instructions for Your Lotus Bloom Pillow
This pattern is worked in continuous spirals from the center outward, with each petal created separately and sewn onto the base. Don't worry—the process is straightforward, and I'll walk you through every detail. Let's begin!
Understanding the Puff Stitch (ps)
Before we start, master this essential stitch. The puff stitch creates that gorgeous, bumpy texture:
- Yarn over, insert hook into the indicated stitch
- Yarn over and pull up a loop (you'll have 3 loops on your hook)
- Repeat steps 1-2 three more times into the same stitch (you'll have 9 loops on your hook)
- Yarn over and pull through all 9 loops at once
- Chain 1 to close and secure the puff
Pro Tip: Keep your tension consistent when pulling up loops. If you pull too tightly, the puff will be stiff; too loosely, and it will look messy. Practice a few puffs before starting your project.
Part 1: Creating the Center Circle (CC1 - Warm Cream)
Round 1: Make a magic ring. Work 6 single crochet (sc) into the ring. Pull tight to close. (6 stitches)
Round 2: Work 2 sc in each stitch around. (12 stitches)
Round 3: *Work 1 ps in the next stitch, 1 sc in the next stitch.* Repeat from * to * around. (6 puffs, 6 sc)
Round 4: *Work 1 ps in the next stitch, 1 sc in the next stitch, 1 ps in the next stitch, 2 sc in the next stitch.* Repeat from * to * around. (12 puffs, 12 sc)
Round 5: *Work 1 ps in the next stitch, 1 sc in the next stitch.* Repeat from * to * around. (12 puffs, 12 sc)
Round 6: *Work 1 ps in the next stitch, 1 sc in the next stitch, 1 ps in the next stitch, 2 sc in the next stitch.* Repeat from * to * around. (18 puffs, 18 sc)
Rounds 7-8: *Work 1 ps in the next stitch, 1 sc in the next stitch.* Repeat from * to * around. (18 puffs, 18 sc each round)
Fasten off and weave in the end. Your center circle should measure approximately 6 inches in diameter.
Part 2: Creating the Petals (MC - Blush Pink)
You'll create 12 petals total—4 small, 4 medium, and 4 large. Each petal is worked flat, then sewn onto the center circle in overlapping layers.
Small Petals (Make 4)
Row 1: Chain 8. Work 1 ps in the 3rd chain from hook, 1 sc in the next chain, 1 ps in the next chain, 1 sc in the next chain, 1 ps in the next chain, 1 sc in the last chain. (3 puffs, 3 sc)
Row 2: Chain 1, turn. Work 1 sc in the first stitch, 1 ps in the next stitch, 1 sc in the next stitch, 1 ps in the next stitch, 1 sc in the next stitch, 1 ps in the next stitch, 1 sc in the last stitch. (3 puffs, 4 sc)
Row 3: Chain 1, turn. Work 1 sc in the first stitch, *1 ps in the next stitch, 1 sc in the next stitch.* Repeat from * to * across. (3 puffs, 4 sc)
Row 4: Chain 1, turn. Work 1 sc in the first stitch, 1 ps in the next stitch, 1 sc in the next stitch, 1 ps in the next stitch, 1 sc in the next stitch, 1 ps in the next stitch, 1 sc in the last stitch. (3 puffs, 4 sc)
Row 5: Chain 1, turn. Work 1 sc in the first stitch, *1 ps in the next stitch, 1 sc in the next stitch.* Repeat from * to * across. (3 puffs, 4 sc)
Row 6: Chain 1, turn. Work 1 sc in the first stitch, 1 ps in the next stitch, 1 sc in the next stitch, 1 ps in the next stitch, 1 sc in the next stitch, 1 ps in the next stitch, 1 sc in the last stitch. (3 puffs, 4 sc)
Fasten off, leaving a long tail for sewing. The petal should be approximately 4 inches long and 2.5 inches wide.
Medium Petals (Make 4)
Row 1: Chain 10. Work 1 ps in the 3rd chain from hook, 1 sc in the next chain, 1 ps in the next chain, 1 sc in the next chain, 1 ps in the next chain, 1 sc in the next chain, 1 ps in the next chain, 1 sc in the last chain. (4 puffs, 4 sc)
Row 2: Chain 1, turn. Work 1 sc in the first stitch, *1 ps in the next stitch, 1 sc in the next stitch.* Repeat from * to * across. (4 puffs, 5 sc)
Rows 3-7: Repeat Row 2. (4 puffs, 5 sc each row)
Row 8: Chain 1, turn. Work 1 sc in the first stitch, *1 ps in the next stitch, 1 sc in the next stitch.* Repeat from * to * across. (4 puffs, 5 sc)
Fasten off, leaving a long tail for sewing. The petal should be approximately 5.5 inches long and 3 inches wide.
Large Petals (Make 4)
Row 1: Chain 12. Work 1 ps in the 3rd chain from hook, 1 sc in the next chain, 1 ps in the next chain, 1 sc in the next chain, 1 ps in the next chain, 1 sc in the next chain, 1 ps in the next chain, 1 sc in the next chain, 1 ps in the next chain, 1 sc in the last chain. (5 puffs, 5 sc)
Row 2: Chain 1, turn. Work 1 sc in the first stitch, *1 ps in the next stitch, 1 sc in the next stitch.* Repeat from * to * across. (5 puffs, 6 sc)
Rows 3-9: Repeat Row 2. (5 puffs, 6 sc each row)
Row 10: Chain 1, turn. Work 1 sc in the first stitch, *1 ps in the next stitch, 1 sc in the next stitch.* Repeat from * to * across. (5 puffs, 6 sc)
Fasten off, leaving a long tail for sewing. The petal should be approximately 7 inches long and 3.5 inches wide.
Part 3: Creating the Base (CC2 - Sage Green)
Round 1: Make a magic ring. Work 6 sc into the ring. Pull tight to close. (6 stitches)
Round 2: Work 2 sc in each stitch around. (12 stitches)
Round 3: *Work 1 ps in the next stitch, 1 sc in the next stitch.* Repeat from * to * around. (6 puffs, 6 sc)
Round 4: *Work 1 ps in the next stitch, 1 sc in the next stitch, 1 ps in the next stitch, 2 sc in the next stitch.* Repeat from * to * around. (12 puffs, 12 sc)
Round 5: *Work 1 ps in the next stitch, 1 sc in the next stitch.* Repeat from * to * around. (12 puffs, 12 sc)
Round 6: *Work 1 ps in the next stitch, 1 sc in the next stitch, 1 ps in the next stitch, 2 sc in the next stitch.* Repeat from * to * around. (18 puffs, 18 sc)
Rounds 7-12: *Work 1 ps in the next stitch, 1 sc in the next stitch.* Repeat from * to * around. (18 puffs, 18 sc each round)
Rounds 13-14: Work 1 sc in each stitch around. (36 sc each round)
Fasten off, leaving a long tail for sewing. Your base should measure approximately 12 inches in diameter.
Part 4: Assembling Your Lotus Pillow
Now for the magical part—bringing your lotus to life! Follow these steps carefully for a beautiful, professional finish.
Step 1: Attach the Small Petals
Position the 4 small petals evenly around the center circle, spacing them about 90 degrees apart. The rounded bottom of each petal should overlap the edge of the center circle by about 1 inch. Using your yarn needle and the long tail from each petal, whip stitch the petals securely to the center circle. Weave in all ends.
Step 2: Attach the Medium Petals
Position the 4 medium petals between the small petals, creating a staggered, overlapping effect. These should sit slightly lower on the center circle, overlapping the small petals by about 0.5 inches. Sew them in place using the same whip stitch technique.
Step 3: Attach the Large Petals
Position the 4 large petals between the medium petals, again staggering for a natural, layered look. These will extend beyond the center circle, creating the outer bloom. Sew them securely in place.
Step 4: Create the Pillow Back
Using CC2 (sage green), create a second base circle identical to the one in Part 3. This will be the back of your pillow.
Step 5: Join the Front and Back
Place the front (with petals) and back (plain base) pieces together with right sides facing out. Using CC2 yarn and your crochet hook, work a round of single crochet through both layers, leaving a 6-inch opening for stuffing. Insert your pillow form or fiberfill, then continue crocheting to close the opening. Fasten off and weave in all ends.
Finishing Touches
Once your pillow is assembled, gently shape the petals with your hands, curling the outer ones slightly outward for that authentic lotus look. Give the whole pillow a gentle steam (if your yarn allows) to relax the stitches and enhance the texture.
Place your Luminous Lotus Bloom Pillow on your favorite chair, sofa, or bed, and enjoy the serene, handcrafted beauty you've created. Every time you see it, you'll remember the joy of making something truly special with your own two hands.
Care Instructions: Spot clean with a damp cloth and mild soap. Avoid machine washing to preserve the puff stitch texture. If needed, hand wash gently and lay flat to dry, reshaping petals while damp.
Happy crocheting, and may your home bloom with handmade beauty!