Lighthouse Stripe Crochet Phone Sleeve Free Pattern
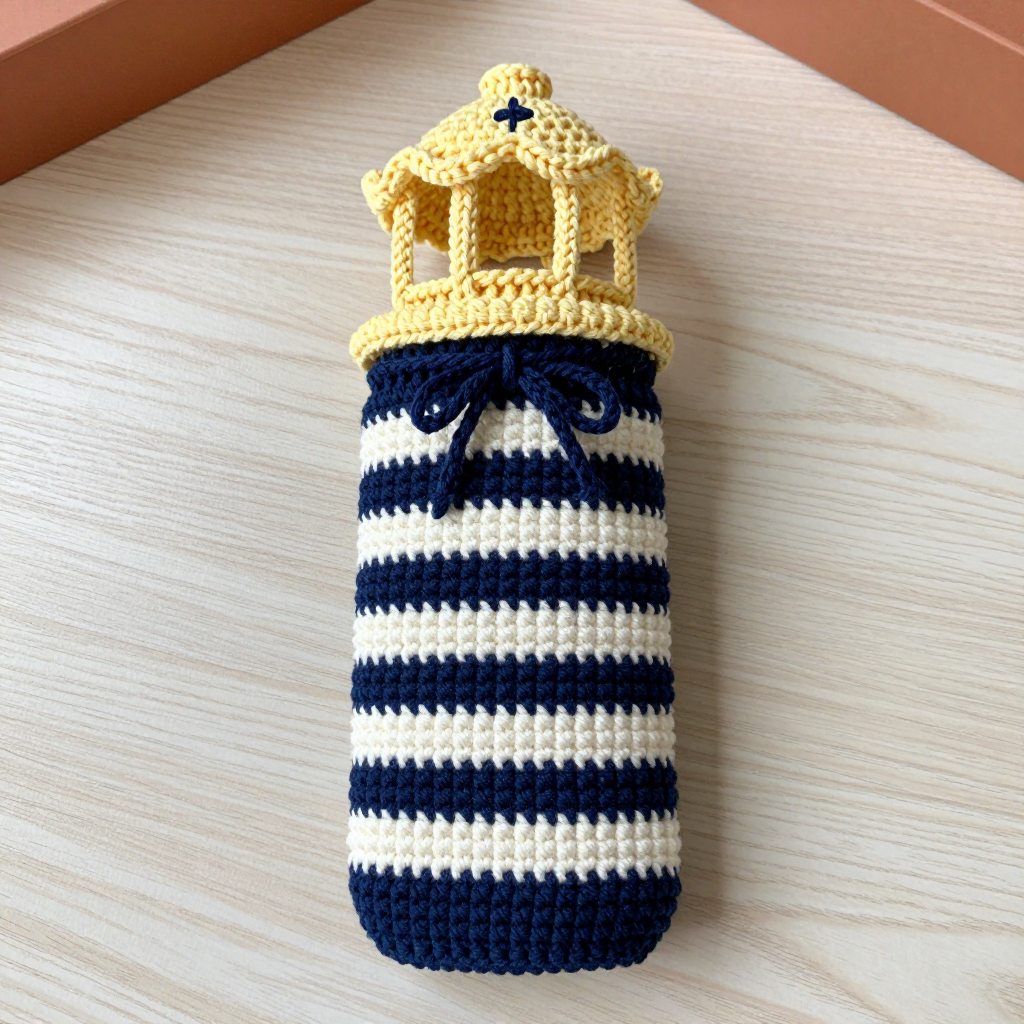
Lighthouse Stripe Crochet Phone Sleeve
If you have ever wanted to make something that looks like it came from a little coastal gift shop, this is it. The Lighthouse Stripe Crochet Phone Sleeve is a tapered, striped pouch that hugs your phone like a tiny lighthouse tower — complete with a butter-yellow lantern room cap and a navy drawstring bow. It is perfect for a first "real" project after you have learned the basic single crochet, because it is worked almost entirely in one simple stitch in the round. The finished sleeve is about 3.25 inches wide and 5.5 inches tall, dense and soft in fine cotton, with crisp navy and cream stripes and a gently flared yellow top. It feels sturdy enough to protect a phone in a bag, yet pretty enough to sit on your nightstand.
Materials Needed
- Yarn: Fine (2) weight cotton yarn. Sample used Knit Picks Comfy Fingering (75% Pima cotton, 25% acrylic; 218 yds/50 g) in Navy (approx 50 yds), Ivory (approx 40 yds), and Butter (approx 15 yds).
- Crochet hook: D/3 (3.25 mm) for the main body, and C/2 (2.75 mm) for the drawstring tie.
- Stitch marker: 1 (or a scrap of contrasting yarn) to mark the first stitch of each round.
- Tapestry needle: a blunt-tipped yarn needle for weaving in ends.
- Scissors: small, sharp craft scissors.
- Finished size: approx 3.25 inches (8.25 cm) wide at the base, tapering to approx 2.75 inches (7 cm) at the top, and 5.5 inches (14 cm) tall when laid flat.
Abbreviations and Beginner Glossary
- ch — chain. Make a slip knot, wrap yarn over hook, pull through the loop on your hook. That is one chain.
- sc — single crochet. Insert hook into stitch, yarn over, pull up a loop (2 loops on hook), yarn over, pull through both loops. One loop remains.
- 2 sc in next sc — work two single crochet stitches into the same stitch. This is an increase and makes the piece wider.
- sc2tog — single crochet two stitches together (a decrease). Insert hook into first stitch, yarn over, pull up a loop; insert hook into next stitch, yarn over, pull up a loop (3 loops on hook); yarn over, pull through all 3 loops. Two stitches become one.
- sl st — slip stitch. Insert hook into stitch, yarn over, pull through both the stitch and the loop on your hook in one motion. Used to join rounds.
- sts — stitches.
- magic ring — an adjustable loop you make with the yarn tail so you can pull the center hole closed tightly. If you prefer, chain 2 and work your first stitches into the first chain instead.
- back loop only (BLO) — each single crochet has two top loops (a front loop and a back loop). Working in the back loop only means you insert your hook under just the loop farther from you.
- round — one complete circle of stitches worked in the round (spiral), as opposed to a "row," which is worked back and forth.
- fasten off — cut the yarn a few inches from your work, then pull the tail all the way through the last loop to lock it.
- weave in ends — thread a yarn tail onto a tapestry needle and sew it back and forth through the inside of the fabric so it disappears.
Gauge
24 sc x 26 rounds = 4 inches (10 cm) in single crochet worked in the round with the D/3 (3.25 mm) hook.
Why gauge matters: Gauge is how many stitches and rounds fit into a set measurement. It tells you whether your finished sleeve will actually fit your phone. If your stitches are looser than the gauge, the sleeve will come out bigger; if tighter, smaller. Gauge is not critical for fit here (phones vary), but it does affect the final size.
How to make a gauge swatch: With your D/3 hook and navy yarn, make a magic ring, work 6 sc into it, then increase as in Rounds 2–6 below to make a small flat circle. Work a few more plain rounds. Measure across the middle: 24 stitches should measure about 4 inches. If you get more stitches than 24 in 4 inches, your tension is tight — try a larger hook. If fewer, try a smaller hook.
Beginner Tips Before You Start
- Use a stitch marker every single round. Because the sleeve is worked in a continuous spiral, the first stitch of each round moves. Clip a marker into the first stitch so you never lose your place.
- Do not pull your yarn too tight. Tension is the number one beginner struggle. Keep your loops relaxed and even; tight stitches make the fabric stiff and hard to work into.
- Change colors on the last stitch of the round. Work the final single crochet of the round until you have two loops on your hook, then drop the old color and pull the new color through to finish the stitch. This keeps the color change clean.
- Carry the unused color up the inside. Do not cut the yarn at every stripe. Let the color you are not using rest against the inside of the work and pick it up again when needed.
- Count your stitches at the end of every increase round. The stitch count in parentheses is your checkpoint. If it does not match, rip back that round and try again — it is much easier to fix now than later.
- Keep the base flat. After Round 8, lay the circle on a table. If it cups upward, your stitches are too tight; if it ripples, too loose.
Step-by-Step Instructions
Pattern Notes
- The sleeve is worked in continuous rounds (a spiral). Do not join unless the pattern tells you to. Use a stitch marker to mark the first stitch of each round.
- Stripe sequence: 4 rounds navy, 3 rounds cream, repeated. Begin with navy.
- Color changes are made on the last yarn-over of the final stitch of the round. Carry the unused color up the inside of the work.
Base (navy, D/3 hook)
Round 1: With navy, make a magic ring. Ch 1 (does not count as a stitch). Work 6 sc into the ring. Pull the tail to close the hole. Place a marker in the first sc. (6 sc)
Round 2: 2 sc in each sc around. (12 sc)
Round 3: [Sc in next sc, 2 sc in next sc] around. (18 sc)
Round 4: [Sc in next 2 sc, 2 sc in next sc] around. (24 sc)
Round 5: [Sc in next 3 sc, 2 sc in next sc] around. (30 sc)
Round 6: [Sc in next 4 sc, 2 sc in next sc] around. (36 sc)
Round 7: [Sc in next 5 sc, 2 sc in next sc] around. (42 sc)
Round 8: Sc in each sc around. (42 sc) The base circle should now measure about 3.25 inches across.
Body (tapered tower with stripes)
Round 9: Sc in each sc around. (42 sc) This begins the straight sides.
Rounds 10–12: Sc in each sc around, changing to cream on the last stitch of Round 12. (42 sc)
Rounds 13–15: With cream, sc in each sc around, changing to navy on the last stitch of Round 15. (42 sc)
Rounds 16–18: With navy, sc in each sc around, changing to cream on the last stitch of Round 18. (42 sc)
Rounds 19–21: With cream, sc in each sc around, changing to navy on the last stitch of Round 21. (42 sc)
Rounds 22–24: With navy, sc in each sc around, changing to cream on the last stitch of Round 24. (42 sc)
Rounds 25–27: With cream, sc in each sc around, changing to navy on the last stitch of Round 27. (42 sc)
Rounds 28–30: With navy, sc in each sc around. (42 sc)
Taper (narrowing the tower top)
Round 31: [Sc in next 5 sc, sc2tog] around. (36 sc)
Round 32: Sc in each sc around. (36 sc)
Round 33: [Sc in next 4 sc, sc2tog] around. (30 sc)
Round 34: Sc in each sc around. (30 sc)
Round 35: [Sc in next 3 sc, sc2tog] around. (24 sc)
Round 36: Sc in each sc around. (24 sc) Change to butter yellow on the last stitch of this round.
Lantern Room Cap (butter yellow)
Round 37: With butter yellow, sc in each sc around. (24 sc)
Round 38: [Sc in next 2 sc, 2 sc in next sc] around. (32 sc)
Round 39: Sc in each sc around. (32 sc)
Round 40: [Sc in next 3 sc, 2 sc in next sc] around. (40 sc)
Round 41: Sc in each sc around. (40 sc)
Round 42: [Sc in next 4 sc, 2 sc in next sc] around. (48 sc)
Round 43: Sc in each sc around. (48 sc)
Round 44: [Sc in next 5 sc, 2 sc in next sc] around. (56 sc)
Round 45: Sc in each sc around. (56 sc)
Round 46: [Sc in next 6 sc, 2 sc in next sc] around. (64 sc)
Round 47: Sc in each sc around. (64 sc) Do not fasten off.
Drawcord Channel
Round 48: Ch 1, turn. Working in back loops only: sc in each sc around. Join with sl st to first sc. (64 sc)
Round 49: Ch 1, turn. Working in both loops: sc in each sc around. Join with sl st to first sc. Fasten off butter yellow and weave in ends. (64 sc)
Drawcord Tie (navy)
With the C/2 (2.75 mm) hook and navy, leave a 4-inch tail. Ch 60. Fasten off, leaving a 4-inch tail. Thread one end through the channel created in Round 48, weaving in and out around the entire circumference. Tie the ends together in a small bow. Trim the tails to about 1 inch.
Assembly and Finishing
Weaving in ends: Thread each yarn tail onto your tapestry needle. Working on the inside of the sleeve, sew the tail back and forth through several stitches in different directions (not in a straight line, or it may pull out), then snip close to the fabric. Do this for every color change tail and the drawstring ends.
Seaming: There are no seams to sew! The sleeve is worked in one continuous piece, so the only "assembly" is threading the drawstring through the channel and tying the bow.
Blocking: Lightly mist the finished sleeve with cool water until damp but not soaking. Slip it over a cylindrical form — a small jar, a drinking glass, or a rolled-up towel — so it holds the tapered lighthouse shape. Smooth the stripes with your fingers and let it dry completely (several hours or overnight). Remove the form and your sleeve will keep its shape.
Optional beacon: With a scrap of navy yarn and your tapestry needle, add a tiny French knot at the center of the yellow cap to suggest a beacon light.
Pro Tips and Variations
- Change the colors: Swap navy and cream for charcoal and pale gray for a modern look, or use red and white for a classic candy-stripe lighthouse. Keep the butter-yellow cap for the signature lantern glow, or try a soft coral.
- Adjust the size: To fit a larger phone, add one more increase round to the base (Round 8 becomes [Sc in next 6 sc, 2 sc in next sc] = 48 sc) and work the body with 48 stitches, adding a few extra plain rounds before the taper. To make it smaller, stop the base at Round 7 (42 sc).
- Substitute yarn: Any fine (2) weight cotton or cotton-blend yarn will work. Avoid fuzzy or slippery yarns for your first attempt — smooth cotton shows the stripes most crisply and is easiest to work with.
- Make it a gift set: Work a second sleeve in reverse colors (cream body, navy cap) and pair them as a matching set for two phones — a sweet handmade present.


