Harvest Moon Candy Corn Pouch Free Pattern – Crochet with Autumn Glow Stripes
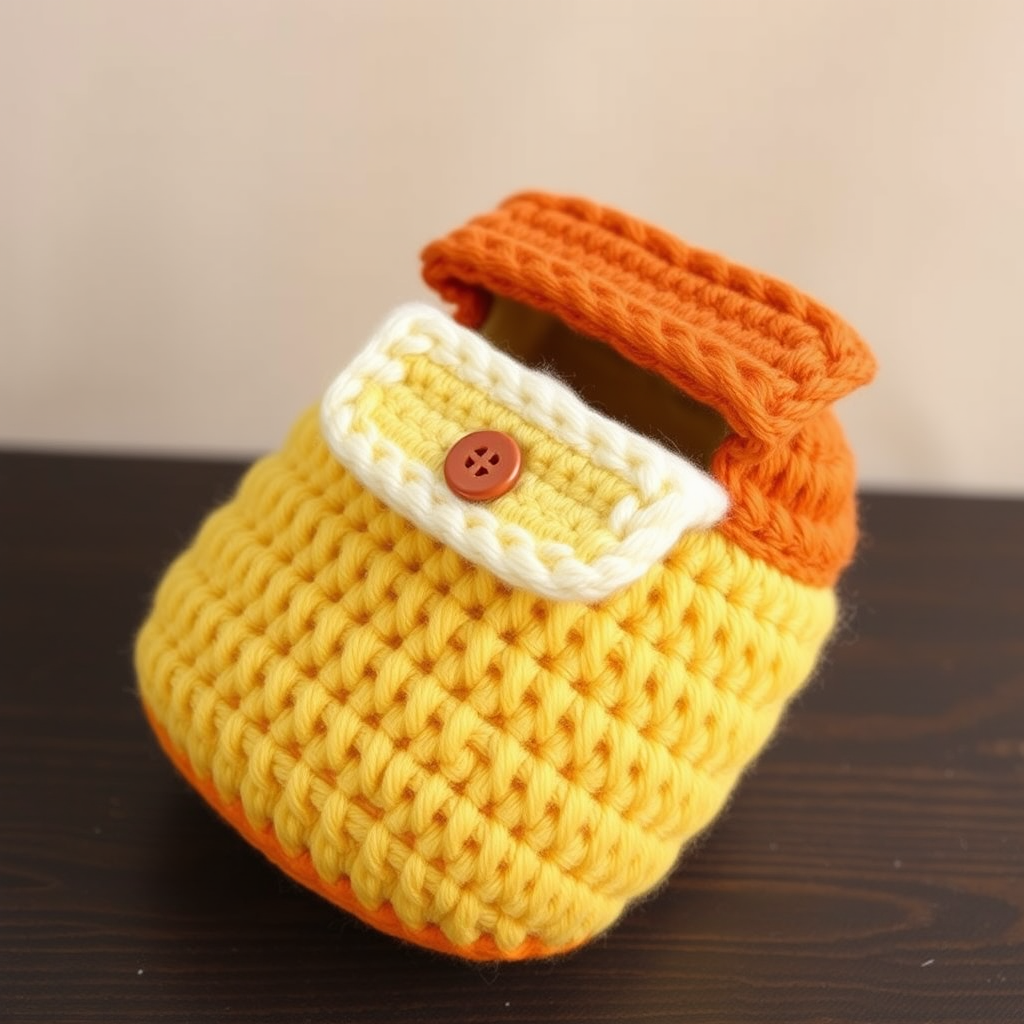
Harvest Moon Candy Corn Pouch Free Pattern – Crochet with Autumn Glow Stripes
There’s something undeniably magical about fall—the crisp air, the golden light, and the sweet nostalgia of candy corn. Now, imagine capturing that feeling in a soft, squishy, handmade pouch you can use for trinkets, jewelry, or as a festive gift. This Harvest Moon Candy Corn Pouch is the perfect beginner-friendly crochet project that blends cozy autumn vibes with a modern, textured twist.
With its warm cream, golden yellow, and burnt orange stripes, this little pouch looks like it was plucked straight from a harvest moon glow. It’s worked in a continuous spiral, so there are no bulky seams, and the simple single crochet stitches make it a relaxing, meditative project. Whether you’re new to amigurumi or a seasoned maker looking for a quick weekend make, this pattern is sure to become a seasonal favorite.
Let’s gather your supplies and get started on this adorable candy corn pouch that’s as fun to make as it is to use!
Materials Needed
Before you begin, make sure you have everything ready. Here’s your complete shopping list:
- Yarn: Worsted weight cotton or acrylic yarn in three colors:
- Color A: Warm cream (for the top)
- Color B: Golden yellow (for the middle)
- Color C: Burnt orange (for the bottom and flap)
- Crochet Hook: 3.5mm (E) crochet hook
- Yarn needle for weaving in ends and sewing the flap
- Stitch marker to keep track of your rounds
- Scissors
- Optional: Small button or snap for closure
Gauge: 4 inches = 16 sc and 18 rows in continuous spiral. (Gauge isn’t critical for this project, but keeping consistent tension will give you a neat, even fabric.)
Abbreviations
- MR: Magic ring
- sc: Single crochet
- inc: Increase (2 sc in same stitch)
- dec: Decrease (sc two stitches together)
- sl st: Slip stitch
- ch: Chain
Step-by-Step Instructions
This pattern is worked in a continuous spiral for the pouch body, which means you won’t join rounds unless noted. Use a stitch marker to mark the beginning of each round—it’s a lifesaver!
Pouch Body
Round 1: With Color A (cream), make a MR, work 6 sc into the ring. (6)
Round 2: Inc in each stitch around. (12)
Round 3: (Sc in next stitch, inc) repeat 6 times. (18)
Round 4: (Sc in next 2 stitches, inc) repeat 6 times. (24)
Round 5: (Sc in next 3 stitches, inc) repeat 6 times. (30)
Round 6: (Sc in next 4 stitches, inc) repeat 6 times. (36)
Round 7: (Sc in next 5 stitches, inc) repeat 6 times. (42)
Round 8: (Sc in next 6 stitches, inc) repeat 6 times. (48)
Rounds 9–12: Sc in each stitch around. (48)
Your cream section is complete. Now it’s time to switch to the golden yellow!
Switch to Color B (yellow):
Rounds 13–18: Sc in each stitch around. (48)
Beautiful! Now for the final color—burnt orange.
Switch to Color C (orange):
Rounds 19–24: Sc in each stitch around. (48)
Now we’ll start shaping the bottom of the pouch by decreasing. This will give it that classic candy corn taper.
Round 25: (Sc in next 6 stitches, dec) repeat 6 times. (42)
Round 26: (Sc in next 5 stitches, dec) repeat 6 times. (36)
Round 27: (Sc in next 4 stitches, dec) repeat 6 times. (30)
Round 28: (Sc in next 3 stitches, dec) repeat 6 times. (24)
Round 29: (Sc in next 2 stitches, dec) repeat 6 times. (18)
Round 30: (Sc in next stitch, dec) repeat 6 times. (12)
Round 31: Dec 6 times. (6)
Fasten off, leaving a long tail. Thread the tail through the front loops of the remaining 6 stitches, pull tight to close the hole, and weave in the end securely.
Flap
The flap is worked flat, back and forth in rows. This will fold over the top of your pouch to keep your treasures safe.
Row 1: With Color C (orange), ch 13, sc in the 2nd ch from the hook and across. (12)
Row 2: Ch 1, turn, sc in each stitch across. (12)
Rows 3–6: Repeat Row 2.
Fasten off, leaving a long tail for sewing.
Finishing Touches
Now it’s time to bring your candy corn pouch to life!
- Position the flap: Place the flap over the top of the pouch (the cream section). The flap should cover the opening, with the straight edge aligned with the back of the pouch.
- Sew the flap: Using your yarn needle and the long tail from the flap, sew the flap onto the back edge of the pouch. Leave the front open so you can easily tuck items inside.
- Add a closure (optional): Attach a small button or snap to the front of the pouch and the corresponding part of the flap. This adds a cute detail and keeps your pouch securely closed.
- Weave in all ends: Use your yarn needle to hide any remaining tails inside the pouch. Trim any excess yarn.
And there you have it—your very own Harvest Moon Candy Corn Pouch! It’s the perfect size for holding small treasures, and its soft, plush texture makes it irresistible to squeeze.
Pro Tips for a Perfect Finish
- Keep tension consistent: Try to keep your stitches even throughout. This will make the color transitions look crisp and clean.
- Use a stitch marker: Since you’re working in a spiral, it’s easy to lose your place. Mark the first stitch of each round and move it up as you go.
- Blocking (optional): If your pouch looks a little wonky, you can gently steam block it to even out the stitches. Just be careful with acrylic yarn—use a low heat setting.
- Customize it: Feel free to play with colors! Swap the cream for white, the yellow for a soft peach, or the orange for a deep rust. The possibilities are endless.
This pattern is a wonderful way to celebrate the season, whether you’re making it for yourself or as a handmade gift. It’s quick, satisfying, and the result is absolutely adorable. So grab your hook, cozy up with your favorite yarn, and let the harvest moon inspire your next creation!
Happy crocheting, and may your autumn be filled with warm stitches and sweet treats. 🍂🧶


