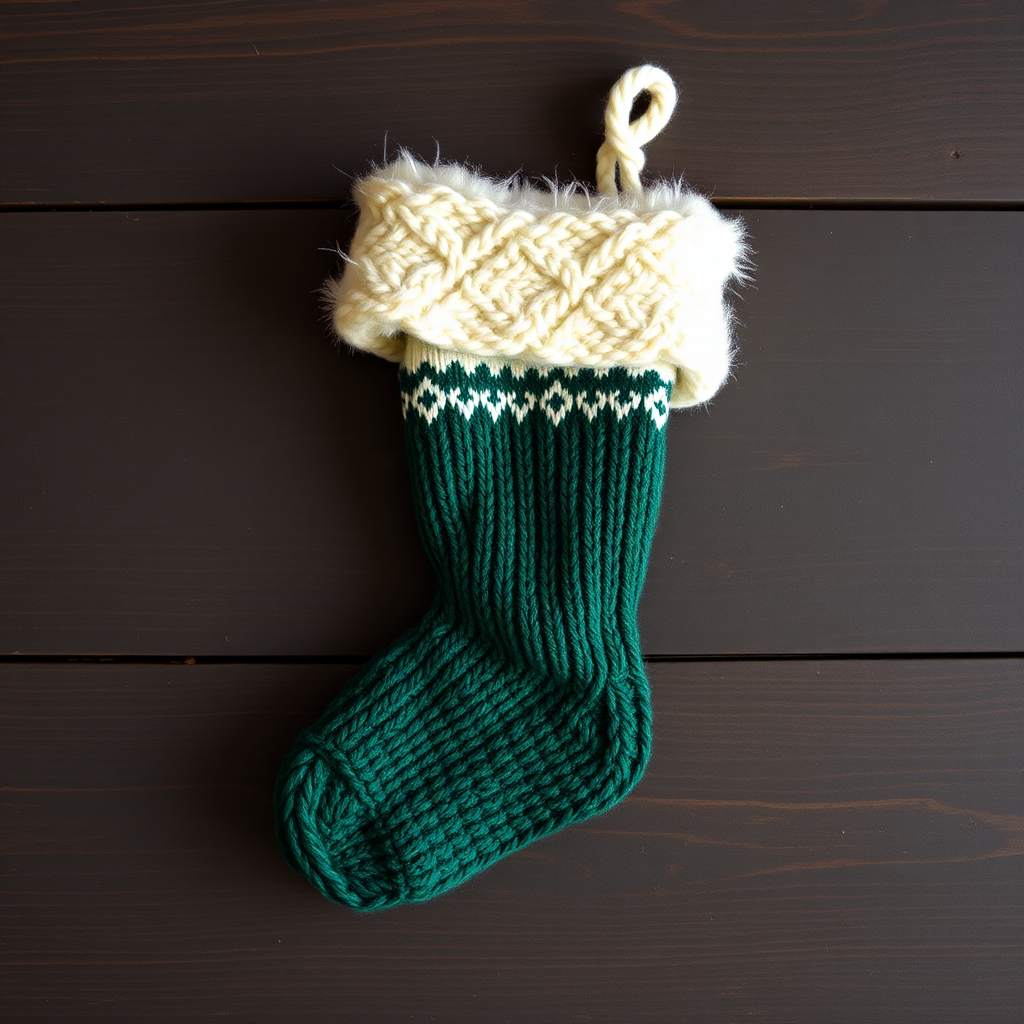
Frosted Evergreen Alpine Stocking Free Pattern – Knit a Nordic Winter Heirloom

Frosted Evergreen Alpine Stocking Free Pattern – Knit a Nordic Winter Heirloom
Wrap your mantel in the quiet magic of a snow-dusted forest with this textured Nordic stocking, knit in cozy worsted wool. The intricate cable-and-lattice design evokes heirloom craftsmanship while the plush folded cuff adds a modern, inviting touch. This pattern is perfect for intermediate knitters looking to create a stunning holiday centerpiece that will be treasured for generations.
Whether you're an experienced knitter or a confident beginner ready for a challenge, this stocking pattern delivers professional results. The deep forest green body with contrasting winter white cuff creates a classic Nordic palette that complements any holiday decor. Let's dive into creating this heirloom-quality piece!
Materials Needed
Before you begin, gather these essential supplies:
Yarn
- Main Color (MC): Worsted weight wool or wool-blend yarn – approximately 350-400 yards. Suggested: Cascade 220 in "Forest Heather"
- Contrast Color (CC): Worsted weight yarn – approximately 100 yards for cuff and trim. Suggested: Cascade 220 in "Winter White"
Needles and Tools
- US 7 (4.5 mm) circular needles, 16-inch length for body
- US 7 (4.5 mm) double-pointed needles for heel and toe
- Stitch markers (at least 4)
- Cable needle
- Tapestry needle for weaving in ends
- Stitch holder or waste yarn
Gauge
20 stitches and 28 rows = 4 inches in stockinette stitch (after blocking). Always check your gauge before starting to ensure proper sizing.
Step-by-Step Instructions
This stocking is worked from the cuff down to the toe in the round. The cuff is folded over after completion. All stitches are knitted unless noted. Stitch counts are given in brackets at key points.
Abbreviations
- k = knit
- p = purl
- k2tog = knit two together (decrease)
- ssk = slip, slip, knit (decrease)
- m1 = make one (increase)
- C4F = slip 2 stitches to cable needle, hold in front, knit 2, knit 2 from cable needle
- C4B = slip 2 stitches to cable needle, hold in back, knit 2, knit 2 from cable needle
- P2tog = purl two together
- st(s) = stitch(es)
- rnd = round
Cuff (Worked in the Round, Then Folded)
Step 1: With CC, cast on 64 stitches. Join in the round, being careful not to twist. Place marker for beginning of round.
Step 2: Work Rounds 1-12: *K2, P2* repeat to end. (This creates the ribbing for the cuff edge.)
Step 3: Round 13: *K2, P2* repeat to end, but increase 8 stitches evenly spaced (m1 after every 8th stitch) – you should now have 72 stitches.
Step 4: Rounds 14-20: Work in stockinette (knit every round) for 7 rounds. This will be the inside of the folded cuff.
Step 5: Round 21: *K2, P2* repeat to end. This creates the fold line for your cuff.
Step 6: Rounds 22-28: Work in stockinette for 7 rounds. This is the outside of the cuff.
Step 7: Round 29: *K2, P2* repeat to end, but decrease 8 stitches evenly (k2tog every 9th stitch) – back to 64 stitches.
Step 8: Switch to MC. The cuff is now complete; it will be folded later.
Leg (Worked in the Round)
Step 1: Round 1: *K8, P2* repeat to end (8 times).
Step 2: Round 2: *C4F, C4B, P2* repeat to end.
Step 3: Rounds 3-5: *K8, P2* repeat to end.
Step 4: Round 6: *C4B, C4F, P2* repeat to end.
Step 5: Rounds 7-9: *K8, P2* repeat to end.
Step 6: Repeat Rounds 2-9 for a total of 6 full pattern repeats (or until leg measures 12 inches from fold line, or desired length). End after a Round 9.
Heel Flap (Worked Back and Forth on Half the Stitches)
Step 1: The heel is worked over the first 32 stitches. Place the remaining 32 stitches on a holder or leave on the circular needle.
Step 2: Row 1 (RS): *Slip 1 purlwise, K1* repeat to end (32 stitches). Turn.
Step 3: Row 2 (WS): Slip 1 purlwise, purl to end. Turn.
Step 4: Repeat Rows 1-2 for 16 rows total (or 32 rows for a deeper heel). End with a WS row.
Turn Heel
Step 1: Row 1 (RS): K18, ssk, k1, turn. (Leave remaining stitches unworked)
Step 2: Row 2 (WS): Slip 1 purlwise, p5, p2tog, p1, turn.
Step 3: Row 3 (RS): Slip 1 purlwise, knit to 1 stitch before the gap, ssk (the stitch before the gap and the stitch after), k1, turn.
Step 4: Row 4 (WS): Slip 1 purlwise, purl to 1 stitch before the gap, p2tog (the stitch before the gap and the stitch after), p1, turn.
Step 5: Repeat Rows 3-4 until all heel stitches have been worked. You will end with 20 stitches on the needle after a WS row.
Gusset (Worked in the Round)
Step 1: With RS facing, knit across the 20 heel stitches. Pick up and knit 16 stitches along the left side of the heel flap. Place marker. Knit across the 32 instep stitches (which were on hold) in pattern (continue the cable/lattice pattern as established). Place marker. Pick up and knit 16 stitches along the right side of the heel flap. Knit the first 10 heel stitches to center of heel. You now have 84 stitches total.
Step 2: Round 1: Knit to 3 stitches before first marker, k2tog, k1, slip marker, work instep in pattern, slip marker, k1, ssk, knit to end.
Step 3: Round 2: Knit all stitches (instep in pattern).
Step 4: Repeat Rounds 1-2 until 64 stitches remain (decrease 2 stitches every other round).
Foot (Worked in the Round)
Step 1: Continue working in stockinette on the sole stitches and in the established pattern on the instep stitches until the foot measures 6 inches from the heel, or 2 inches less than desired total foot length.
Step 2: On the next round, discontinue the pattern on the instep and knit all stitches plain.
Toe Shaping
Step 1: Round 1: *K6, k2tog* repeat to end (56 stitches).
Step 2: Round 2: Knit all.
Step 3: Round 3: *K5, k2tog* repeat to end (48 stitches).
Step 4: Round 4: Knit all.
Step 5: Round 5: *K4, k2tog* repeat to end (40 stitches).
Step 6: Round 6: Knit all.
Step 7: Round 7: *K3, k2tog* repeat to end (32 stitches).
Step 8: Round 8: *K2, k2tog* repeat to end (24 stitches).
Step 9: Round 9: *K1, k2tog* repeat to end (16 stitches).
Step 10: Round 10: *K2tog* repeat to end (8 stitches).
Step 11: Cut yarn, thread through remaining stitches, pull tight, and weave in end.
Finishing
Step 1: Fold the cuff down at the fold line so the ribbed edge is on the outside. The stockinette section will be hidden inside.
Step 2: Sew a hanging loop: With CC, crochet a chain of 20 stitches, or knit an i-cord of 20 rows. Attach to the inside back of the cuff.
Step 3: Weave in all ends. Block gently to shape, being careful not to flatten the cables.
Pro Tips for Success
- Gauge matters: Always knit a swatch first. The cable pattern will pull in slightly, so check your gauge on the stockinette sections.
- Mark your place: Use locking stitch markers to track your pattern repeats in the leg section.
- Blocking: Blocking is essential for cables – it helps them open up and lie flat. Use a gentle steam block or wet block.
- Customization: Adjust the length by adding or removing pattern repeats in the leg section.
This Frosted Evergreen Alpine Stocking is more than just a holiday decoration – it's a family heirloom in the making. The timeless cable pattern and classic color palette ensure it will complement any holiday style for years to come. Happy knitting!