Cozy Cabin Christmas Stocking Free Pattern

Cozy Cabin Christmas Stocking Free Knitting Pattern
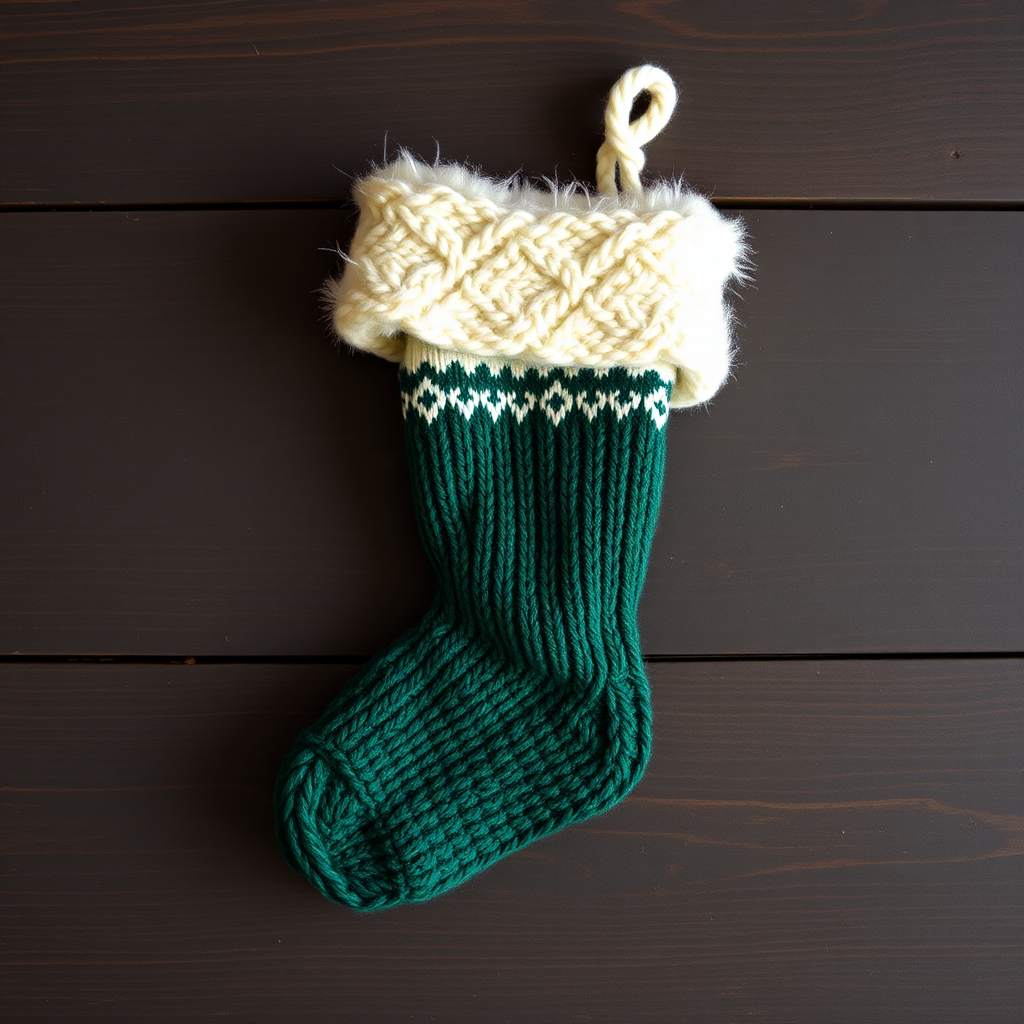
Bring the warmth of a rustic cabin fireplace into your holiday home with this stunning Cozy Cabin Christmas Stocking. This free knitting pattern creates a thick, textured stocking in a deep forest green, featuring a prominent braided cable running down the center and a plush, cream-colored faux fur cuff. The contrasting cream heel and toe add a classic, handcrafted touch that will make this stocking a cherished family heirloom for years to come. Whether you're an experienced knitter looking for a rewarding project or a confident beginner ready for a challenge, this pattern is designed to guide you through every step with clarity and ease.
This project is perfect for holiday decorating, gift-giving, or simply adding a cozy, handcrafted feel to your mantelpiece. The chunky yarn works up quickly, and the detailed instructions below ensure a flawless finish. Let's get started on creating a stocking that feels like a warm hug on a cold winter's night.
Materials Needed
Before you begin, gather all your materials to ensure a smooth knitting experience. This pattern calls for specific tools and yarns to achieve the perfect rustic look and durable finish.
Yarn
- Main Color (MC) - Forest Green: 2 skeins of worsted weight yarn (approx. 400 yards total). A hand-dyed or tweed yarn will enhance the rustic cabin aesthetic.
- Contrast Color (CC) - Cream: 1 skein of worsted weight yarn (approx. 200 yards total) for the heel, toe, and cuff. Choose a soft, fluffy yarn for the cuff to mimic faux fur, or use a standard cream worsted for a classic look.
Needles & Notions
- US 7 (4.5 mm) straight knitting needles for the main body.
- US 7 (4.5 mm) circular needle (16-inch length) for knitting the cuff in the round.
- Cable needle for the braided cable detail.
- Tapestry needle for seaming and weaving in ends.
- Stitch markers (optional, but helpful for tracking rows).
- Scissors
Gauge
20 stitches x 26 rows = 4 inches in stockinette stitch (knit on US 7 needles). Always knit a gauge swatch to ensure your stocking matches the intended size. If your gauge is off, adjust your needle size accordingly.
Step-by-Step Instructions
This stocking is knit flat from the top down in two pieces (front and back), then seamed together. The heel and toe are worked in the contrasting cream color, and the cuff is knit separately in the round and attached at the end. Follow these detailed instructions carefully for a professional, polished result.
Abbreviations
- K: Knit
- P: Purl
- St(s): Stitch(es)
- MC: Main Color (Forest Green)
- CC: Contrast Color (Cream)
- C4F: Cable 4 Front (slip 2 sts to cable needle, hold in front, K2, then K2 from cable needle)
- C4B: Cable 4 Back (slip 2 sts to cable needle, hold in back, K2, then K2 from cable needle)
- K2tog: Knit two stitches together (decrease)
- SSK: Slip, slip, knit (decrease)
- RS: Right side
- WS: Wrong side
Part 1: Knitting the Front Panel
Note: The front panel features the braided cable down the center. The stocking is worked from the top (cuff edge) down to the toe.
Cast On: With MC, cast on 40 stitches onto your straight needles.
Ribbing (Top Edge):
Row 1 (RS): K1, P1 across all 40 stitches.
Row 2 (WS): P1, K1 across all 40 stitches.
Repeat Rows 1 and 2 until the ribbing measures 1.5 inches from the cast-on edge. End with a WS row.
Set Up Cable Pattern:
Next Row (RS): K15 (left side), P2, K6 (cable section), P2, K15 (right side).
Next Row (WS): P15, K2, P6, K2, P15.
Repeat these two rows once more to establish the pattern.
Begin Cable Twists:
Row 1 (RS): K15, P2, C4F (slip 2 to cable needle, hold front, K2, K2 from cable needle), K2, P2, K15.
Row 2 (WS): P15, K2, P6, K2, P15.
Rows 3-6: Repeat Rows 1 and 2 twice more (working the cable section as K6 on RS rows, P6 on WS rows).
Row 7 (RS): K15, P2, K2, C4B (slip 2 to cable needle, hold back, K2, K2 from cable needle), P2, K15.
Row 8 (WS): P15, K2, P6, K2, P15.
Rows 9-12: Repeat Rows 7 and 8 twice more.
Continue alternating between the C4F and C4B twist patterns every 6 rows (with 4 plain rows in between) until the piece measures 8 inches from the cast-on edge, ending with a WS row.
Shape the Heel (worked in CC):
Switch to CC yarn.
Row 1 (RS): K across all 40 stitches.
Row 2 (WS): P across all 40 stitches.
Repeat these two rows until the heel section measures 3 inches from the color change, ending with a WS row. This forms the back of the heel.
Shape the Heel Turn (Short Rows):
Row 1 (RS): K24, SSK, K1, turn work (leaving remaining stitches unworked).
Row 2 (WS): Slip 1, P10, P2tog, P1, turn.
Row 3 (RS): Slip 1, K11, SSK, K1, turn.
Row 4 (WS): Slip 1, P12, P2tog, P1, turn.
Continue in this manner, working one more stitch before each decrease, until all stitches are worked. You will have 24 stitches remaining on the needle. End with a WS row.
Shape the Foot (MC):
Switch back to MC.
Row 1 (RS): K across all 24 stitches.
Row 2 (WS): P across all 24 stitches.
Repeat these two rows until the foot section measures 5 inches from the heel turn, ending with a WS row. This is the bottom of the foot.
Shape the Toe (CC):
Switch to CC yarn.
Row 1 (RS): K1, SSK, K to last 3 sts, K2tog, K1. (22 sts)
Row 2 (WS): P across all stitches.
Repeat Rows 1 and 2 until 10 stitches remain, ending with a WS row.
Final Row (RS): K2tog across all stitches (5 sts). Cut yarn, leaving a long tail. Thread tail through remaining stitches and pull tight to close the toe. Set aside.
Part 2: Knitting the Back Panel
The back panel is worked identically to the front, but without the cable pattern. It is simply stockinette stitch.
Cast On: With MC, cast on 40 stitches.
Ribbing: Work the same 1.5-inch ribbing as the front panel (K1, P1).
Body: Switch to stockinette stitch (K on RS, P on WS) and work until the piece measures 8 inches from the cast-on edge, ending with a WS row.
Heel: Switch to CC and work the heel and heel turn exactly as described for the front panel.
Foot: Switch to MC and work the foot section to the same length as the front panel.
Toe: Switch to CC and shape the toe exactly as described for the front panel. Cut yarn and close the toe.
Part 3: Seaming the Stocking
With the right sides facing each other, use a tapestry needle and MC yarn to whip stitch or mattress stitch the front and back panels together along the sides and bottom. Start at the top ribbing edge, sew down the side, around the toe, and up the other side. Leave the top edge open for the cuff. Turn the stocking right side out.
Part 4: Knitting the Cuff
The cuff is knit in the round using the circular needle and CC yarn. It is designed to be folded over for a plush, fluffy look.
Pick Up Stitches: With the circular needle and CC yarn, pick up and knit 40 stitches evenly around the top edge of the stocking.
Join in the round: Place a marker and join, being careful not to twist the stitches.
Ribbing: Work in K1, P1 ribbing for 4 inches.
Bind Off: Bind off loosely in pattern (K1, P1). Cut yarn and weave in the end.
Fold the cuff down over the stocking. The ribbing will naturally curl and create a cozy, rolled edge. If you used a fluffy yarn, it will resemble a faux fur trim.
Finishing Touches
- Weave in all loose ends with a tapestry needle.
- Block the stocking gently to even out the stitches and set the cable pattern. Lay flat to dry.
- For a hanging loop, cut a 6-inch piece of MC yarn, fold it in half, and sew the ends securely to the inside of the top back corner of the stocking.
Your Cozy Cabin Christmas Stocking is now complete! Admire the beautiful braided cable, the plush cream cuff, and the rustic charm it brings to your holiday decor. This stocking is sure to be a conversation piece and a beloved part of your family's Christmas traditions for years to come. Happy knitting!