Enchanted Harvest Guardian Pumpkin Free Pattern – A Crocheted Forest Spirit
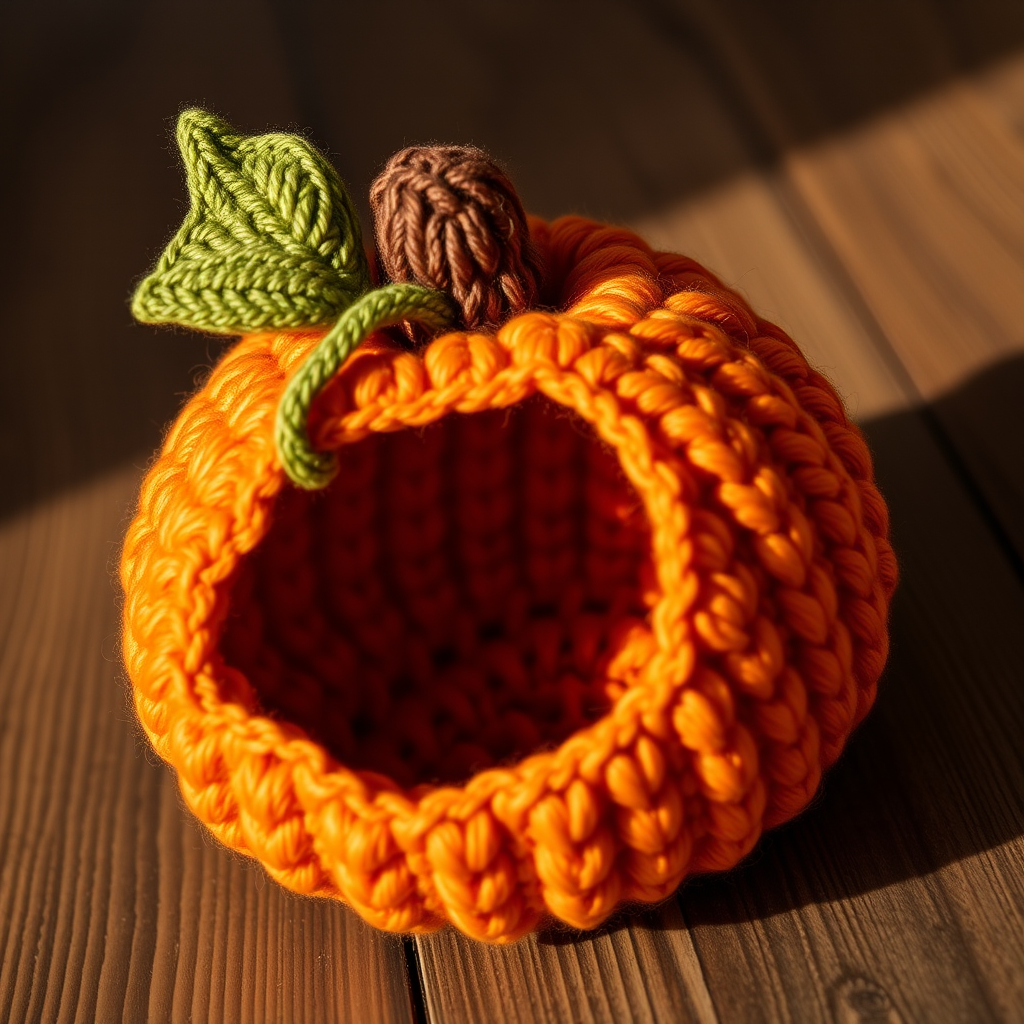
Enchanted Harvest Guardian Pumpkin – A Whimsical Crochet & Knit Project
Welcome to a magical crafting journey! Today, we're bringing the Enchanted Harvest Guardian Pumpkin to life—a whimsical amigurumi that blends the art of crochet with a touch of knitting. This isn't your average fall decoration; it's a forest spirit with a textured, linked-crochet body and a cozy, hand-knitted leaf-and-vine crown. The earthy moss and burnt amber tones make it a perfect autumnal accent for your shelf, mantel, or as a heartfelt handmade gift. Whether you're a seasoned maker or a curious beginner, this pattern is designed to be your trusted guide. Let's gather our materials and bring this little guardian to life!
Materials Needed
Before we dive into the magic, let's ensure you have everything you need. This project is wonderfully portable and uses simple, accessible materials.
- Yarn: Worsted weight cotton or acrylic blend (e.g., Lion Brand 24/7 Cotton) in three colors:
- Moss Green (for the leaf and vine)
- Burnt Orange (for the pumpkin body)
- Cream (for the optional face embroidery)
- Brown (small amount for the stem)
- Crochet Hook: Size G/6 (4.0 mm) for the pumpkin body and stem.
- Knitting Needles: Size US 6 (4.0 mm) for the knitted leaf and vine.
- Yarn Needle: For sewing pieces together and weaving in ends.
- Stuffing: Polyester fiberfill or your preferred amigurumi stuffing.
- Stitch Marker (optional): To help keep track of your rounds.
Note on Gauge: Gauge is not critical for amigurumi, but aim for tight stitches to prevent the stuffing from showing through. A good rule of thumb is approximately 4 single crochets (sc) per inch.
Step-by-Step Instructions
Let's break this down into manageable sections. We'll start with the pumpkin body, then create the stem, and finish with the charming knitted leaf and vine. Take your time, enjoy the process, and don't be afraid to refer back to this guide.
Part 1: The Pumpkin Body (Linked Single Crochet – LSC)
The linked single crochet (LSC) stitch creates a beautiful, dense, and textured fabric—perfect for amigurumi. If you're new to this stitch, here's a quick refresher: Insert your hook into the horizontal bar of the previous stitch (instead of the top loop), yarn over, pull up a loop, then complete the stitch as a normal single crochet. This creates a lovely, woven-like texture.
Round 1: With Burnt Orange yarn, make a magic ring. Work 6 single crochet (sc) into the ring. Pull the tail tight to close the ring. (6 stitches)
Round 2: Work 2 LSC in each stitch around. (12 stitches)
Round 3: *LSC in the next stitch, 2 LSC in the next stitch*; repeat from * to * around. (18 stitches)
Round 4: *LSC in the next 2 stitches, 2 LSC in the next stitch*; repeat from * to * around. (24 stitches)
Round 5: *LSC in the next 3 stitches, 2 LSC in the next stitch*; repeat from * to * around. (30 stitches)
Round 6: *LSC in the next 4 stitches, 2 LSC in the next stitch*; repeat from * to * around. (36 stitches)
Rounds 7–12: LSC in each stitch around. (36 stitches) – This creates the pumpkin's height. Work these rounds evenly, and your piece will begin to form a bowl shape.
Round 13 (Decrease): *LSC in the next 4 stitches, LSC2tog (linked single crochet 2 together)*; repeat from * to * around. (30 stitches)
Round 14: *LSC in the next 3 stitches, LSC2tog*; repeat from * to * around. (24 stitches)
Round 15: *LSC in the next 2 stitches, LSC2tog*; repeat from * to * around. (18 stitches) – Begin stuffing the pumpkin firmly. You want it to be plump and hold its shape well.
Round 16: *LSC in the next stitch, LSC2tog*; repeat from * to * around. (12 stitches) – Continue stuffing until the pumpkin is full and firm.
Round 17: LSC2tog around. (6 stitches) – Fasten off, leaving a long tail (about 12 inches). Thread the tail through a yarn needle, weave it through the front loops of the remaining 6 stitches, pull tight to close the hole, and secure with a knot. Weave in the end.
Part 2: Creating the Pumpkin Ridges (Optional but Recommended)
This step gives your pumpkin its classic, segmented look. It's simple and adds so much character.
- Cut a long strand of Burnt Orange yarn (about 24 inches). Thread it onto your yarn needle.
- Insert the needle from the bottom center of the pumpkin to the top center, pulling the yarn through.
- Now, wrap the yarn around the outside of the pumpkin, pulling gently to create an indentation. Bring the needle back through the center from top to bottom.
- Repeat this process to create 6–8 vertical indentations, spacing them evenly around the pumpkin. Pull gently to shape the segments, creating that beautiful, classic pumpkin look. Secure the yarn at the bottom and weave in the ends.
Part 3: The Stem (Crochet)
Now for the little brown stem that sits proudly on top.
- With Brown yarn, make a magic ring and work 6 sc into it. Pull tight. (6 stitches)
- Work even (1 sc in each stitch) for 5 rounds. This will create a small, sturdy tube.
- Fasten off, leaving a tail for sewing. Stuff the stem lightly if desired, then sew it onto the top center of the pumpkin, right where your ridges converge.
Part 4: The Knitted Leaf and Vine
This is where we bring in the knitting needles! This part is simple and creates a beautiful, organic look.
Knitted Leaf:
- With Moss Green yarn and your knitting needles, cast on 3 stitches.
- Row 1: Knit all stitches.
- Row 2: K1, yarn over (yo), k1, yo, k1. (5 stitches)
- Row 3: Knit all stitches.
- Row 4: K2, yo, k1, yo, k2. (7 stitches)
- Row 5: Knit all stitches.
- Row 6: K3, yo, k1, yo, k3. (9 stitches)
- Row 7: Knit all stitches.
- Row 8: K4, yo, k1, yo, k4. (11 stitches)
- Row 9: Knit all stitches.
- Row 10 (Decrease): K2tog (knit 2 together), k7, k2tog. (9 stitches)
- Row 11: Knit all stitches.
- Row 12: K2tog, k5, k2tog. (7 stitches)
- Row 13: Knit all stitches.
- Row 14: K2tog, k3, k2tog. (5 stitches)
- Row 15: Knit all stitches.
- Row 16: K2tog, k1, k2tog. (3 stitches)
- Row 17: K3tog (knit 3 together) – fasten off. This creates a lovely, pointed leaf.
Knitted Vine:
- Cast on 3 stitches with Moss Green yarn.
- Knit in I-cord for 6 inches. (If you're unfamiliar with I-cord, it's simply knitting back and forth on these 3 stitches without turning your work—just slide the stitches to the other end of the needle and knit again.)
- Bind off. This will create a curly, vine-like cord.
Assembly: Sew the leaf and vine to the top of the pumpkin, curling the vine around the stem for a whimsical, forest-like look.
Part 5: The Face (Optional)
To give your guardian a bit of personality, you can embroider a simple face.
- Using Cream yarn and a yarn needle, embroider two simple triangle eyes and a small smile onto the front of the pumpkin. Or, leave it plain for a classic, elegant look. The choice is yours!
And there you have it—your very own Enchanted Harvest Guardian Pumpkin! This project is a wonderful way to combine crochet and knitting into one charming piece. It's perfect for gifting, decorating, or simply enjoying the satisfaction of creating something magical with your own hands. Happy crafting, and may your harvest be ever enchanted!


