Drowsy Dewdrop Teether Lovey Free Pattern – Crochet a Cloud-Soft Sleepy Bear
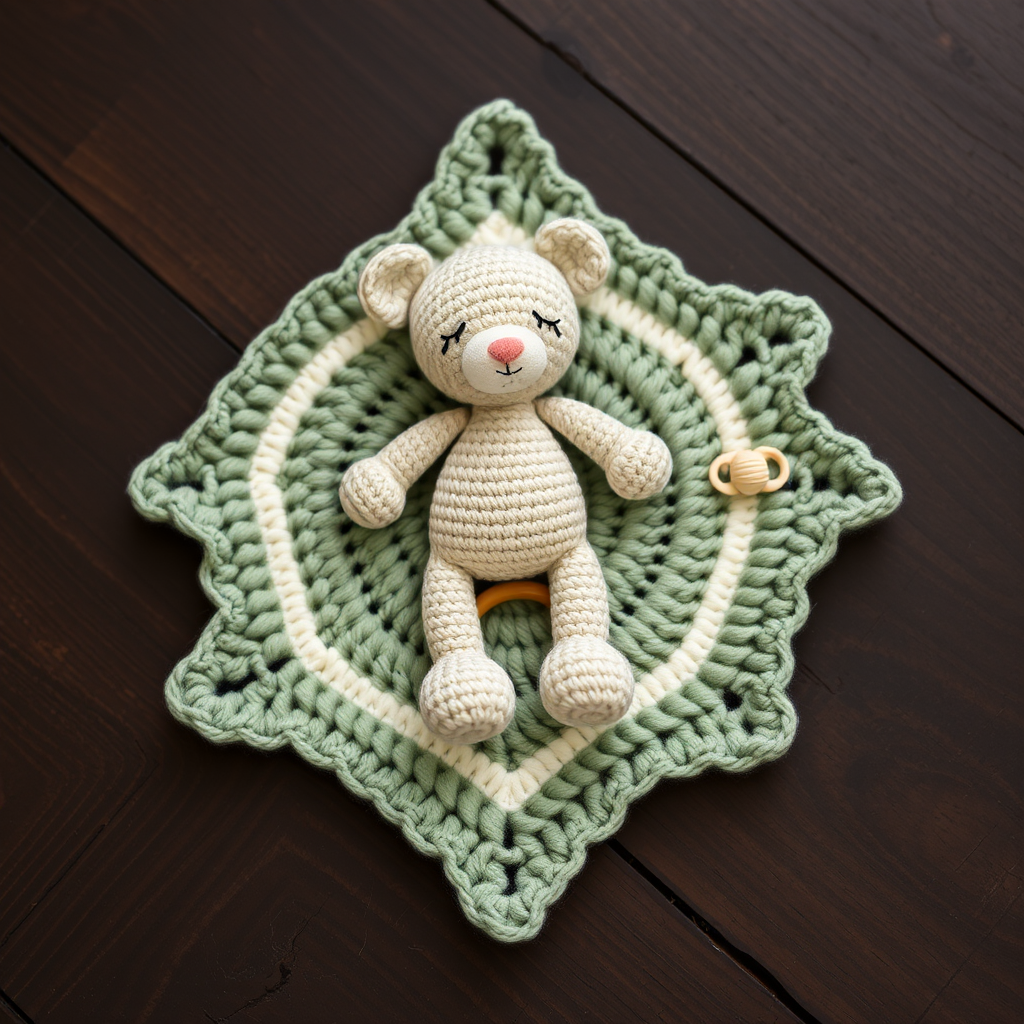
Introducing the Drowsy Dewdrop Teether Lovey: A Cloud-Soft Sleepy Bear
There is something truly magical about creating a handmade heirloom for a little one. The Drowsy Dewdrop Teether Lovey is more than just a crochet pattern—it's a gentle embrace, a nap-time companion, and a practical teething aid all wrapped into one adorable package. This pattern blends the cozy texture of soft cotton yarn with a silky satin trim and a wooden teether ring, creating a sensory-rich experience that babies adore.
Designed with a muted sage green lovey square and a sweet sleepy bear at its center, this project is perfect for intermediate beginners ready to try their hand at amigurumi. The bear's closed eyes and dusty blush muzzle give it a serene, dreamy expression that will soothe both baby and parents alike. Whether you're crafting a baby shower gift or adding to your nursery decor, this heirloom-quality pattern is sure to become a treasured keepsake.
In this comprehensive guide, I'll walk you through every step—from gathering your materials to stitching the final details—so you can create this cloud-soft lovey with confidence and joy.
Materials Needed
Before you begin, gather the following supplies. Having everything ready will make your crochet session smooth and enjoyable.
Yarn
- Worsted weight cotton or cotton-blend yarn in three colors:
- Soft sage green (for the lovey square)
- Warm cream (for the bear and border)
- Dusty blush (for the muzzle and small details)
- Approximately 200g total of yarn
Hooks and Tools
- 3.5mm (E) crochet hook for the bear and lovey
- 2.5mm (C) crochet hook for small details and the teether ring
- Stitch markers (essential for tracking continuous spiral rounds)
- Yarn needle for sewing and weaving in ends
- Scissors
- Polyester fiberfill stuffing
- Black or dark brown embroidery yarn for the face details
- Satin ribbon (approx. 1.5 inches wide) for the trim
- Wooden teether ring (optional, but recommended)
Gauge
4 inches = 16 single crochet stitches and 18 rows in single crochet. While gauge isn't critical for this pattern, maintaining consistent tension will help your lovey look polished and professional.
Step-by-Step Instructions
This pattern is worked in continuous spirals unless otherwise noted. Always use a stitch marker to track your rounds—this is crucial for amigurumi projects!
Part 1: The Sleepy Bear Head (in Cream)
Let's start with the centerpiece—the adorable sleepy bear head.
Round 1: Create a magic ring, then work 6 single crochet (sc) into the ring. (6 stitches)
Round 2: Increase (inc) in each stitch around. (12 stitches)
Round 3: (Sc in next stitch, inc) repeat around. (18 stitches)
Round 4: (Sc in next 2 stitches, inc) repeat around. (24 stitches)
Round 5: (Sc in next 3 stitches, inc) repeat around. (30 stitches)
Round 6: (Sc in next 4 stitches, inc) repeat around. (36 stitches)
Rounds 7-12: Sc in each stitch around for 6 rounds. (36 stitches)
Round 13: (Sc in next 4 stitches, decrease) repeat around. (30 stitches)
Round 14: (Sc in next 3 stitches, decrease) repeat around. (24 stitches)
Round 15: (Sc in next 2 stitches, decrease) repeat around. (18 stitches)
Now is the time to stuff the head firmly with fiberfill. Make sure it's packed well but not so tight that it distorts the shape.
Round 16: (Sc in next stitch, decrease) repeat around. (12 stitches)
Round 17: Decrease around. (6 stitches)
Fasten off, leaving a long tail. Weave the tail through the remaining stitches and pull tight to close the opening. Weave in the end securely.
Part 2: Ears (Make 2, in Cream)
These sweet little ears will give your bear its signature charm.
Round 1: Magic ring, 6 sc in ring. (6 stitches)
Round 2: Increase in each stitch around. (12 stitches)
Round 3: (Sc in next stitch, inc) repeat around. (18 stitches)
Fasten off, leaving a long tail for sewing. Fold each ear flat and sew to the head at approximately Rounds 4-6, positioning them symmetrically on either side of the head.
Part 3: Muzzle and Face Details (in Cream and Dusty Blush)
The muzzle gives your bear its sweet, sleepy expression.
Round 1: Magic ring, 6 sc in ring. (6 stitches)
Round 2: Increase in each stitch around. (12 stitches)
Round 3: (Sc in next stitch, inc) repeat around. (18 stitches)
Fasten off, leaving a tail for sewing.
Face Embroidery: Using dusty blush yarn, embroider a small triangle nose at the center of the muzzle. Then, using black or dark brown yarn, create a closed sleepy eye line on each side of the muzzle. These should be gentle curved lines that slope downward, giving the bear its drowsy expression.
Sew the muzzle to the center of the head, positioning it below where the eyes will be. The muzzle should sit slightly lower than the midpoint of the face.
Part 4: Body (in Cream)
Now let's create the bear's body.
Round 1: Magic ring, 6 sc in ring. (6 stitches)
Round 2: Increase in each stitch around. (12 stitches)
Round 3: (Sc in next stitch, inc) repeat around. (18 stitches)
Round 4: (Sc in next 2 stitches, inc) repeat around. (24 stitches)
Rounds 5-8: Sc in each stitch around for 4 rounds. (24 stitches)
Round 9: (Sc in next 2 stitches, decrease) repeat around. (18 stitches)
Round 10: Sc in each stitch around. (18 stitches)
Stuff lightly—the body should be softer than the head. Fasten off, leaving a tail for sewing. Sew the head to the body, making sure the seam is hidden.
Part 5: Arms (Make 2, in Cream)
These little arms will eventually "hug" the lovey square.
Round 1: Magic ring, 6 sc in ring. (6 stitches)
Round 2: Increase in each stitch around. (12 stitches)
Rounds 3-5: Sc in each stitch around for 3 rounds. (12 stitches)
Round 6: (Sc in next stitch, decrease) repeat around. (8 stitches)
Stuff lightly. Fasten off, leaving a tail for sewing. Set aside.
Part 6: Legs (Make 2, in Cream)
These will anchor the bear to the bottom corners of the lovey.
Round 1: Magic ring, 6 sc in ring. (6 stitches)
Round 2: Increase in each stitch around. (12 stitches)
Rounds 3-4: Sc in each stitch around for 2 rounds. (12 stitches)
Round 5: (Sc in next stitch, decrease) repeat around. (8 stitches)
Stuff lightly. Fasten off, leaving a tail for sewing.
Part 7: The Lovey Square (in Sage Green)
This is the comforting blanket portion of your lovey. It's worked in rows, not spirals.
Foundation: Chain (ch) 41.
Row 1: Sc in the 2nd chain from the hook and across. (40 stitches). Chain 1, turn.
Rows 2-40: Sc in each stitch across. (40 stitches). Chain 1, turn at the end of each row.
Fasten off. This creates a 10x10 inch square. Weave in the ends.
Part 8: Lovey Border (in Cream)
Adding a border gives your lovey a polished, finished look.
Attach cream yarn to any corner of the square. Work single crochet evenly around all four edges, placing 3 sc in each corner to ensure the corners lay flat. Join with a slip stitch to the first sc. Fasten off and weave in the ends.
Part 9: Satin Trim
The satin trim adds a luxurious, sensory element that babies love to rub.
Cut a piece of satin ribbon (approximately 1.5 inches wide) to fit around the lovey edge. Sew the ribbon to the back of the lovey, leaving the front visible. Alternatively, you can iron-on hem the ribbon for a cleaner finish. If you prefer a softer look, you can skip the satin and crochet a simple edging with cream yarn instead.
Part 10: Teether Ring (in Cream)
This ring will hold the wooden teether (not included).
Using the 2.5mm hook and cream yarn, chain 30. Slip stitch to form a ring. Work 2 rounds of single crochet around the ring. Fasten off. Attach the ring securely to the top corner of the lovey with a few firm stitches, ensuring it can withstand gentle pulling.
Part 11: Assembly
Now for the fun part—bringing it all together!
- Sew the bear's head to the center of the lovey square. Make sure it's positioned evenly.
- Attach the arms to the top corners of the lovey, so they appear to be hugging the square from above.
- Attach the legs to the bottom corners of the lovey, completing the hugging pose.
- Weave in all ends carefully, making sure no loose threads are visible.
- Block gently if needed to even out the stitches and give your lovey a professional finish.
Final Thoughts
Congratulations! You've just created a beautiful, heirloom-quality Drowsy Dewdrop Teether Lovey. This project is perfect for baby showers, first birthdays, or simply as a special gift for a little one you love. The combination of soft cotton, satin trim, and the gentle sleepy bear makes this a truly unique and cherished item.
Remember, the beauty of handmade items lies in their imperfections—each stitch carries your love and care. Don't be afraid to customize the colors to match a nursery theme or add your own personal touches. Happy crocheting, and may your little one enjoy many peaceful naps with their new cloud-soft companion!


