Cranberry Glow Striped Stockings Knitting Pattern – Free Pattern
Cranberry Glow Striped Stockings Knitting Pattern – Free Pattern
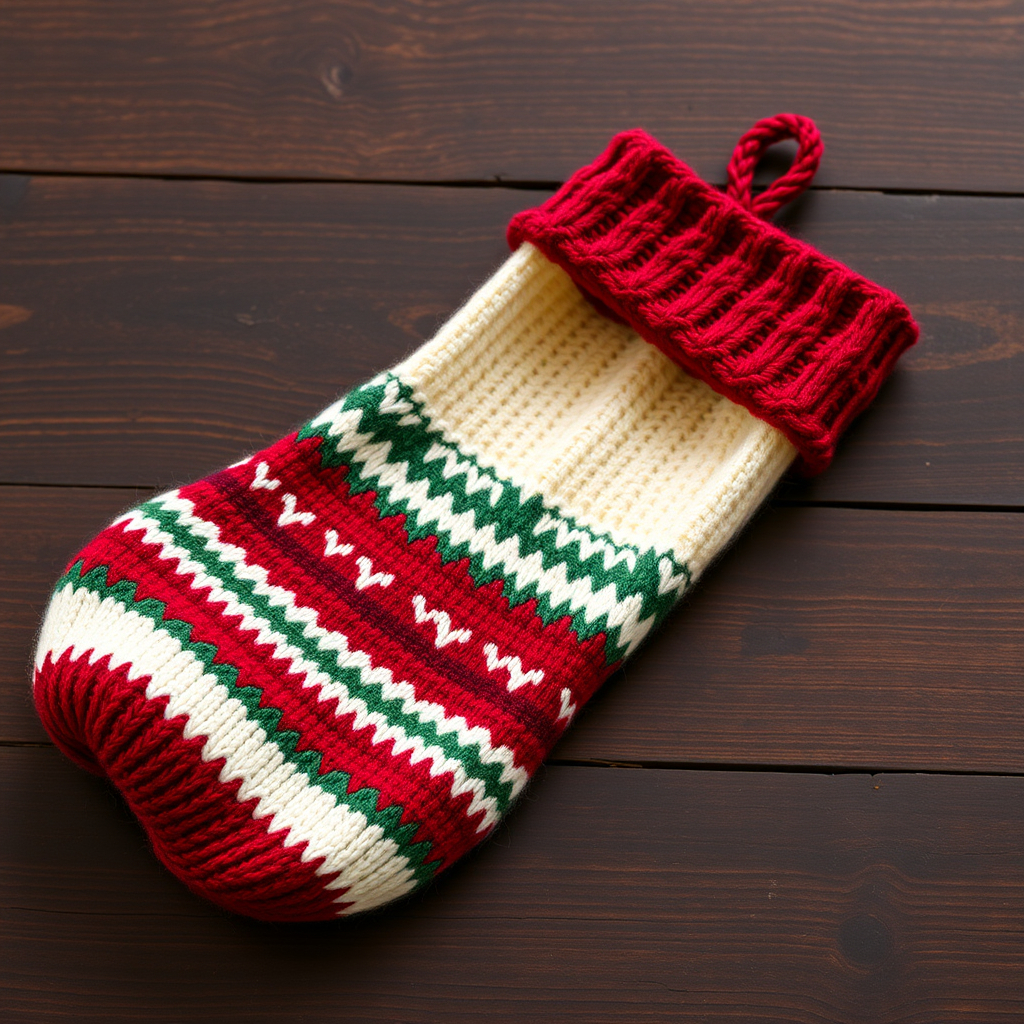
Wrap your mantel in warmth this holiday season with these richly textured, berry-toned stockings. This pattern blends classic Fair Isle-inspired stripes with a modern, chunky knit, creating a plush, cozy fabric that begs to be filled with treats. Each stitch tells a story of cozy evenings and festive cheer, making these stockings a cherished heirloom for years to come. Whether you're knitting for your own home or crafting a handmade gift, this pattern is designed to be approachable for beginners while still delivering a stunning, professional result.
The deep cranberry red, forest green, and cream color palette evokes the warmth of a crackling fire and the sparkle of holiday lights. The thick, worsted-weight yarn ensures your stocking works up quickly and has a dense, warm texture that will stand up to years of use. With a traditional shape, a neat ribbed cuff, and a small crocheted loop for hanging, these stockings are as practical as they are beautiful.
Materials Needed
Before you begin, gather the following materials. All yarns are worsted weight, making this an accessible and affordable project.
- Yarn: Red Heart Super Saver (worsted weight, 100% acrylic) in the following colors:
- Color A (Cherry Red): 2 skeins – used for the main body, heel, toe, and cuff
- Color B (Paddy Green): 2 skeins – used for the stripe pattern
- Color C (Aran): 1 skein – used for the accent stripes
- Needles:
- US 8 (5.0 mm) circular needles, 16-inch length – for the body of the stocking
- US 7 (4.5 mm) double-pointed needles (DPNs) – for the heel and toe
- Other Supplies:
- Stitch markers (at least 2)
- Yarn needle for weaving in ends
- Scissors
- Crochet hook (any size, for the hanging loop)
Gauge: 18 stitches and 24 rows = 4 inches in stockinette stitch with the larger needles (US 8). Always check your gauge to ensure your stocking comes out the correct size. If your gauge is off, adjust your needle size accordingly.
Step-by-Step Instructions
This stocking is worked from the top down, in the round, with a traditional heel flap and gusset. Follow each step carefully, and you'll have a beautiful stocking in no time. The pattern is broken into clear sections for easy reference.
Stocking Body (Worked in the Round from Top Down)
Cast On: With the larger circular needles (US 8) and Color A, cast on 60 stitches. Place a stitch marker to mark the beginning of the round, and join in the round, being careful not to twist your stitches.
Ribbing: Work in k2, p2 ribbing (knit 2, purl 2) in Color A for 2 inches. This creates a neat, stretchy cuff that will hold the stocking's shape.
Stripe Pattern: Switch to stockinette stitch (knit every round). Now, begin the stripe sequence. Work the following 8-round repeat:
- Rounds 1-4: Knit in Color B (Paddy Green).
- Rounds 5-6: Knit in Color C (Aran).
- Rounds 7-10: Knit in Color A (Cherry Red).
- Rounds 11-12: Knit in Color C (Aran).
Repeat this 8-round sequence (4 rounds B, 2 rounds C, 4 rounds A, 2 rounds C) until the body measures 12 inches from the cast-on edge. Be sure to end after completing a 4-round Color A section, so you're ready to start the heel with Color A.
Heel Flap
The heel is worked back and forth on only half of your stitches, creating a flat flap. This is a classic technique that gives the stocking its shape.
Setup: Transfer the first 30 stitches onto one DPN (Needle 1) and the remaining 30 stitches onto another DPN (Needle 2). The stitches on Needle 2 will be the instep (top of the foot) and will be set aside for now. You will work only on Needle 1 for the heel flap, using Color A.
Row 1 (Right Side): Slip 1 stitch purlwise (with yarn in back), then knit the remaining 29 stitches. (30 stitches total)
Row 2 (Wrong Side): Slip 1 stitch purlwise (with yarn in front), then purl the remaining 29 stitches.
Repeat these 2 rows until the heel flap measures 2.5 inches, ending with a Wrong Side row. This creates a sturdy, reinforced heel.
Turn the Heel
This short-row technique shapes the bottom of the heel. Follow these instructions carefully, as they create the curved cup that fits the foot.
Row 1 (Right Side): Knit 17 stitches, k2tog (knit 2 together), k1, turn your work.
Row 2 (Wrong Side): Slip 1 purlwise, purl 5, p2tog (purl 2 together), p1, turn.
Row 3: Slip 1 purlwise, knit 6, k2tog, k1, turn.
Row 4: Slip 1 purlwise, purl 7, p2tog, p1, turn.
Continue in this manner, working one more stitch before the decrease on each subsequent row. This means on the next right-side row, you'll knit 8 stitches before the k2tog, and on the next wrong-side row, you'll purl 9 stitches before the p2tog. Keep going until all heel stitches have been worked. You will now have 18 stitches remaining on your heel needle.
Gusset
The gusset connects the heel to the instep, adding shape and room for the foot. This section is worked in the round again.
Pick Up Stitches: With Color A, pick up and knit 14 stitches along the left side of the heel flap. To do this, insert your needle into the edge stitch of the flap, wrap the yarn, and pull through a loop. Do this 14 times.
Next, knit across the 30 instep stitches (from Needle 2), continuing the stripe pattern where you left off. If you ended the body on a 4-round Color A section, you'll be in the middle of that section, so continue with Color A.
Now, pick up and knit 14 stitches along the right side of the heel flap, just as you did on the left side.
Finally, knit across the first 9 heel stitches to bring the round to the center of the heel. This is your new starting point for the round. You now have a total of 76 stitches on your needles (14 + 30 + 14 + 18 = 76). Place a marker to mark the new beginning of the round if needed.
Decrease Round: Knit to 3 stitches before the instep marker (the marker that separates the sole from the instep), k2tog, k1. Then, knit across the instep stitches. On the other side of the instep, k1, ssk (slip, slip, knit – a left-leaning decrease), then knit to the end of the round.
Next Round: Knit all stitches plain.
Repeat these 2 rounds (decrease round, then plain knit round) until you have 60 stitches remaining (30 for the instep, 30 for the sole). This shaping creates a smooth, comfortable fit around the ankle.
Foot
Now you'll continue working in the round to create the foot of the stocking. Maintain the stripe pattern on the instep (the top 30 stitches) and use Color A on the sole (the bottom 30 stitches). This means you'll be carrying the stripe colors across the instep only, while the sole stays solid red. To do this, simply knit the instep stitches in the established stripe sequence, and knit the sole stitches in Color A. When you switch colors, be sure to twist the yarns at the junction to avoid holes.
Continue in this manner until the foot measures 7 inches from the heel turn, or until it reaches your desired length. A good rule of thumb is to make the foot about 2 inches less than the total desired foot length, as the toe will add length.
Toe
The toe is shaped with a series of decreases. Switch to Color A entirely for the toe, and work in stockinette stitch (knit every round).
Decrease Round 1: K4, k2tog, repeat to end of round. (You will have 50 stitches)
Next Round: Knit all stitches.
Decrease Round 2: K3, k2tog, repeat to end of round. (40 stitches)
Next Round: Knit all stitches.
Decrease Round 3: K2, k2tog, repeat to end of round. (30 stitches)
Next Round: Knit all stitches.
Decrease Round 4: K1, k2tog, repeat to end of round. (20 stitches)
Next Round: Knit all stitches.
Decrease Round 5: K2tog, repeat to end of round. (10 stitches)
Cut your yarn, leaving a long tail (about 12 inches). Thread the tail through a yarn needle, then pass it through the remaining 10 stitches on your needles. Pull tight to close the toe, and secure the yarn with a few small stitches. Weave in the end.
Hanging Loop
To hang your stocking, you'll create a simple crocheted loop.
With Color A and your crochet hook, make a slip knot and chain 20 stitches. Then, slip stitch into the first chain to form a loop. Cut the yarn and pull through to secure. Attach this loop to the top corner of the stocking (on the inside, near the cuff) with a few small stitches using your yarn needle. Make sure it's securely fastened so it can hold the weight of the stocking and its contents.
Finishing
Weave in all loose ends carefully using your yarn needle. Make sure to weave them in on the wrong side of the work so they're invisible from the outside. Block the stocking gently to shape it. To block, wet the stocking with lukewarm water, gently squeeze out excess water (do not wring), and lay it flat to dry, shaping it to the correct dimensions. This will help even out the stitches and give your stocking a polished, professional look.
Your Cranberry Glow Striped Stocking is now complete! Hang it by the fireplace, fill it with goodies, and enjoy the cozy, festive charm it brings to your home. These stockings also make wonderful handmade gifts for loved ones. Happy knitting!