Blossom Belly Avocado Amigurumi Free Pattern – Knit a Blooming Mama-To-Be
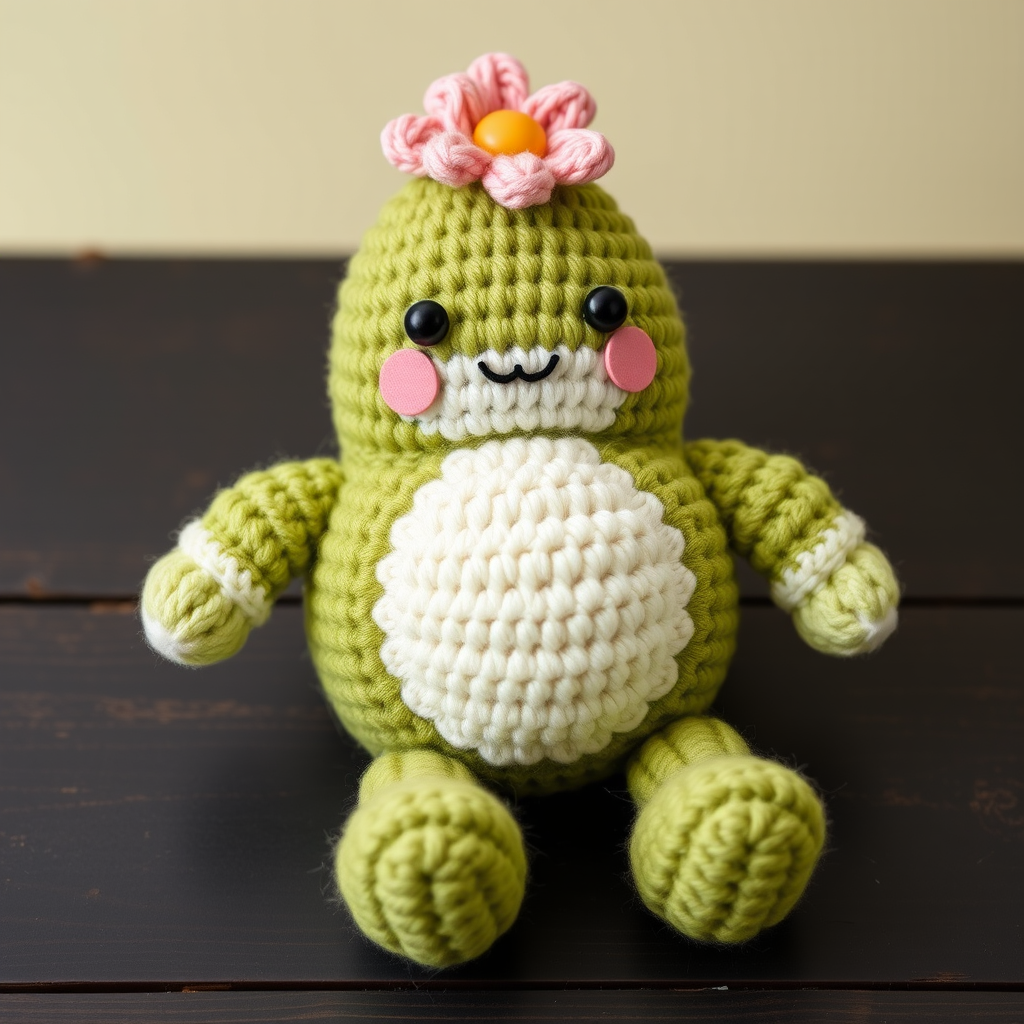
Blossom Belly Avocado Amigurumi Free Pattern – Knit a Blooming Mama-To-Be
There's something undeniably magical about creating a handmade gift that celebrates a new life. This Blossom Belly Avocado Amigurumi is the perfect project for crafters who want to make something truly special for an expectant mama or a nursery that needs a touch of whimsy. With its sweet, serene expression, delicate flower crown, and prominently rounded cream belly, this knitted avocado mama is as heartwarming as it is adorable. Whether you're a seasoned knitter or just starting your amigurumi journey, this pattern is designed to be accessible, cozy, and utterly delightful.
This pattern is incredibly versatile—it works beautifully as a baby shower centerpiece, a thoughtful gift, or a cuddly companion for a little one. The soft, worsted weight yarn creates a plush, huggable texture, while the firm stuffing ensures the doll holds its charming shape. Let's dive into this blooming project and create something truly special!
Materials Needed
Before we begin, gather your supplies. This project is all about creating a tight, firm fabric to prevent the stuffing from showing through, so choose your materials with care.
- Yarn: Worsted weight yarn in the following colors:
- Avocado green (main body, arms, legs)
- Dark green (for embroidered eyes)
- Cream (for the belly)
- Soft pink (for the smile, blush, and flower crown)
- Yellow (for the flower crown center)
- Small amount of brown (optional, for the pit detail)
- Needles/Hook: US Size 3 (3.25 mm) knitting needles or crochet hook (depending on your preferred version). A tapestry needle for sewing and embroidery.
- Gauge: Not critical for this project, but aim for a tight, firm fabric to prevent stuffing from showing through.
- Stuffing: Polyester fiberfill or your preferred stuffing material.
- Optional: Stitch markers, fabric paint (for blush), and a small amount of brown yarn for the pit.
Step-by-Step Instructions
This pattern includes both a knitted and a crochet version. Choose the one that suits your skills best. Both versions create the same adorable avocado mama, so pick your favorite and let's get started!
Knitted Version (using magic ring and increases/decreases)
Head and Body (worked in one piece)
- With avocado green yarn, cast on 6 stitches. Join in the round, being careful not to twist.
- Round 1: Knit into front and back of each stitch (kfb) – 12 stitches.
- Round 2: *Kfb, k1* repeat around – 18 stitches.
- Round 3: *Kfb, k2* repeat around – 24 stitches.
- Round 4: *Kfb, k3* repeat around – 30 stitches.
- Rounds 5-8: Knit all stitches.
- Round 9: *Kfb, k4* repeat around – 36 stitches.
- Rounds 10-14: Knit all stitches.
- Round 15: *K2tog, k4* repeat around – 30 stitches.
- Rounds 16-18: Knit all stitches.
- Round 19: *K2tog, k3* repeat around – 24 stitches.
- Rounds 20-22: Knit all stitches.
- Round 23: *K2tog, k2* repeat around – 18 stitches.
- Rounds 24-26: Knit all stitches.
- Round 27: *K2tog, k1* repeat around – 12 stitches.
- Rounds 28-30: Knit all stitches.
- Round 31: *K2tog* repeat around – 6 stitches. Cut yarn, thread through remaining stitches, and pull tight to close. Stuff firmly before closing.
Belly (worked separately and sewn on)
- With cream yarn, cast on 6 stitches. Join in the round.
- Round 1: Kfb around – 12 stitches.
- Round 2: *Kfb, k1* around – 18 stitches.
- Round 3: *Kfb, k2* around – 24 stitches.
- Rounds 4-8: Knit all stitches.
- Round 9: *K2tog, k2* around – 18 stitches.
- Round 10: *K2tog, k1* around – 12 stitches.
- Round 11: *K2tog* around – 6 stitches. Cut yarn, thread through remaining stitches, and pull tight. Stuff firmly and sew onto the front of the body, slightly below the head.
Arms (make 2)
- With avocado green yarn, cast on 6 stitches. Join in the round.
- Rounds 1-6: Knit all stitches.
- Round 7: K2tog around – 3 stitches. Cut yarn, thread through remaining stitches, and pull tight. Stuff lightly and sew to the sides of the body.
Legs (make 2)
- With avocado green yarn, cast on 6 stitches. Join in the round.
- Rounds 1-4: Knit all stitches.
- Round 5: Kfb around – 12 stitches.
- Rounds 6-7: Knit all stitches.
- Bind off loosely. Stuff and sew to the bottom of the body.
Face
- With dark green yarn, embroider two small eyes using a satin stitch or French knots.
- With soft pink yarn, embroider a small smile using a backstitch.
- Add a small blush to the cheeks using a tiny bit of pink yarn or fabric paint.
Flower Crown
- With soft pink yarn, cast on 5 stitches. Knit in garter stitch for 2 rows. Bind off. This is one petal. Make 5 petals.
- Sew the petals together in a circle, leaving a small hole in the center.
- With yellow yarn, make a small pom-pom or a French knot in the center. Sew the crown onto the top of the head.
Crochet Version (using magic ring and single crochet)
Head and Body
- With avocado green yarn, make a magic ring, ch 1, 6 sc in ring. Pull tight.
- Round 1: 2 sc in each st around – 12 stitches.
- Round 2: *2 sc in next st, sc in next st* around – 18 stitches.
- Round 3: *2 sc in next st, sc in next 2 sts* around – 24 stitches.
- Round 4: *2 sc in next st, sc in next 3 sts* around – 30 stitches.
- Rounds 5-8: Sc in each st around.
- Round 9: *2 sc in next st, sc in next 4 sts* around – 36 stitches.
- Rounds 10-14: Sc in each st around.
- Round 15: *sc2tog, sc in next 4 sts* around – 30 stitches.
- Rounds 16-18: Sc in each st around.
- Round 19: *sc2tog, sc in next 3 sts* around – 24 stitches.
- Rounds 20-22: Sc in each st around.
- Round 23: *sc2tog, sc in next 2 sts* around – 18 stitches.
- Rounds 24-26: Sc in each st around.
- Round 27: *sc2tog, sc in next st* around – 12 stitches.
- Rounds 28-30: Sc in each st around.
- Round 31: *sc2tog* around – 6 stitches. Fasten off, leaving a long tail. Stuff firmly, then weave the tail through the front loops of the remaining stitches and pull tight to close.
Belly
- With cream yarn, magic ring, ch 1, 6 sc in ring.
- Round 1: 2 sc in each st around – 12 stitches.
- Round 2: *2 sc in next st, sc in next st* around – 18 stitches.
- Round 3: *2 sc in next st, sc in next 2 sts* around – 24 stitches.
- Rounds 4-8: Sc in each st around.
- Round 9: *sc2tog, sc in next 2 sts* around – 18 stitches.
- Round 10: *sc2tog, sc in next st* around – 12 stitches.
- Round 11: *sc2tog* around – 6 stitches. Fasten off, stuff firmly, and sew onto the front of the body.
Arms (make 2)
- With avocado green yarn, magic ring, ch 1, 6 sc in ring.
- Rounds 1-6: Sc in each st around.
- Round 7: *sc2tog* around – 3 stitches. Fasten off, stuff lightly, and sew to the sides.
Legs (make 2)
- With avocado green yarn, magic ring, ch 1, 6 sc in ring.
- Rounds 1-4: Sc in each st around.
- Round 5: 2 sc in each st around – 12 stitches.
- Rounds 6-7: Sc in each st around. Fasten off, stuff, and sew to the bottom.
Face and Flower Crown
Follow the same instructions as the knitted version, using embroidery for the face and crocheting small petals (ch 2, 3 dc in same st, ch 2, sl st) for the crown.
Final Touches and Tips
Once your avocado mama is assembled, take a moment to admire your handiwork! The key to a professional-looking amigurumi is ensuring the stuffing is firm but not overstuffed, and that all pieces are securely sewn. If you want to add an extra special touch, consider embroidering a tiny brown pit on the belly or adding a small bow to the flower crown.
This pattern is perfect for beginners because it uses basic stitches and simple shaping. The most important thing is to enjoy the process—each stitch brings you closer to creating a cherished keepsake that will be loved for years to come. Whether you're knitting or crocheting, this Blossom Belly Avocado is sure to bring a smile to anyone's face.
Happy crafting, and enjoy making this blooming mama-to-be!


