Whispering Pine Knitted Headband Free Pattern – Cozy Nordic-Inspired Twist
Whispering Pine Knitted Headband Free Pattern – Cozy Nordic-Inspired Twist
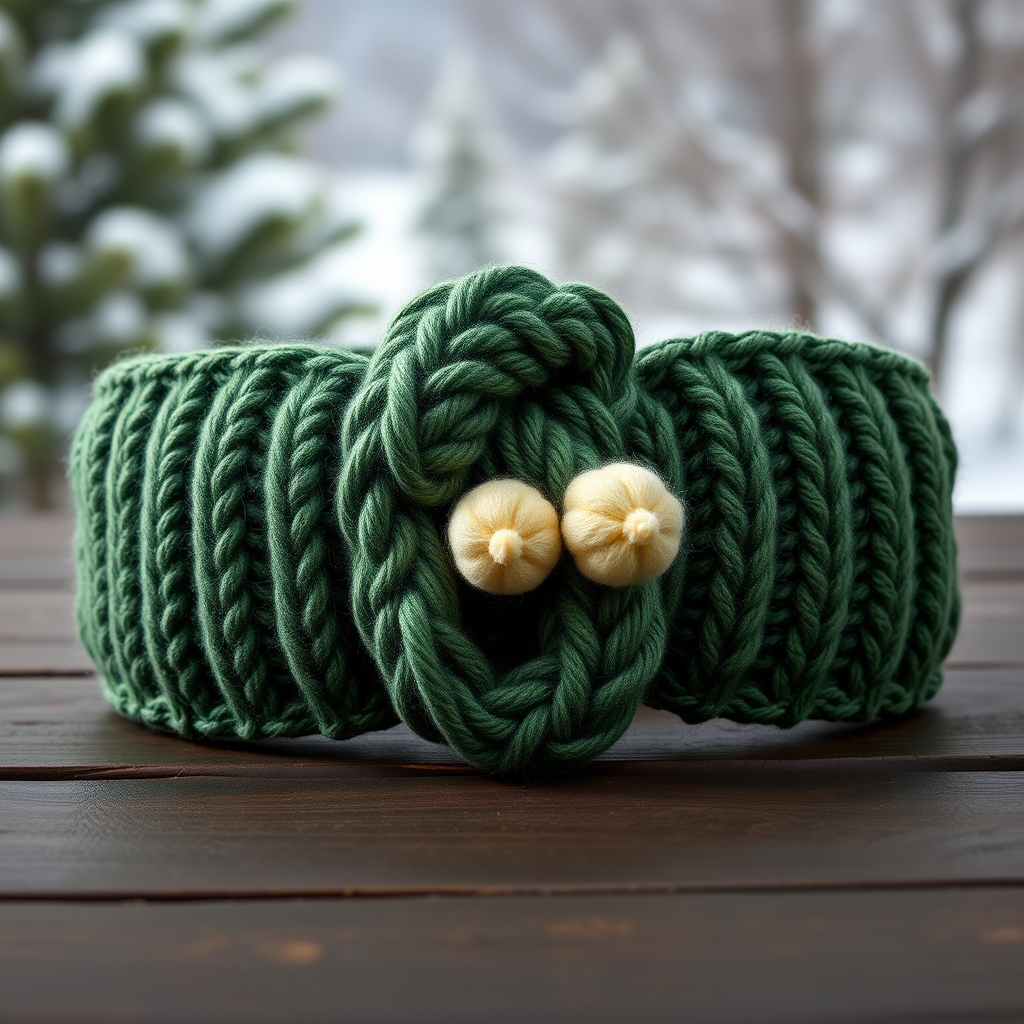
Wrap yourself in the quiet charm of a Nordic forest with this textured, twisted headband that combines warmth and elegance. The intricate cable-and-bobble pattern creates a plush, dimensional accessory perfect for chilly days. Whether you're a seasoned knitter looking for a quick weekend project or a beginner ready to tackle your first cable, this pattern offers a satisfying challenge with stunning results. The rich forest green base, accented with a creamy bobble, evokes the serenity of snow-dusted pines—a rustic yet refined piece that will become a staple in your winter wardrobe.
Materials Needed
Before you begin, gather the following supplies. All materials are readily available at most craft stores or online yarn retailers.
- Yarn: Worsted weight yarn in two shades:
- Forest Green (MC) – approximately 120 yards
- Cream (CC) – approximately 30 yards
- Needles: US 8 (5 mm) knitting needles
- Cable needle (or a double-pointed needle of similar size)
- Tapestry needle for weaving in ends and sewing the bobble accent
- Stitch holder or scrap yarn (for holding stitches during grafting)
Gauge
18 stitches and 24 rows = 4 inches in stockinette stitch. While gauge is important for fit, this headband is quite forgiving. If your gauge is slightly off, you can adjust the length by adding or removing pattern repeats (see notes below).
Finished Size
Approximately 20 inches in circumference and 4.5 inches wide. This comfortably fits an average adult head. To adjust, add or subtract pattern repeats (rows 11-18) to lengthen or shorten the band.
Step-by-Step Instructions
Abbreviations
Familiarize yourself with these abbreviations before starting:
- CO: Cast on
- K: Knit
- P: Purl
- C4F: Slip 2 stitches to cable needle, hold in front, knit next 2 stitches, then knit 2 from cable needle
- MB: Make bobble (k1, p1, k1, p1, k1 into same stitch, turn, p5, turn, k5, then pass 2nd, 3rd, 4th, 5th stitches over the 1st)
- K2tog: Knit 2 together
- SSK: Slip slip knit
Section 1: Main Body (Worked Flat)
This section creates the main fabric of the headband, featuring ribbed edges, a central cable, and bobble accents.
Step 1: With MC, CO 20 stitches.
Step 2 – Ribbing: Work the following two rows to create a neat, stretchy edge:
- Row 1 (RS): K2, P2, K2, P2, K2, P2, K2, P2, K2, P2
- Row 2 (WS): P2, K2, P2, K2, P2, K2, P2, K2, P2, K2
Repeat rows 1-2 for 4 more times (total 10 rows of ribbing). This gives you a sturdy, non-rolling edge.
Step 3 – Cable and Bobble Pattern: Now begin the main pattern. Work the following 8-row repeat:
- Row 11 (RS): K2, P2, C4F, P2, MB, P2, C4F, P2, K2
- Row 12 (WS): P2, K2, P4, K2, P1, K2, P4, K2, P2
- Row 13 (RS): K2, P2, K4, P2, K1, P2, K4, P2, K2
- Row 14 (WS): P2, K2, P4, K2, P1, K2, P4, K2, P2
- Row 15 (RS): K2, P2, C4F, P2, MB, P2, C4F, P2, K2
- Row 16 (WS): P2, K2, P4, K2, P1, K2, P4, K2, P2
- Row 17 (RS): K2, P2, K4, P2, K1, P2, K4, P2, K2
- Row 18 (WS): P2, K2, P4, K2, P1, K2, P4, K2, P2
Step 4: Repeat rows 11-18 until the piece measures approximately 18 inches from the cast-on edge, ending with a WS row. This length ensures a comfortable fit around the head with the twist. If your head is larger or smaller, adjust here—just remember to end on a WS row.
Section 2: Twisted Seam
This is where the magic happens—creating the elegant twist that gives the headband its signature look.
Step 1: Carefully place the live stitches from your needle onto a stitch holder or scrap yarn.
Step 2: With the RS facing, pick up 20 stitches along the cast-on edge. This is easiest done by inserting your needle into each cast-on loop and knitting them onto your needle.
Step 3: Now, twist the piece once before grafting. Hold both sets of stitches (the held ones and the newly picked-up ones) in front of you. Rotate the piece so that the fabric makes a single 360-degree twist. This twist will sit at the front of the headband, creating the dimensional knot effect.
Step 4: Graft the two ends together using the Kitchener stitch. If you're unfamiliar with this technique, here's a quick refresher:
- Thread a tapestry needle with a length of MC yarn (about 3 times the width of your stitches).
- Hold the two needles parallel, with the wrong sides facing each other.
- Insert the tapestry needle into the first stitch on the front needle as if to purl, pull through, and slip the stitch off.
- Insert the needle into the first stitch on the back needle as if to knit, pull through, and slip the stitch off.
- Continue alternating: front needle as if to knit (leave stitch on), back needle as if to purl (leave stitch on), front needle as if to purl (slip off), back needle as if to knit (slip off).
Work evenly until all stitches are grafted. This creates an invisible, seamless join.
Section 3: Bobble Accent (Optional)
Add a charming finishing touch with a contrasting cream bobble at the center of the twist.
Step 1: With CC, CO 1 stitch.
Step 2: Work MB into that single stitch. This will create a small, round bobble.
Step 3: Fasten off, leaving a tail of about 6 inches.
Step 4: Using the tapestry needle, sew the bobble securely onto the center of the twist. Position it so it sits prominently at the front, adding a pop of texture and color. Weave the tail in on the wrong side.
Finishing
Complete your headband with these final steps:
- Weave in all ends using the tapestry needle, being careful to hide them within the ribbing or cable pattern so they're invisible from the RS.
- Block gently to shape. Wet block or steam block, depending on your yarn's fiber content. Lay flat to dry, gently shaping the headband to its intended dimensions. This helps even out the stitches and set the twist.
- Try it on! The headband should sit comfortably around your head, with the twist centered at the front. The ribbed edges will keep it snugly in place without being too tight.
Tips for Success
- Bobble technique: If you find the bobble tricky, practice on a swatch first. The key is to work all 5 stitches into the same stitch, then decrease them back to one on the following row.
- Cable tension: When working C4F, keep your tension even. Don't pull the cable needle stitches too tight, or the cable will pucker.
- Customization: Feel free to experiment with different color combinations. A cream base with a green bobble would be equally stunning, or try a single solid color for a more minimalist look.
- Yarn substitution: Any worsted weight yarn will work. Just be sure to check your gauge and adjust needle size if needed.
This Whispering Pine Headband is more than just an accessory—it's a wearable piece of Nordic-inspired art. The combination of cables, bobbles, and the elegant twist creates a sophisticated texture that elevates any winter outfit. Whether you're gifting it to a loved one or treating yourself, this pattern is sure to become a cherished favorite. Happy knitting!


