Whispering Dune Chevron Puffs Hat Free Pattern – Knit a Textured Desert Bloom
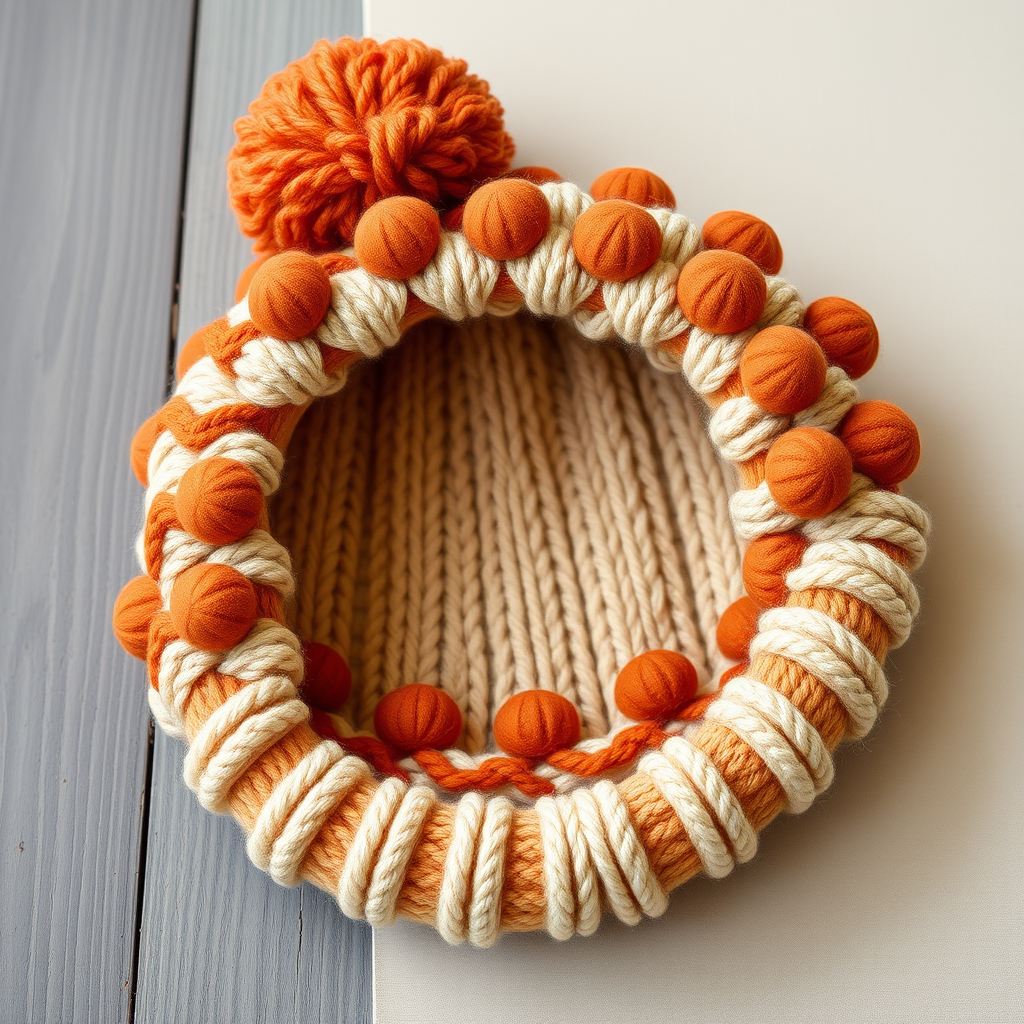
Whispering Dune Chevron Puffs Hat: A Beginner-Friendly Knitting Adventure
Imagine wrapping your head in the soft, sculptural waves of a desert landscape—that's the magic of the Whispering Dune Chevron Puffs Hat. This free knitting pattern combines the tactile joy of bobbles with the rhythmic flow of chevron ribbing, creating a modern, textured masterpiece that's as cozy as it is striking. The warm sand and terracotta palette evokes serene sunsets over rolling dunes, making this hat a statement piece for chilly days. Whether you're a seasoned knitter or a confident beginner looking for a rewarding challenge, this pattern will guide you through every step to create a hat that's both functional and a true work of art.
Materials Needed
Before you begin, gather these supplies to ensure a smooth knitting experience:
- Yarn: Worsted weight yarn in two colors:
- Main Color (MC) – Sand (approx 120g) – Suggested: Lion Brand Wool-Ease Worsted in "Sand"
- Contrast Color (CC) – Terracotta (approx 50g) – Suggested: Lion Brand Wool-Ease Worsted in "Terracotta"
- Needles: US 7 (4.5mm) 16-inch circular needle and double-pointed needles (or size needed to meet gauge)
- Notions: Stitch markers, tapestry needle for weaving in ends and seaming
Gauge: 18 stitches and 24 rows = 4 inches in stockinette stitch. One chevron puff repeat (12 stitches) = 2.5 inches wide. Always knit a gauge swatch to ensure your hat fits perfectly!
Step-by-Step Instructions
Finished Size & Adjustments
This pattern creates an adult medium hat (21-22 inch head circumference). To adjust the size, add or subtract multiples of 12 stitches from the cast-on count. Each 12-stitch repeat adds or removes approximately 2.5 inches of circumference.
Special Stitches
Master these two techniques before starting:
- MB (Make Bobble): Knit into the front and back of the same stitch 3 times (you'll have 6 stitches on your right needle). Turn your work, purl 6 stitches, turn, knit 6 stitches, turn, purl 6 stitches, turn. Now, knit 2 together three times (you'll have 3 stitches). Pass the first 2 stitches over the last stitch (1 stitch remains). This creates a beautiful, puffy bobble.
- Chevron Puff Pattern (worked over 12 stitches): This is the heart of the hat. Each row builds on the previous, creating the signature wave. The pattern naturally increases stitch count, but we'll compensate to keep the hat shape (see "Hat Body" below).
Hat Body
Step 1: Cast On & Ribbing
With MC, cast on 96 stitches. Join in the round, being careful not to twist. Place a stitch marker to mark the beginning of the round. Work in K2, P2 ribbing for 1.5 inches. This creates a snug, comfortable brim.
Step 2: Transition to Flat Knitting
Switch to working flat in rows (back and forth) to create the chevron shape. You'll seam the back later. This technique allows the chevron waves to flow diagonally across the hat.
Step 3: Begin the Chevron Puff Pattern
Work 8 repeats of the 12-stitch pattern across each row (8 × 12 = 96 stitches). Work Rows 1-10 of the pattern as written. Here's the breakdown:
- Row 1 (RS): *K2tog, k2, MB, k2, ssk, k1, yo, k1, yo, k1* – repeat from * to end.
- Row 2 (WS): Purl all stitches.
- Row 3: *K2tog, k2, MB, k2, ssk, k3, yo, k1, yo, k2* – repeat from * to end.
- Row 4: Purl all stitches.
- Row 5: *K2tog, k2, MB, k2, ssk, k5, yo, k1, yo, k3* – repeat from * to end.
- Row 6: Purl all stitches.
- Row 7: *K2tog, k2, MB, k2, ssk, k7, yo, k1, yo, k4* – repeat from * to end.
- Row 8: Purl all stitches.
- Row 9: *K2tog, k2, MB, k2, ssk, k9, yo, k1, yo, k5* – repeat from * to end.
- Row 10: Purl all stitches.
Step 4: Stabilize the Stitch Count
Starting with Row 11, the pattern naturally increases the stitch count (from 12 to 30 stitches per repeat). To keep the hat shape, you'll compensate by adding a decrease at the end of each repeat. Here's how:
- Row 11: *K2tog, k2, MB, k2, ssk, k11, yo, k1, yo, k6, k2tog* – repeat from * to end. (The extra k2tog at the end keeps the stitch count at 12 per repeat.)
- Row 12: Purl all stitches.
- Row 13: *K2tog, k2, MB, k2, ssk, k13, yo, k1, yo, k7, k2tog* – repeat from * to end.
- Row 14: Purl all stitches.
- Row 15: *K2tog, k2, MB, k2, ssk, k15, yo, k1, yo, k8, k2tog* – repeat from * to end.
- Row 16: Purl all stitches.
- Row 17: *K2tog, k2, MB, k2, ssk, k17, yo, k1, yo, k9, k2tog* – repeat from * to end.
- Row 18: Purl all stitches.
- Row 19: *K2tog, k2, MB, k2, ssk, k19, yo, k1, yo, k10, k2tog* – repeat from * to end.
- Row 20: Purl all stitches.
- Row 21: *K2tog, k2, MB, k2, ssk, k21, yo, k1, yo, k11, k2tog* – repeat from * to end.
- Row 22: Purl all stitches.
- Row 23: *K2tog, k2, MB, k2, ssk, k23, yo, k1, yo, k12, k2tog* – repeat from * to end.
- Row 24: Purl all stitches.
- Row 25: *K2tog, k2, MB, k2, ssk, k25, yo, k1, yo, k13, k2tog* – repeat from * to end.
- Row 26: Purl all stitches.
- Row 27: *K2tog, k2, MB, k2, ssk, k27, yo, k1, yo, k14, k2tog* – repeat from * to end.
- Row 28: Purl all stitches.
- Row 29: *K2tog, k2, MB, k2, ssk, k29, yo, k1, yo, k15, k2tog* – repeat from * to end.
- Row 30: Purl all stitches.
Step 5: Bind Off
After completing Row 30, you'll have a beautiful trapezoid shape. Bind off loosely to maintain the stretchy edge. Cut yarn, leaving a long tail for seaming.
Seaming & Assembly
Step 6: Create the Tube
Fold the hat in half with right sides together, matching the cast-on edge to the bind-off edge. Using your tapestry needle and the long tail, seam the side edges together to form a tube. Leave the top open—this will become the crown.
Step 7: Gather the Crown
Thread a yarn needle with a long piece of MC. Run the needle through the bind-off stitches along the top edge. Pull tight to gather the crown closed, then secure with a few firm stitches. Weave in the end securely.
Finishing Touches
Step 8: Create the Pom-Pom
With CC (Terracotta), make a pom-pom approximately 3 inches in diameter. You can use a pom-pom maker or a simple cardboard template. Attach it securely to the gathered crown.
Step 9: Weave in Ends & Block
Weave in all remaining ends using your tapestry needle. Block the hat lightly to shape—this helps the chevron pattern lay flat and the bobbles pop. Lay flat to dry.
Optional Customization
For a slouchier fit, work an extra 10 rows of the pattern (continuing the stitch-count compensation method) before binding off. This adds length and a relaxed, casual silhouette.
Congratulations! You've created a stunning Whispering Dune Chevron Puffs Hat. The combination of textured bobbles, flowing chevrons, and warm desert tones makes this a truly special piece. Wear it with pride, gift it to a loved one, or make another in different colors—the possibilities are endless. Happy knitting!


