The Woodland Wanderer Pullover: A Free Knitting Pattern for a Cozy, Textured Unisex Sweater
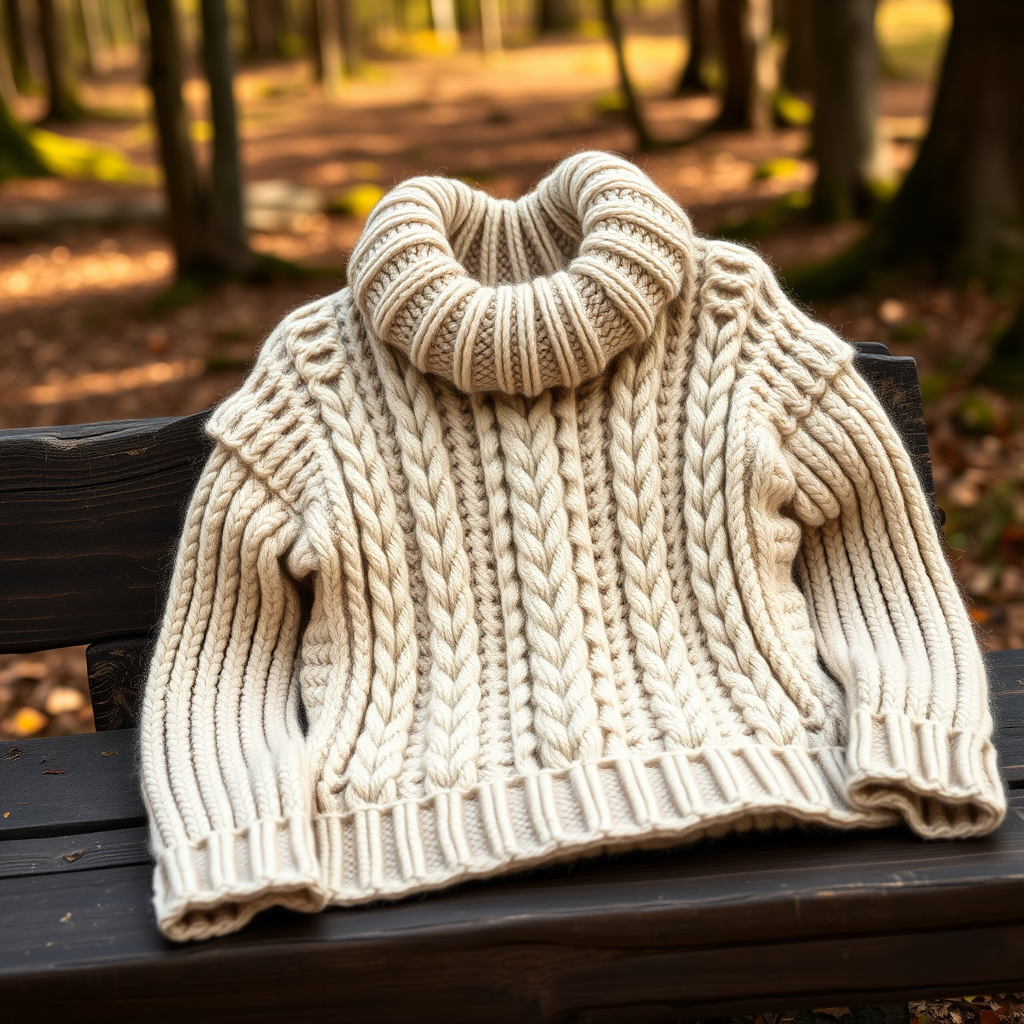
Introducing the Woodland Wanderer Pullover
Embrace the quiet beauty of the forest with this oversized, unisex pullover. The Woodland Wanderer features a rich tapestry of moss stitch, seed stitch, and a dramatic, textured cowl neck. Knit in a heathered oatmeal yarn, it’s the perfect blend of rustic charm and modern comfort. This pattern is designed for adventurous beginners and intermediate knitters alike, offering a satisfying project that builds confidence with cables and textured stitches while creating a stunning, cozy garment.
Materials Needed
Yarn
- Weight: Aran weight (10 ply) yarn
- Amount: Approximately 1200 (1350, 1500, 1650, 1800) yards, depending on size
- Shown in: Cascade Yarns 220 Superwash Aran in 'Oatmeal'
Needles
- US 8 (5.0 mm) circular needles (32-inch or longer for magic loop) – for ribbing and collar
- US 9 (5.5 mm) circular needles (32-inch or longer for magic loop) – for main body
- US 9 (5.5 mm) double-pointed needles for sleeves (or use magic loop method)
- Cable needle
Notions
- Stitch markers (at least 4)
- Tapestry needle for weaving in ends
- Scissors
Gauge
16 stitches and 22 rows = 4 inches in stockinette stitch on larger needles (US 9), after blocking. Always check your gauge for best fit.
Step-by-Step Instructions
Sizes and Finished Measurements
Sizes: XS (S, M, L, XL)
Finished Chest Circumference: 38 (42, 46, 50, 54) inches with 4-6 inches of positive ease.
Abbreviations
- CO: Cast on
- K: Knit
- P: Purl
- St st: Stockinette stitch (knit on RS, purl on WS)
- k2tog: Knit two together (right-leaning decrease)
- p2tog: Purl two together
- M1L: Make one left (increase, pick up bar between stitches from front to back, knit through back loop)
- M1R: Make one right (increase, pick up bar between stitches from back to front, knit through front loop)
- PM: Place marker
- SM: Slip marker
- RS: Right side
- WS: Wrong side
Stitch Patterns
Moss Stitch (worked flat, multiple of 2 + 1)
- Row 1 (RS): K1, *P1, K1; repeat from * to end.
- Row 2: P1, *K1, P1; repeat from * to end.
- Repeat Rows 1-2 for pattern.
Seed Stitch (worked in the round, multiple of 2)
- Round 1: *K1, P1; repeat from * to end.
- Round 2: *P1, K1; repeat from * to end.
- Repeat Rounds 1-2 for pattern.
Cable Panel (worked flat, over 12 stitches)
- Row 1 (RS): P2, K8, P2.
- Row 2: K2, P8, K2.
- Row 3 (Cable Cross): P2, slip 4 stitches to cable needle and hold in front, K4, then K4 from cable needle, P2.
- Row 4: K2, P8, K2.
- Repeat Rows 1-4 for pattern.
Back
- With smaller needles (US 8), CO 77 (85, 93, 101, 109) stitches.
- Work in Moss Stitch for 2 inches, ending with a WS row.
- Switch to larger needles (US 9).
- Set-up Row (RS): Work 12 stitches in Moss Stitch, PM, work Cable Panel over next 12 stitches, PM, work 29 (37, 45, 53, 61) stitches in St st, PM, work Cable Panel over next 12 stitches, PM, work 12 stitches in Moss Stitch.
- Continue in pattern as established until piece measures 15 (15.5, 16, 16.5, 17) inches from CO, ending with a WS row.
Armhole Shaping
- Bind off 4 (5, 6, 7, 8) stitches at the beginning of the next 2 rows.
- Decrease Row (RS): K1, k2tog, work in pattern to last 3 stitches, k2tog, K1.
- Repeat decrease row every RS row 3 (4, 5, 6, 7) more times. 59 (63, 67, 71, 75) stitches remain.
- Work even (no decreases) until armhole measures 8 (8.5, 9, 9.5, 10) inches from bind-off, ending with a WS row.
Shoulder and Neck Shaping
- Bind off 6 (7, 7, 8, 8) stitches at the beginning of the next 2 rows.
- Bind off 6 (6, 7, 7, 8) stitches at the beginning of the next 2 rows.
- At the same time, when you bind off the first set of shoulder stitches, bind off center 19 (19, 21, 21, 23) stitches for the neck, and work each side separately.
- Bind off remaining 6 (6, 7, 7, 8) stitches on each shoulder.
Front
- Work same as back until armhole measures 6 (6.5, 7, 7.5, 8) inches from bind-off, ending with a WS row.
Neck Shaping
- Work across 25 (27, 28, 30, 31) stitches, join a second ball of yarn, bind off center 9 (9, 11, 11, 13) stitches, work to end.
- Work both sides simultaneously. At each neck edge, decrease 1 stitch every RS row 4 times: At beginning of row: K1, k2tog; At end of row: work to last 3 stitches, k2tog, K1. 21 (23, 24, 26, 27) stitches remain per shoulder.
- Work even until armhole measures same as back.
- Bind off shoulders as for back.
Sleeves (make 2)
- With smaller needles (US 8), CO 37 (39, 41, 43, 45) stitches.
- Work in Moss Stitch for 2 inches, ending with a WS row.
- Switch to larger needles (US 9) and work in St st (knit every row in the round, or knit RS, purl WS if working flat).
- Increase Row (RS): K1, M1L, knit to last stitch, M1R, K1.
- Repeat increase row every 6th row 10 (11, 12, 13, 14) more times. 59 (63, 67, 71, 75) stitches.
- Work even until sleeve measures 17 (17.5, 18, 18.5, 19) inches from CO, ending with a WS row.
Sleeve Cap
- Bind off 4 (5, 6, 7, 8) stitches at the beginning of the next 2 rows.
- Decrease Row (RS): K1, k2tog, knit to last 3 stitches, k2tog, K1.
- Repeat decrease row every RS row 12 (13, 14, 15, 16) more times.
- Bind off 2 stitches at the beginning of the next 4 rows.
- Bind off remaining 15 (15, 15, 17, 17) stitches.
Collar
- Sew shoulder seams.
- With smaller needles (US 8) and RS facing, pick up and knit 80 (84, 88, 92, 96) stitches around the neckline. Join to work in the round, PM.
- Work in Seed Stitch for 1 inch.
- Switch to larger needles (US 9) and continue in Seed Stitch until collar measures 6 (6.5, 7, 7.5, 8) inches from pick-up row.
- Bind off loosely in pattern (knit the knits and purl the purls as you bind off).
Finishing
- Sew in sleeves, matching the center of the sleeve cap to the shoulder seam.
- Sew side and sleeve seams using mattress stitch for a seamless finish.
- Weave in all ends carefully.
- Block to measurements: soak in lukewarm water, gently squeeze out excess, lay flat on towels, and shape to the finished measurements. Allow to dry completely.
Your Woodland Wanderer Pullover is complete! Enjoy the cozy, textured warmth of your handmade sweater, perfect for crisp forest walks or quiet evenings by the fire.


