The Celestial Sash Tunic: A Free Knitting Pattern for a Beaded Empire-Waist Garment
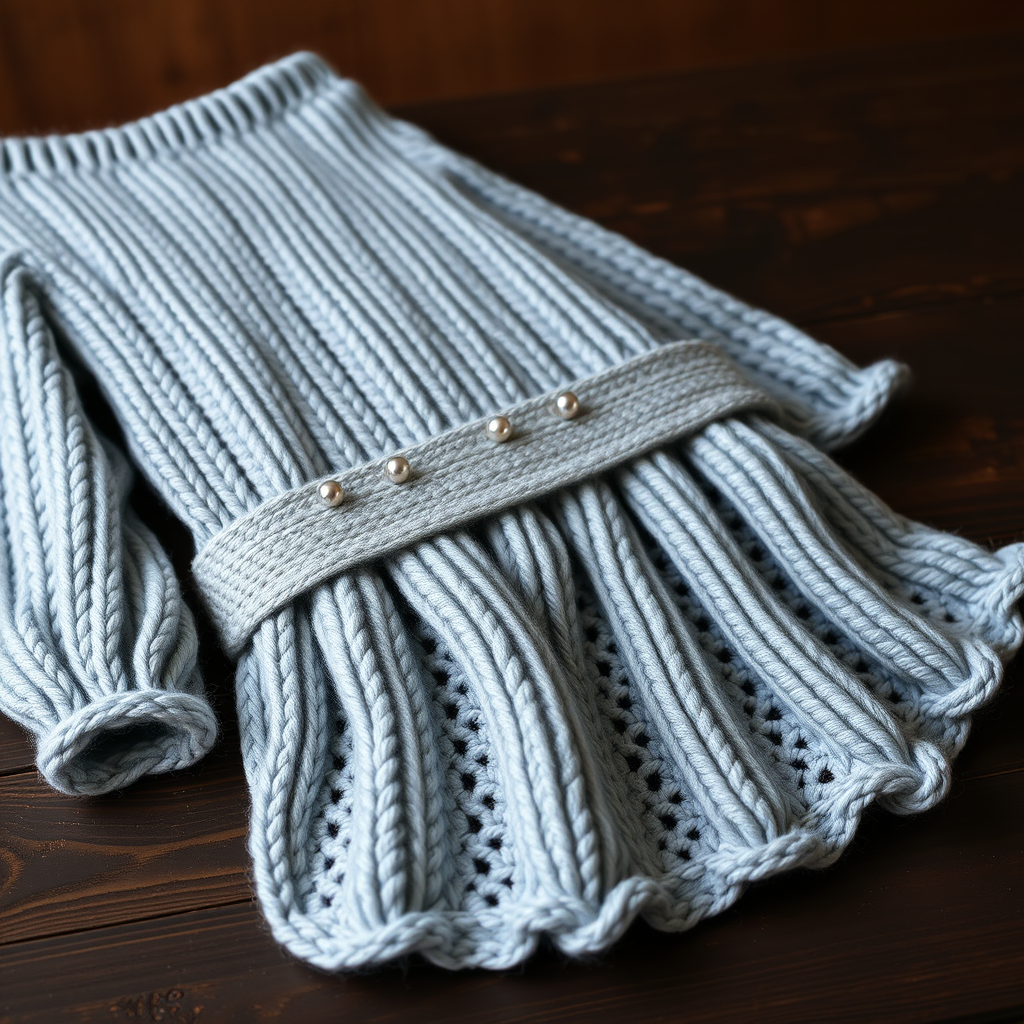
Introducing the Celestial Sash Tunic
Embrace celestial elegance with this unique A-line tunic, featuring a beaded empire-waist sash that adds a touch of boho glamour. Knit seamlessly from the top down in a soft, heathered worsted-weight yarn, this garment is perfect for layering over jeans or a slip dress. The lightweight stockinette body drapes beautifully, while the ribbed hem and cuffs provide a polished finish. The star of the show is the separate beaded sash, which you'll knit and attach at the empire waist, creating a stunning focal point with iridescent silver beads that catch the light. Whether you're a seasoned knitter or an adventurous beginner, this pattern is designed to be clear, detailed, and achievable.
Materials Needed
Yarn
- Weight: Worsted weight (Category 4) yarn
- Color: Heather blue-grey (sample uses Knit Picks Wool of the Andes Tweed in 'Glacier')
- Amount: Approximately 800-1000 yards for size M (adjust for other sizes)
Needles
- Main needle: US 7 (4.5 mm) circular needles with a 32-inch cable (for body and yoke)
- Ribbing needle: US 6 (4.0 mm) circular needles (for hem and cuffs)
- Optional: Double-pointed needles (DPNs) in US 7 and US 6 for sleeves if not using magic loop
Notions
- Stitch markers (including one unique marker for beginning of round)
- Stitch holders or waste yarn (for sleeve stitches)
- Yarn needle for weaving ends
- Approximately 30-40 small iridescent silver beads (size 6/0 or similar)
- Sewing needle and thread (for attaching beads if preferred, or use the bead-as-you-go method)
- Small button or snap (for closing the sash at center front)
Gauge
- Stockinette stitch on larger needles: 20 stitches x 28 rows = 4 inches (10 cm)
- Always check your gauge and adjust needle size if necessary to match.
Step-by-Step Instructions
Sizes and Finished Measurements
This pattern is written for sizes XS (S, M, L, XL). Finished bust circumference: 34 (38, 42, 46, 50) inches. Choose the size that gives you 2-4 inches of positive ease at the bust.
Abbreviations
- CO = cast on
- k = knit
- p = purl
- st(s) = stitch(es)
- k2tog = knit two together (right-leaning decrease)
- ssk = slip, slip, knit (left-leaning decrease)
- yo = yarn over (increase)
- pm = place marker
- sm = slip marker
- RS = right side
- WS = wrong side
Pattern Notes
- The tunic is worked seamlessly from the top down in the round.
- The beaded sash is knit separately as a flat rectangle and sewn onto the finished tunic.
- All increases are made with yarn overs (yo) to create decorative eyelets along the yoke.
- When working the beading row, slide beads up the working yarn before purling to place them between stitches.
Yoke
- Cast on: With larger needles (US 7), CO 80 (88, 96, 104, 112) sts. Join in the round, being careful not to twist. Place a unique marker at the beginning of the round.
- Rounds 1-4: Knit all stitches (4 rounds of stockinette).
- Increase Round 1: *K8 (9, 10, 11, 12), yo, k1, yo; repeat from * to end of round. You now have 100 (110, 120, 130, 140) sts.
- Rounds 5-7: Knit all stitches (3 rounds even).
- Increase Round 2: *K9 (10, 11, 12, 13), yo, k1, yo; repeat from * to end. You now have 120 (132, 144, 156, 168) sts.
- Continue increasing: Repeat the pattern of increasing every 4th round (knit 3 rounds even, then an increase round). Each increase round, work 1 more stitch between the yarn overs. For example:
- Increase Round 3: *K10 (11, 12, 13, 14), yo, k1, yo; repeat from *
- Increase Round 4: *K11 (12, 13, 14, 15), yo, k1, yo; repeat from *
- Continue until you have 200 (220, 240, 260, 280) sts total. This will take approximately 10-12 increase rounds depending on size.
- Final yoke round: After the last increase round, knit 2 rounds even (no increases).
Divide for Body and Sleeves
- Set up: Knit 30 (33, 36, 39, 42) sts for the right front. Place the next 40 (44, 48, 52, 56) sts on a stitch holder or waste yarn for the right sleeve.
- Underarm cast-on: Using the backward loop method, CO 6 (8, 10, 12, 14) sts for the right underarm.
- Back: Knit 60 (66, 72, 78, 84) sts for the back. Place the next 40 (44, 48, 52, 56) sts on a holder for the left sleeve.
- Underarm cast-on: CO 6 (8, 10, 12, 14) sts for the left underarm.
- Left front: Knit 30 (33, 36, 39, 42) sts for the left front. You now have 132 (148, 164, 180, 196) sts on the needle for the body.
Body
- Knit body: Continue knitting in the round (stockinette stitch) until the piece measures 12 (13, 14, 15, 16) inches from the underarm, measured straight down.
- Ribbing: Switch to smaller needles (US 6). Work in k2, p2 ribbing for 2 inches. Bind off loosely in pattern (knit the knits and purl the purls).
Sleeves
- Set up: Transfer the held sleeve stitches (40/44/48/52/56 sts) to larger needles (US 7).
- Pick up underarm: With the RS facing, pick up and knit 6 (8, 10, 12, 14) sts from the underarm cast-on edge. Join in the round. You now have 46 (52, 58, 64, 70) sts.
- Knit sleeve: Knit every round until the sleeve measures 6 inches from the underarm.
- Ribbing: Switch to smaller needles (US 6). Work in k2, p2 ribbing for 1 inch. Bind off loosely in pattern.
- Repeat: Work the second sleeve identically.
Beaded Sash
- Cast on: With smaller needles (US 6), CO 10 sts.
- Row 1 (RS): K2, p6, k2.
- Row 2 (WS): K2, p6, k2.
- Repeat: Repeat rows 1-2 until the sash measures 30 (32, 34, 36, 38) inches, or desired length to wrap comfortably around the empire waist (just below the bust).
- Beading Row (RS): K2, *p1, slide one bead up the working yarn close to the needle, p1; repeat from * to last 2 sts, k2. This places a bead between each pair of purl stitches, creating a line of beads.
- Final rows: Work 2 more rows in pattern (Row 1 and Row 2). Bind off loosely in pattern.
Finishing
- Weave in ends: Use a yarn needle to weave in all loose ends securely on the wrong side.
- Attach sash: Position the beaded sash horizontally around the tunic at the empire waistline (just below the yoke increases, where the body begins). Pin it in place, leaving a 2-inch opening at the center front (where the sash ends will meet). Sew the sash to the tunic using a whip stitch or mattress stitch, catching only the back loops of the sash to keep the beads visible.
- Closure: Sew a small button or snap to the center front opening to close the sash. Alternatively, you can tie the sash ends in a bow if you prefer.
- Blocking: Gently hand wash the tunic in cool water with a mild wool wash. Lay flat to dry, shaping to the correct measurements. This will even out the stitches and give the garment a professional finish.
Your Celestial Sash Tunic is now complete! Wear it with pride, knowing you've created a unique, elegant piece that combines celestial charm with boho sophistication.


