Sunflower Fan Border Bolster Free Crochet Pattern: Art Deco Halloween Pillow
Sunflower Fan Border Bolster: A Beginner-Friendly Art Deco Halloween Pillow
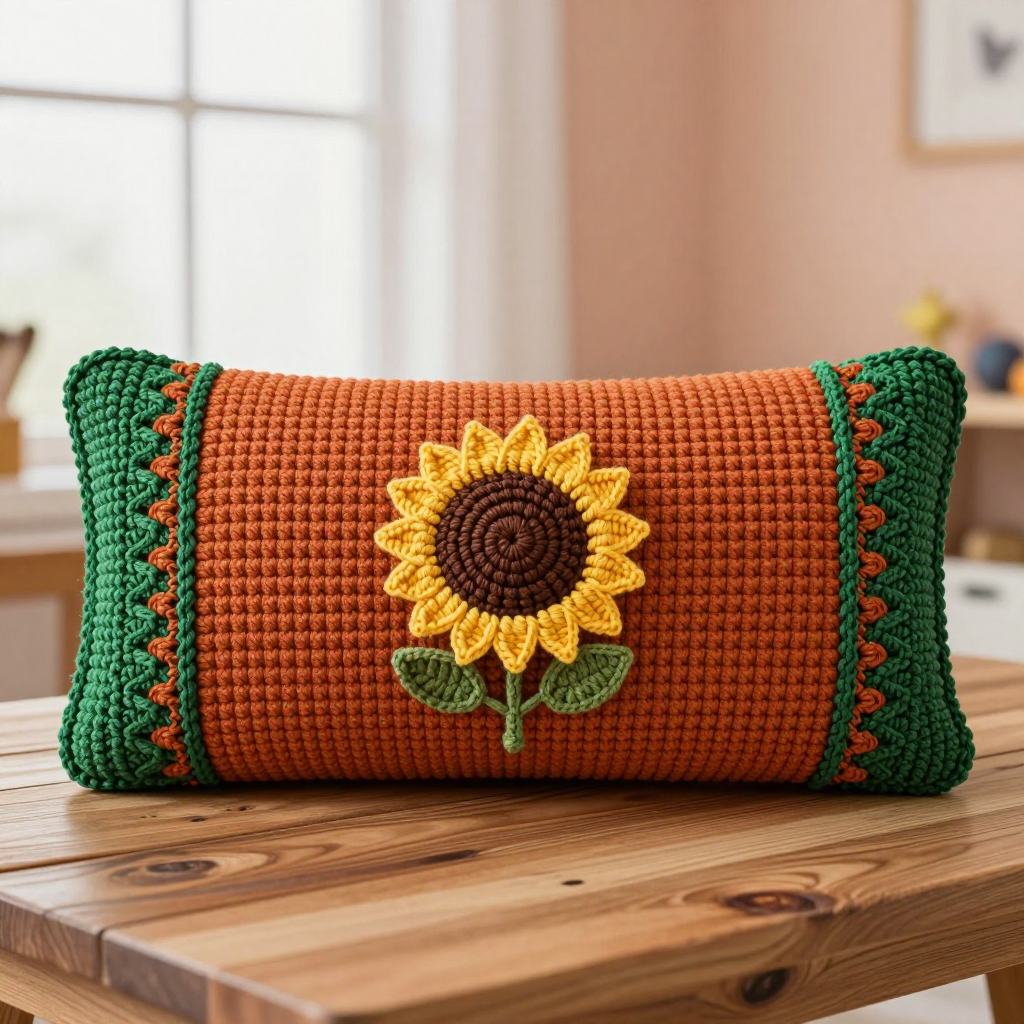
If you have never held a crochet hook before, this bolster pillow is the perfect first big project for you. It is worked almost entirely in single crochet, the simplest stitch there is, so you can build confidence while you create something that looks genuinely elegant. The finished piece is a plump, straight cylinder about 14 inches long and 8 inches around, in a warm rust orange, with deep forest green Deco fan bands and tiny picot bumps at each end. A small amigurumi sunflower with a domed brown center and twelve golden petals sits at the front center, giving the whole pillow a subtle, sophisticated Halloween feel. It looks beautiful on a sofa or reading chair, and it feels firm, smooth, and cozy in your hands.
Materials Needed
- Yarn for the body: Worsted weight acrylic yarn (Category 4; approx. 200 yd/100 g per skein). You need 2 skeins of rust, about 340 yd total.
- Yarn for the bands: 1 skein of forest green worsted weight, about 90 yd.
- Yarn for the sunflower: Fine cotton yarn (Category 1; approx. 50 yd). Small amounts of dark brown, golden yellow, and forest green.
- Main hook: Size H-8 (5.0 mm) crochet hook for the worsted body and bands.
- Small hook: Size C-2 (2.75 mm) crochet hook for the fine-cotton sunflower.
- Stitch marker: 1 removable marker to track your rounds.
- Tapestry needle: A blunt needle with a large eye for weaving in ends.
- Scissors: Any sharp pair for cutting yarn.
- Sewing needle and matching thread: For attaching the sunflower and leaves.
- Stuffing: A 14 in x 8 in (35.5 cm x 20 cm) cylindrical bolster insert, or polyester fiberfill.
- Finished size: 14 in (35.5 cm) long x 8 in (20 cm) diameter. Body circumference approx. 25 in (63.5 cm). Each green band is approx. 2.5 in (6.4 cm) tall. Sunflower approx. 2.75 in (7 cm) across.
Abbreviations and Beginner Glossary
- ch - chain. Wrap yarn over hook, pull it through the loop on your hook. This makes a small loop.
- sl st - slip stitch. Insert hook into the stitch, yarn over, pull through the stitch AND through the loop on your hook all at once. Makes an almost invisible join.
- sc - single crochet. Insert hook into stitch, yarn over, pull up a loop (2 loops on hook), yarn over, pull through both loops. The shortest, simplest stitch.
- dc - double crochet. Yarn over first, insert hook, pull up a loop (3 loops on hook), yarn over, pull through 2 loops, yarn over, pull through last 2 loops. A taller stitch.
- hdc - half double crochet. Yarn over, insert hook, pull up a loop (3 loops), yarn over, pull through all 3 loops at once.
- tr - treble crochet. Yarn over twice, insert hook, pull up a loop (4 loops), yarn over and pull through 2 loops three times. The tallest stitch here.
- sc2tog - single crochet 2 together. Insert hook into first stitch, pull up a loop, insert hook into next stitch, pull up a loop (3 loops), yarn over, pull through all 3. This decreases your stitch count by one.
- ch-3 picot - chain 3, then slip stitch into the third chain from your hook. Makes a tiny bump.
- BLO - back loop only. Each stitch has two loops at the top; work only into the loop farther from you.
- st(s) - stitch or stitches.
- rnd - round. One complete circle of stitches worked around.
- magic ring - an adjustable loop you make with your yarn, then crochet into, and pull tight to close the center hole.
- yarn over - wrap the working yarn over your hook from back to front.
Gauge
Worsted body in sc: 16 sts x 18 rows = 4 in (10 cm) on the 5.0 mm hook. Deco fan band: 1 fan repeat (12 sts) = 3 in (7.6 cm) wide; 8 rows = 2 in (5 cm). Fine cotton sunflower: 9 sc x 10 rounds = 1 in (2.5 cm) on the 2.75 mm hook.
Gauge matters because it tells you whether your finished pillow will actually fit the insert. If your stitches are too tight, the tube will be too small; too loose, and it will sag. To make a swatch, chain 22, work 20 single crochet rows, then measure a 4-inch square in the middle. If you have more than 16 stitches in 4 inches, try a larger hook; if fewer, try a smaller one.
Beginner Tips Before You Start
- Count your first round twice. The chain of 80 is the foundation of everything, so count it carefully before joining.
- Do not twist the chain. Before you join into a ring, lay the chain flat and make sure all the bumps face the same way.
- Use your stitch marker. Place it in the first stitch of each round so you always know where a round begins and ends.
- Do not pull the yarn too tight. Keep an even, relaxed tension; tight stitches make the tube stiff and hard to work into.
- Work the fan band slowly. The ch-3 spaces and 3-dc groups are easy once you see them, so pause and check each group.
- Try the tube on the insert early. Once the body is half done, slip it over the form to check the fit before you continue.
Step-by-Step Instructions
The bolster is worked in joined rounds from one end to the other as a straight tube. The green Deco fan bands are worked in the round at each end of the rust body. The sunflower is a separate mini amigurumi piece worked in fine cotton and sewn on last. All instructions use US terms.
Part 1: Rust Body
With rust worsted and the 5.0 mm hook, ch 80. Join with sl st to the first ch, being careful not to twist. (80 sts; at 16 sts per 4 in this gives approx. 20 in / 51 cm circumference before stretching, and the finished tube stretches to fit the 25 in / 63.5 cm insert comfortably.)
Rnd 1: Ch 1, sc in each ch around, join with sl st to first sc. (80 sc)
Rnds 2-4: Ch 1, sc in each st around, join with sl st. (80 sc)
Rnd 5: Ch 1, sc in each st around, join with sl st. Place marker in first st. (80 sc)
Rnds 6-38: Repeat Rnd 5. (80 sc per rnd; approx. 8.5 in / 21.5 cm of rust body)
Do not fasten off; continue to Part 2.
Part 2: Forest Green Deco Fan Band (First End)
Change to forest green.
Rnd 1: Ch 1, sc in each st around, join with sl st. (80 sc)
Rnd 2 (fan foundation): Ch 1, sc in first st, *ch 3, skip 2 sts, sc in next st; repeat from * around, ending ch 3, skip 2 sts, join with sl st to first sc. (27 ch-3 spaces)
Rnd 3: Sl st into first ch-3 space, ch 3 (counts as first dc), 2 dc in same space, *ch 1, 3 dc in next ch-3 space; repeat from * around, ch 1, join with sl st to top of ch 3. (27 groups of 3 dc)
Rnd 4: Ch 1, sc in each dc and ch-1 space around, join with sl st. (80 sc)
Rnd 5: Ch 1, sc in each st around, join with sl st. (80 sc)
Rnd 6 (picot edge): Ch 1, sc in first st, *ch 3, sl st in third ch from hook (picot made), sc in next 2 sts; repeat from * around, join with sl st to first sc. Fasten off forest green.
Part 3: Rust Body Continued
Rejoin rust to any st of Rnd 6.
Rnds 39-70: Ch 1, sc in each st around, join with sl st. (80 sc per rnd; approx. 7 in / 18 cm)
Do not fasten off; continue to Part 4.
Part 4: Forest Green Deco Fan Band (Second End)
Change to forest green. Work Rnds 1-6 exactly as in Part 2. Fasten off. Weave in all ends.
Part 5: Mini Amigurumi Sunflower (Fine Cotton, 2.75 mm Hook)
Center (dark brown):
Rnd 1: Make a magic ring, ch 1, work 6 sc into ring, join with sl st. (6 sc)
Rnd 2: Ch 1, 2 sc in each st around, join with sl st. (12 sc)
Rnd 3: Ch 1, *2 sc in next st, sc in next st; repeat from * around, join with sl st. (18 sc)
Rnd 4: Ch 1, sc in each st around, join with sl st. (18 sc)
Rnd 5: Ch 1, *sc2tog, sc in next st; repeat from * around, join with sl st. (12 sc)
Stuff lightly with a small amount of fiberfill. Do not fasten off.
Petals (golden yellow), worked into the front loops of Rnd 5:
Row 1: Working in front loop only, *ch 6, dc in third ch from hook, dc in next ch, tr in next ch, dc in next ch, sl st in same front loop; repeat from * around all 12 front loops. (12 petals) Fasten off golden yellow, leaving a 12 in (30 cm) tail.
Leaves (forest green fine cotton), make 2:
Row 1: Ch 6. Sc in second ch from hook, hdc in next ch, dc in next ch, hdc in next ch, sc in last ch. Fasten off, leaving a 6 in (15 cm) tail. Sew one leaf to each side of the sunflower base.
Assembly and Finishing
Step 1 - Stuff or insert: Insert the bolster form, or stuff the tube firmly and evenly with polyester fiberfill, working it in from one end in small handfuls so it does not clump.
Step 2 - Attach the sunflower: Using the long tail and a sewing needle, whipstitch the sunflower appliqué to the front center of the rust body, approx. 1 in (2.5 cm) below the center line. Whipstitch means passing the needle over the edge of the piece and back through the pillow surface in small, even stitches, catching only the surface of the pillow so the stitches do not show on the back.
Step 3 - Attach the leaves: Sew the leaves in place with matching thread, tucking them just under the petals at the base of the sunflower.
Step 4 - Weave in ends: Thread each loose end onto the tapestry needle and run it back and forth through the inside of the work for about 2 inches, then trim close.
Step 5 - Block: Gently steam-block the green bands only, holding the iron an inch above the fabric, to open the fan stitches. Let the pillow dry completely before using.
Pro Tips and Variations
- Change the palette: Swap rust for charcoal and forest green for pumpkin orange for a moodier Halloween look, or use cream and sage for a year-round version.
- Adjust the size: To make a longer bolster, add extra single crochet rounds in Part 3 in multiples of 2; to make it wider, add stitches to the starting chain in multiples of 3 so the fan repeat still works.
- Substitute yarn: Any worsted weight yarn works for the body and bands; just check your gauge first. For the sunflower, any fine cotton gives crisp petals.
- Add a second sunflower: Work a second mini sunflower and place it at the opposite end of the pillow for a balanced, symmetrical look.