Retro Rocket Jet Pouch Free Crochet Pattern
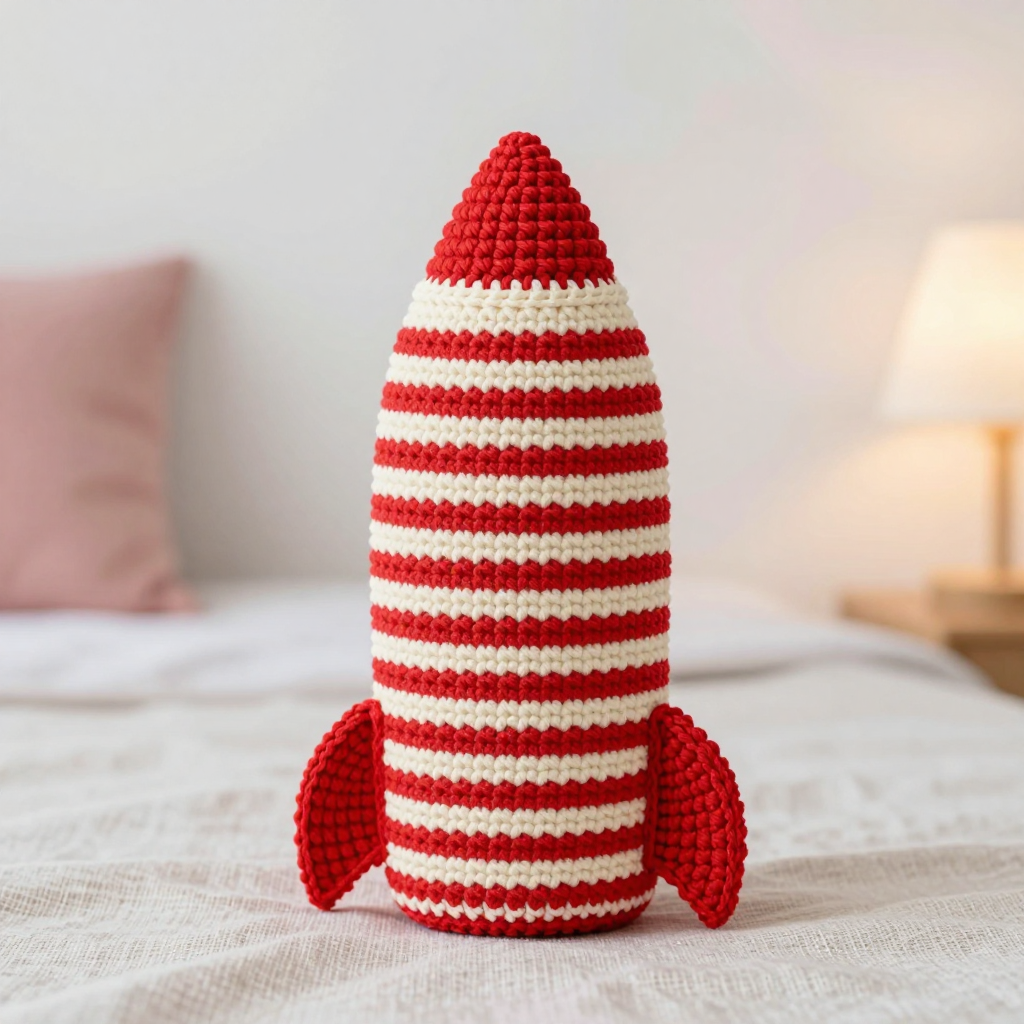
Retro Rocket Jet Pouch: A Free Beginner Crochet Pattern
Introduction
Welcome to your very first crochet adventure! This Retro Rocket Jet Pouch is the perfect project for someone who has never held a crochet hook before. It uses only the most basic stitch in all of crochet (the single crochet), and the body is worked flat as a simple rectangle, so there is no complicated shaping to worry about. When you are finished, you will have a charming little candy-red and cream striped rocket, about 3.5 inches wide and 6 inches tall, with a pointed cone top and two tiny fins. The single crochet fabric gives it a crisp, slightly ridged texture that feels sturdy and satisfying in your hand, and the alternating stripes make every row feel like a small victory. It is a wonderful first project because it is small, quick, and absolutely adorable when it is done.
Materials Needed
- Yarn: Worsted weight (category 4) acrylic yarn, approximately 120 yards total — about 70 yards of candy red (Color A) and 50 yards of cream (Color B).
- Crochet hook: Size G/6, which is 4.0 mm.
- Stitch marker: One, to help you keep track of your rounds on the cone top.
- Tapestry needle: A large-eyed, blunt-tipped needle for seaming and weaving in ends.
- Scissors: Any small pair of craft scissors.
- Optional: A small button (about 1/2 inch) if you would like to add a closure.
- Finished size: Approximately 3.5 inches wide x 6 inches tall, including the cone top. The pouch is worked flat and then seamed into a tube.
Abbreviations and Beginner Glossary
Do not worry if these look like a secret code. Here is every abbreviation used in this pattern, explained in plain English.
- ch — chain. Make a loop of yarn on your hook, then pull the yarn through the loop. That is one chain. A row of chains is the foundation you build your first stitches into.
- sc — single crochet. Insert your hook into the next stitch, wrap the yarn over the hook, pull it up through the stitch (you now have two loops on your hook), wrap the yarn over again, and pull it through both loops. One single crochet made.
- st / sts — stitch / stitches. A "stitch" is one completed single crochet (or chain). "Sts" just means more than one.
- sl st — slip stitch. Insert your hook into the next stitch, wrap the yarn over, and pull it straight through both the stitch and the loop on your hook in one motion. It creates almost no height and is used to join rounds.
- sc2tog — single crochet two together. This is a decrease, which means it makes your row narrower. Insert your hook into the next stitch, pull up a loop (two loops on hook), insert your hook into the following stitch, pull up a loop (three loops on hook), wrap the yarn over, and pull through all three loops. Two stitches have become one.
- 2 sc in next st — make two single crochets into the same stitch. This is an increase, which makes your round wider.
- magic ring — a loop of yarn you wrap around your fingers and work stitches into, then pull tight so the center closes with no hole. If you prefer, you can instead chain 2 and work your first round into the second chain from the hook.
- turn — flip your work over so you can crochet back along the row you just finished.
- fasten off — cut the yarn a few inches from your work, then pull the tail all the way through the last loop on your hook to lock it.
- right sides together — the "right side" is the pretty, outward-facing side of your fabric. Placing two pieces right sides together means the nice sides face each other and the seam will be hidden inside.
Gauge
Gauge: 16 single crochet stitches x 18 rows = 4 x 4 inches (10 x 10 cm).
Gauge simply means how big your stitches come out. If your stitches are larger than this, your pouch will turn out bigger than 3.5 x 6 inches; if they are smaller, it will turn out smaller. To check your gauge, crochet a small square about 5 inches wide and 5 inches tall in single crochet, then lay a ruler across the middle and count how many stitches fit in 4 inches. If you have more than 16, try again with a larger hook; if you have fewer, try a smaller hook. This step takes ten minutes and saves you from a disappointing surprise at the end.
Beginner Tips Before You Start
- Count every row. The body is only 14 stitches wide, so counting is quick. Say the numbers out loud if it helps.
- Do not pull your yarn too tight. Tension is the number one thing beginners struggle with. Hold the yarn gently; your stitches should slide easily on the hook.
- Use your stitch marker on the cone. Place it in the first stitch of each round so you always know where the round begins and ends.
- Change colors on the last stitch of the row. When you make the final single crochet of a stripe, pull the new color through the last two loops to finish that stitch. This makes a clean color change.
- Keep your turning chain loose. The "ch 1" at the start of each row is not a stitch; it just gives your row a little height. Do not work into it when you come back.
- Weave in ends as you go. It is much easier to tidy up a few tails at the end than a whole nest of them.
Step-by-Step Instructions
Body (worked flat in stripes)
With Color A (candy red), ch 15.
Row 1: Sc in the 2nd ch from your hook and in each ch across. (14 sc)
Row 2: Ch 1, turn. Sc in each st across. (14 sc)
Rows 3–4: With Color B (cream), repeat Row 2 twice. (14 sc)
Rows 5–6: With Color A, repeat Row 2 twice. (14 sc)
Rows 7–8: With Color B, repeat Row 2 twice. (14 sc)
Rows 9–10: With Color A, repeat Row 2 twice. (14 sc)
Rows 11–12: With Color B, repeat Row 2 twice. (14 sc)
Rows 13–14: With Color A, repeat Row 2 twice. (14 sc)
Rows 15–16: With Color B, repeat Row 2 twice. (14 sc)
Rows 17–18: With Color A, repeat Row 2 twice. (14 sc)
Rows 19–20: With Color B, repeat Row 2 twice. (14 sc)
Rows 21–22: With Color A, repeat Row 2 twice. (14 sc)
Rows 23–24: With Color B, repeat Row 2 twice. (14 sc)
Rows 25–26: With Color A, repeat Row 2 twice. (14 sc)
Fasten off, leaving a long tail (about 18 inches) for seaming. Your rectangle should measure roughly 3.5 inches wide and 6 inches tall.
Seaming the Body
Fold the rectangle in half with right sides together, matching the first row to the last row. Using the long tail and your tapestry needle, whipstitch (or mattress stitch) the two side edges together to form a tube. Whipstitch means passing your needle through one edge and then the other, over and over, like lacing a shoe. Turn the tube right side out. The bottom stays open for now; the top will be closed by the cone.
Cone Top
With Color A, make a magic ring.
Rnd 1: 6 sc in the ring. Join with a sl st to the first sc. (6 sc)
Rnd 2: Ch 1, 2 sc in each st around. Join. (12 sc)
Rnd 3: Ch 1, [sc in next st, 2 sc in next st] around. Join. (18 sc)
Rnd 4: Ch 1, sc in each st around. Join. (18 sc)
Rnd 5: Ch 1, [sc in next 2 sts, 2 sc in next st] around. Join. (24 sc)
Rnd 6: Ch 1, sc in each st around. Join. (24 sc)
Rnd 7: Ch 1, [sc in next 3 sts, 2 sc in next st] around. Join. (30 sc)
Rnd 8: Ch 1, sc in each st around. Join. (30 sc)
Rnd 9: Ch 1, [sc in next 4 sts, 2 sc in next st] around. Join. (36 sc)
Rnd 10: Ch 1, sc in each st around. Join. (36 sc)
Fasten off, leaving a long tail. The cone should measure about 3.5 inches across the base and 3 inches tall. If you like, tuck a few yarn scraps inside the tip to help it hold its shape, then sew the base of the cone to the top opening of the body with your tapestry needle, matching the circumference stitch for stitch.
Fins (make 2)
With Color A, ch 6.
Row 1: Sc in the 2nd ch from hook and in each ch across. (5 sc)
Row 2: Ch 1, turn. Sc in first 2 sts, sc2tog, sc in last st. (4 sc)
Row 3: Ch 1, turn. Sc in first st, sc2tog, sc in last st. (3 sc)
Row 4: Ch 1, turn. Sc2tog, sc in last st. (2 sc)
Row 5: Ch 1, turn. Sc2tog. (1 sc)
Fasten off. Make a second fin the same way.
Assembly and Finishing
Sew one fin to each side of the body near the bottom, with the pointed end facing outward and slightly downward. Use your tapestry needle and a length of Color A yarn, and take small stitches so the fins sit flat against the body. Weave in all ends by threading each tail onto your tapestry needle and running it back and forth through the inside of the fabric for about an inch, then trim close to the surface. The pouch is open at the top under the cone for small items; if you prefer a closed holder, sew the cone base fully closed after inserting your contents. To block the finished pouch, lightly mist it with water, shape it with your fingers, and let it dry flat. Blocking simply means dampening the fabric so it relaxes into a neat, even shape.
Pro Tips and Variations
- Change the colors: Try silver and blue for a moon-rocket look, or green and white for a space-alien rocket. Any two worsted weight colors will work.
- Make it bigger or smaller: Add or remove pairs of rows to change the height, and add or remove chains in multiples of two to change the width. Just remember to adjust the cone base to match.
- Substitute yarn: Cotton worsted weight gives a crisper, sturdier pouch, while a softer acrylic blend makes it squishier. Always check your gauge with the new yarn.
- Add a closure: Attach a small button to the front of the body near the top, then make a loop of ch 8 on the back edge and sew it in place to fasten.


