Penguin Pocket Chef Crochet Apron Free Pattern: Ice Blue & Silver Bib Apron
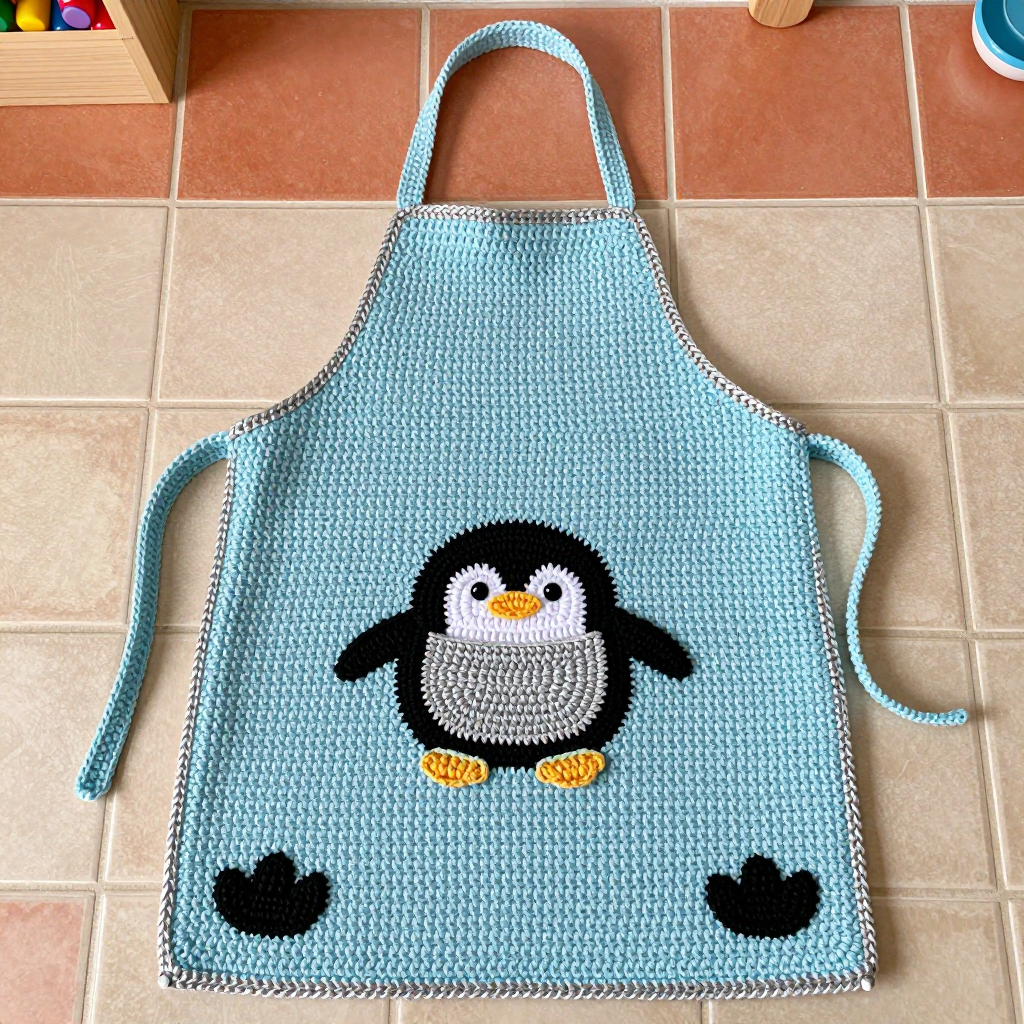
Penguin Pocket Chef Crochet Apron: Ice Blue & Silver Bib Apron
Introduction
If you have ever wanted to make something that makes people smile the moment they walk into the kitchen, this is that project. The Penguin Pocket Chef Apron is a flat, rectangular bib apron crocheted in icy blue worsted yarn, topped with a big silver-bellied penguin pocket and two tiny black-and-white penguin feet at the bottom corners. It is perfect for complete beginners because almost every piece is a simple flat rectangle worked in one easy stitch, and the fun parts are small appliqués you sew on at the end. The finished apron feels soft but sturdy, with a lovely horizontal ridge texture from the half double crochet, and it measures about 16 inches wide by 17 inches tall, so it fits a child or works as a cute decorative or craft apron for an adult. Every stitch is explained below, so even if you have never held a hook before, you can make this.
Materials Needed
- Yarn (worsted weight, category 4, acrylic or cotton blend): 500 yds Ice Blue (main apron), 120 yds Silver (penguin belly and edging), 60 yds Black (penguin body, feet, eyes), 30 yds White (penguin face and eye highlights), small amount Orange (beak).
- Hooks: H/8 (5.0 mm) hook for the apron body, neck strap, and waist ties; G/6 (4.0 mm) hook for the pocket, appliqués, and edging.
- Stitch markers (at least 4) to mark corners and strap placement.
- Tapestry needle (a big blunt needle with a large eye) for sewing pieces together and weaving in ends.
- Scissors for cutting yarn.
- Measuring tape for checking gauge and finished sizes.
- Finished size: Apron 16 inches wide x 17 inches tall; skirt 16 inches wide x 10 inches tall; bib 5 inches wide x 7 inches tall; neck strap 26 inches long; waist ties 24 inches each; penguin pocket about 5 inches wide x 8 inches tall.
Abbreviations and Beginner Glossary
- ch – chain: wrap yarn over hook, pull it through the loop on your hook. This makes the foundation "chain" you build on.
- st / sts – stitch / stitches: one completed loop-and-pull in your work.
- sc – single crochet: insert hook into stitch, yarn over, pull up a loop (2 loops on hook), yarn over, pull through both loops. One loop remains.
- hdc – half double crochet: yarn over first, insert hook into stitch, yarn over, pull up a loop (3 loops on hook), yarn over, pull through all 3 loops at once.
- hdc2tog – half double crochet two stitches together (a decrease): yarn over, insert hook into first stitch, pull up a loop (3 loops), yarn over, pull through all 3 (1 loop), then repeat the same steps into the next stitch and pull through all loops to finish. This turns 2 stitches into 1.
- sc2tog – single crochet two stitches together (a decrease): insert hook into first stitch, pull up a loop, insert hook into next stitch, pull up a loop (3 loops on hook), yarn over, pull through all 3 loops. This turns 2 stitches into 1.
- sl st – slip stitch: insert hook into stitch, yarn over, pull through both the stitch and the loop on your hook at once. Used to join rounds.
- turn – flip your work over so you can crochet back across the row you just made.
- fasten off – cut yarn leaving a tail, then pull the tail all the way through the last loop to lock it.
- magic ring – a loop of yarn you make with your fingers that you crochet into, then pull tight to close the center hole.
- whipstitch – a simple sewing stitch: bring the needle up through both layers, over the edge, and back down, repeating to make small slanted stitches.
- gauge – how many stitches and rows fit in 4 inches; it keeps your finished size correct.
Gauge
With the H/8 (5.0 mm) hook in half double crochet: 14 sts x 12 rows = 4 inches (10 cm). Pocket gauge with the G/6 (4.0 mm) hook in single crochet: 16 sts x 18 rows = 4 inches.
Gauge matters because it decides the final size of your apron. If your stitches are looser than the gauge, the apron will come out bigger; if tighter, it will come out smaller. To make a swatch, chain 22, work half double crochet rows until the piece is about 4 inches tall, then lay it flat and measure 4 inches across the middle. Count how many stitches fit in those 4 inches. If you have more than 14, try a larger hook; if fewer, try a smaller hook.
Beginner Tips Before You Start
- Count every row. The bib shaping changes stitch counts often, so count your stitches at the end of each row before you turn.
- Use stitch markers at the two waist corners (end of Row 30) and at the top corners of the bib so you know exactly where the ties and neck strap go later.
- Do not pull the yarn too tight. Keep an even, relaxed tension so your hdc rows stay soft and your stitch counts stay accurate.
- Always work the first stitch of each row. Beginners often skip it by accident, which makes the apron narrow on one side.
- Keep your turning chain small. For hdc rows, chain 1 and turn; that chain does not count as a stitch.
- Sew appliqués with matching yarn and a tapestry needle, not with the crochet hook, for a neat, flat finish.
Step-by-Step Instructions
Apron Body (Ice Blue, H/8 hook)
The apron is worked flat from the bottom up in half double crochet, then the bib is narrowed at the waist.
Row 1: Ch 58. Hdc in 2nd ch from hook and in each ch across. Turn. (56 hdc)
Rows 2–30: Ch 1, hdc in each st across. Turn. (56 hdc)
At the end of Row 30 the skirt measures approx. 16 inches wide x 10 inches tall.
Waist Shaping (begin bib)
Row 31: Ch 1, hdc in first 18 sts, hdc2tog, hdc in next 16 sts, hdc2tog, hdc in last 18 sts. Turn. (54 hdc)
Row 32: Ch 1, hdc in each st across. Turn. (54 hdc)
Row 33: Ch 1, hdc in first 17 sts, hdc2tog, hdc in next 16 sts, hdc2tog, hdc in last 17 sts. Turn. (52 hdc)
Row 34: Ch 1, hdc in each st across. Turn. (52 hdc)
Row 35: Ch 1, hdc in first 16 sts, hdc2tog, hdc in next 16 sts, hdc2tog, hdc in last 16 sts. Turn. (50 hdc)
Row 36: Ch 1, hdc in each st across. Turn. (50 hdc)
Row 37: Ch 1, hdc in first 15 sts, hdc2tog, hdc in next 16 sts, hdc2tog, hdc in last 15 sts. Turn. (48 hdc)
Row 38: Ch 1, hdc in each st across. Turn. (48 hdc)
Row 39: Ch 1, hdc in first 14 sts, hdc2tog, hdc in next 16 sts, hdc2tog, hdc in last 14 sts. Turn. (46 hdc)
Row 40: Ch 1, hdc in each st across. Turn. (46 hdc)
Row 41: Ch 1, hdc in first 13 sts, hdc2tog, hdc in next 16 sts, hdc2tog, hdc in last 13 sts. Turn. (44 hdc)
Row 42: Ch 1, hdc in each st across. Turn. (44 hdc)
Row 43: Ch 1, hdc in first 12 sts, hdc2tog, hdc in next 16 sts, hdc2tog, hdc in last 12 sts. Turn. (42 hdc)
Row 44: Ch 1, hdc in each st across. Turn. (42 hdc)
Row 45: Ch 1, hdc in first 11 sts, hdc2tog, hdc in next 16 sts, hdc2tog, hdc in last 11 sts. Turn. (40 hdc)
Row 46: Ch 1, hdc in each st across. Turn. (40 hdc)
Row 47: Ch 1, hdc in first 10 sts, hdc2tog, hdc in next 16 sts, hdc2tog, hdc in last 10 sts. Turn. (38 hdc)
Row 48: Ch 1, hdc in each st across. Turn. (38 hdc)
Row 49: Ch 1, hdc in first 9 sts, hdc2tog, hdc in next 16 sts, hdc2tog, hdc in last 9 sts. Turn. (36 hdc)
Row 50: Ch 1, hdc in each st across. Turn. (36 hdc)
Row 51: Ch 1, hdc in first 8 sts, hdc2tog, hdc in next 16 sts, hdc2tog, hdc in last 8 sts. Turn. (34 hdc)
Row 52: Ch 1, hdc in each st across. Turn. (34 hdc)
Row 53: Ch 1, hdc in first 7 sts, hdc2tog, hdc in next 16 sts, hdc2tog, hdc in last 7 sts. Turn. (32 hdc)
Row 54: Ch 1, hdc in each st across. Turn. (32 hdc)
Row 55: Ch 1, hdc in first 6 sts, hdc2tog, hdc in next 16 sts, hdc2tog, hdc in last 6 sts. Turn. (30 hdc)
Row 56: Ch 1, hdc in each st across. Turn. (30 hdc)
Row 57: Ch 1, hdc in first 5 sts, hdc2tog, hdc in next 16 sts, hdc2tog, hdc in last 5 sts. Turn. (28 hdc)
Row 58: Ch 1, hdc in each st across. Turn. (28 hdc)
Row 59: Ch 1, hdc in first 4 sts, hdc2tog, hdc in next 16 sts, hdc2tog, hdc in last 4 sts. Turn. (26 hdc)
Row 60: Ch 1, hdc in each st across. Turn. (26 hdc)
Row 61: Ch 1, hdc in first 3 sts, hdc2tog, hdc in next 16 sts, hdc2tog, hdc in last 3 sts. Turn. (24 hdc)
Row 62: Ch 1, hdc in each st across. Turn. (24 hdc)
Row 63: Ch 1, hdc in first 2 sts, hdc2tog, hdc in next 16 sts, hdc2tog, hdc in last 2 sts. Turn. (22 hdc)
Row 64: Ch 1, hdc in each st across. Turn. (22 hdc)
Row 65: Ch 1, hdc in first st, hdc2tog, hdc in next 16 sts, hdc2tog, hdc in last st. Turn. (20 hdc)
Row 66: Ch 1, hdc in each st across. Turn. (20 hdc)
Row 67: Ch 1, hdc2tog, hdc in next 16 sts, hdc2tog. Turn. (18 hdc)
Rows 68–80: Ch 1, hdc in each st across. Turn. (18 hdc)
Fasten off, leaving a 12-inch tail. The bib measures approx. 5 inches wide x 7 inches tall; the whole apron is approx. 16 inches wide x 17 inches tall.
Neck Strap (Ice Blue, H/8 hook)
Row 1: Ch 4. Sc in 2nd ch from hook and in each ch across. Turn. (3 sc)
Repeat Row 1 until the strap measures 26 inches. Fasten off. Sew one end to the top left corner of the bib and the other to the top right corner.
Waist Ties (Ice Blue, H/8 hook) – make 2
Row 1: Ch 4. Sc in 2nd ch from hook and in each ch across. Turn. (3 sc)
Repeat Row 1 until the tie measures 24 inches. Fasten off. Sew one tie to each side of the waist (Row 30 edge).
Penguin Pocket (G/6 hook)
The pocket is worked flat in single crochet from the bottom up, then the silver belly is worked as a separate oval and sewn on.
Pocket body (Black):
Row 1: Ch 21. Sc in 2nd ch from hook and in each ch across. Turn. (20 sc)
Rows 2–14: Ch 1, sc in each st across. Turn. (20 sc)
Row 15: Ch 1, sc2tog, sc in next 16 sts, sc2tog. Turn. (18 sc)
Row 16: Ch 1, sc in each st across. Turn. (18 sc)
Row 17: Ch 1, sc2tog, sc in next 14 sts, sc2tog. Turn. (16 sc)
Row 18: Ch 1, sc in each st across. Turn. (16 sc)
Row 19: Ch 1, sc2tog, sc in next 12 sts, sc2tog. Turn. (14 sc)
Row 20: Ch 1, sc in each st across. Turn. (14 sc)
Row 21: Ch 1, sc2tog, sc in next 10 sts, sc2tog. Turn. (12 sc)
Row 22: Ch 1, sc in each st across. Turn. (12 sc)
Row 23: Ch 1, sc2tog, sc in next 8 sts, sc2tog. Turn. (10 sc)
Row 24: Ch 1, sc in each st across. Turn. (10 sc)
Row 25: Ch 1, sc2tog, sc in next 6 sts, sc2tog. Turn. (8 sc)
Row 26: Ch 1, sc in each st across. Turn. (8 sc)
Row 27: Ch 1, sc2tog, sc in next 4 sts, sc2tog. Turn. (6 sc)
Row 28: Ch 1, sc in each st across. Turn. (6 sc)
Row 29: Ch 1, sc2tog, sc in next 2 sts, sc2tog. Turn. (4 sc)
Row 30: Ch 1, sc in each st across. Turn. (4 sc)
Row 31: Ch 1, sc2tog twice. Turn. (2 sc)
Row 32: Ch 1, sc2tog. Fasten off. (1 sc)
Pocket measures approx. 5 inches wide x 8 inches tall.
Silver belly (Silver, G/6 hook):
Row 1: Ch 13. Sc in 2nd ch from hook and in each ch across. Turn. (12 sc)
Rows 2–10: Ch 1, sc in each st across. Turn. (12 sc)
Row 11: Ch 1, sc2tog, sc in next 8 sts, sc2tog. Turn. (10 sc)
Row 12: Ch 1, sc in each st across. Turn. (10 sc)
Row 13: Ch 1, sc2tog, sc in next 6 sts, sc2tog. Turn. (8 sc)
Row 14: Ch 1, sc in each st across. Turn. (8 sc)
Row 15: Ch 1, sc2tog, sc in next 4 sts, sc2tog. Turn. (6 sc)
Row 16: Ch 1, sc in each st across. Turn. (6 sc)
Row 17: Ch 1, sc2tog, sc in next 2 sts, sc2tog. Turn. (4 sc)
Row 18: Ch 1, sc in each st across. Turn. (4 sc)
Row 19: Ch 1, sc2tog twice. Turn. (2 sc)
Row 20: Ch 1, sc2tog. Fasten off. (1 sc)
Belly measures approx. 3 inches wide x 5 inches tall. Whipstitch the silver belly to the center front of the black pocket with Silver yarn, leaving a 1/2-inch black border all around.
Penguin face (White, G/6 hook):
Row 1: Ch 9. Sc in 2nd ch from hook and in each ch across. Turn. (8 sc)
Rows 2–4: Ch 1, sc in each st across. Turn. (8 sc)
Row 5: Ch 1, sc2tog, sc in next 4 sts, sc2tog. Turn. (6 sc)
Row 6: Ch 1, sc in each st across. Turn. (6 sc)
Row 7: Ch 1, sc2tog, sc in next 2 sts, sc2tog. Turn. (4 sc)
Row 8: Ch 1, sc2tog twice. Fasten off. (2 sc)
Sew the white face to the top of the black pocket, centered, with the pointed end down.
Eyes (Black, G/6 hook) – make 2: Magic ring, 6 sc into ring. Join with sl st to first sc. Fasten off. Sew one eye to each side of the white face. Add a tiny White sc highlight on each eye with White yarn.
Beak (Orange, G/6 hook): Ch 3. Sc in 2nd ch from hook, sc in last ch. Turn. (2 sc) Ch 1, sc2tog. Fasten off. (1 sc) Sew the beak below the eyes, centered on the white face.
Sew the completed penguin pocket to the center front of the bib, approx. 1 inch below the top edge, using Black yarn and a whipstitch along the sides and bottom only, leaving the top open as a pocket.
Penguin Foot Appliqués (G/6 hook) – make 2
Foot pad (Black):
Row 1: Ch 7. Sc in 2nd ch from hook and in each ch across. Turn. (6 sc)
Rows 2–3: Ch 1, sc in each st across. Turn. (6 sc)
Row 4: Ch 1, sc2tog, sc in next 2 sts, sc2tog. Turn. (4 sc)
Row 5: Ch 1, sc2tog twice. Fasten off. (2 sc)
Toes (Black, G/6 hook) – make 3 per foot: Ch 4. Sc in 2nd ch from hook and in each ch across. Fasten off. (3 sc)
Sew three toes to the rounded top of each foot pad. Sew one finished foot appliqué to each bottom corner of the apron skirt, pointing inward, using Black yarn.
Edging (Silver, G/6 hook)
With Silver yarn, work a single crochet border around the entire outer edge of the apron: join Silver at the bottom right corner, sc evenly up the right side, across the top of the bib, down the left side, and across the bottom, working 3 sc in each corner to turn neatly. Join with sl st to first sc. Fasten off. Weave in all ends.
Assembly and Finishing
Seaming: Thread your tapestry needle with Ice Blue yarn. Sew the neck strap ends to the top left and top right corners of the bib using small whipstitches, going through the strap and the apron edge several times for strength. Sew each waist tie to the side edge at the waist (the Row 30 edge), again with small whipstitches. Sew the penguin pocket to the bib along the sides and bottom only, so the top stays open. Sew the foot appliqués to the bottom corners of the skirt, pointing inward.
Weaving in ends: Turn the apron to the wrong side. Thread each yarn tail onto the tapestry needle and weave it in and out through the back of several stitches, then trim close to the work. Never knot the tails; weaving hides them securely.
Blocking: Lightly mist the apron with water and pin it flat to measurements: apron 16 inches wide x 17 inches tall, bib 5 inches wide x 7 inches tall, neck strap 26 inches, waist ties 24 inches each. Let it dry completely. This relaxes the stitches and makes the edges lie flat.
Reinforce: Sew buttons or reinforce the strap seams with a double strand of Ice Blue yarn for extra durability.
Pro Tips and Variations
- Change the colors: Swap Ice Blue for mint green or lavender, and Silver for cream, to make a completely different penguin chef.
- Adjust the size: For a larger adult apron, add 14 chains to the starting chain (each 14 sts adds about 4 inches of width) and work more plain hdc rows before the waist shaping.
- Substitute yarn: Cotton yarn gives a washable, kitchen-friendly apron; acrylic is softer and lighter. Always check your gauge with the new yarn.
- Add a pocket lining: Sew a small fabric rectangle behind the penguin pocket for extra strength if the apron will hold heavy utensils.