Free Pattern: Knit Barn Owl Entrelac Boot Slippers for Babies
Free Pattern: Knit Barn Owl Entrelac Boot Slippers for Babies
Introduction
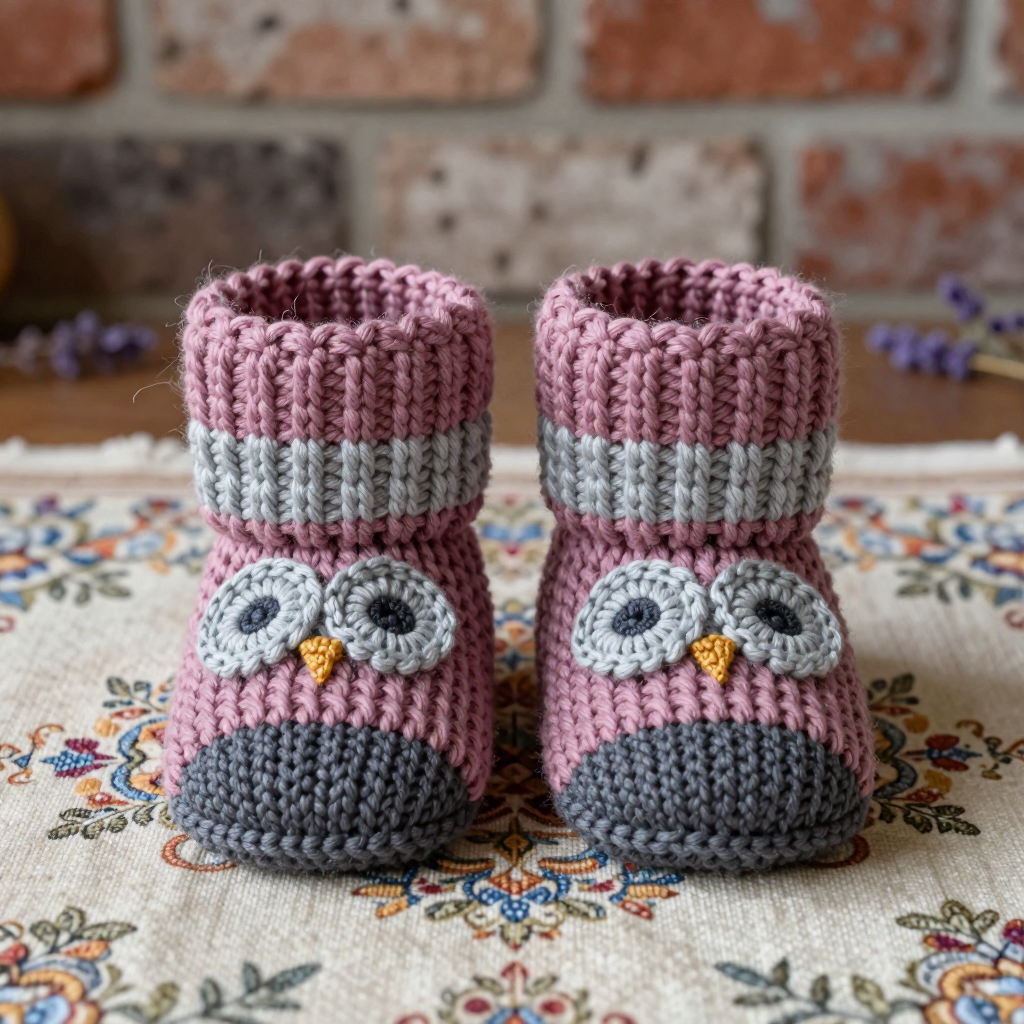
These cozy little Barn Owl boot slippers are the perfect first project for anyone who has ever wanted to try entrelac knitting but felt a bit nervous about it. The bootie is built from small, friendly rectangles of dusty rose and light grey merino, so you only ever work a few stitches at a time — no long rows to lose your place in! Once the bootie is sewn together, two tiny knitted owl eyes and a little mustard beak turn it into a sweet farmhouse-style keepsake that's just right for Halloween photos or everyday snuggles. The finished booties are soft, squishy, and about 4.5 inches (11.5 cm) long, sized for babies 6–12 months. If you can knit, purl, and decrease, you can absolutely make these — let's get started!
Materials Needed
- Yarn: DK weight (light worsted) merino wool, approximately 100 g total:
- 50 g dusty rose (MC — main color)
- 30 g light grey (CC1 — contrast color 1)
- 10 g dark grey (CC2 — contrast color 2)
- 5 g mustard/ochre (CC3 — contrast color 3, for beaks)
- Knitting needles: US 5 (3.75 mm) straight needles for the vamp and appliqués
- Double-pointed needles: US 5 (3.75 mm) set for the sole
- Stitch markers: 4–6 (helpful for marking rectangle edges)
- Tapestry needle: blunt-tipped, for seaming and weaving in ends
- Scissors
- Finished size: 6–12 months — foot length approx. 4.5 in (11.5 cm), width approx. 2.25 in (5.5 cm)
Abbreviations and Beginner Glossary
- st / sts — stitch / stitches (one loop on your needle is one stitch)
- K — knit stitch (insert the right needle into the front of the stitch from left to right, wrap yarn around, pull the loop through, and slide the old stitch off)
- P — purl stitch (insert the right needle into the front of the stitch from right to left, wrap yarn around the front, pull the loop through, and slide the old stitch off)
- k2tog — knit two stitches together (insert your needle through two stitches at once and knit them as one — this decreases your stitch count by one)
- kfb — knit front and back (knit into the front of the stitch, then knit into the back of the same stitch before sliding it off — this increases your stitch count by one)
- turn — stop knitting the row and flip your work around so the other side faces you (this is how short rows work)
- pick up and knit — insert your needle into the edge of your knitting, wrap yarn, and pull a loop through to create a new stitch along that edge
- bind off — the way to finish your knitting so it doesn't unravel (knit two stitches, lift the first over the second, and repeat across)
- cast on — the way to create your very first row of stitches on the needle
- MC / CC1 / CC2 / CC3 — main color / contrast colors 1, 2, and 3
- entrelac — a knitting technique where you build small squares (rectangles) that interlock like a woven basket
- French knot — a tiny embroidered dot made by wrapping yarn around the needle once and pulling it through
- mattress stitch — an invisible seaming technique worked from the right side, catching the horizontal bars between stitches
Gauge
22 sts and 30 rows = 4 inches (10 cm) in stockinette stitch with US 5 (3.75 mm) needles.
Gauge matters because it tells you whether your booties will come out the right size. If your stitches are too big, the booties will be too large for a baby's foot; too small, and they won't fit at all. To check your gauge, cast on about 30 stitches and knit in stockinette (knit one row, purl one row) for about 4 inches. Lay the swatch flat, place a ruler across the middle, and count how many stitches fit in 4 inches. If you have more than 22, go up a needle size; if you have fewer, go down a size. Wash and dry your swatch the way you'll wash the booties, since merino can relax after blocking.
Beginner Tips Before You Start
- Use stitch markers. Place a marker at the start of each rectangle so you always know where one ends and the next begins.
- Don't pull your yarn too tight. Tension is everything in entrelac — keep your stitches relaxed so the rectangles stay square and the bootie stays soft.
- Count your stitches after every rectangle. Each rectangle should end with 6 stitches. If you have 5 or 7, undo that rectangle and try again.
- Turn your work firmly. When a pattern says "turn," flip the whole piece around so the wrong side faces you — this is what creates the short rows.
- Keep your colors organized. Wind each color into its own small ball and keep them in separate bags so they don't tangle.
- Don't worry about perfection. Entrelac looks complicated but is just small, repeated steps — and any tiny wobbles disappear once the bootie is sewn and blocked.
Step-by-Step Instructions
Entrelac Vamp (make 2, one per bootie)
The vamp is worked flat in entrelac rectangles using short rows. Each rectangle is 6 sts wide and 6 rows tall.
Foundation: With MC, cast on 18 sts.
Base Triangles (Row 1 of entrelac):
Triangle 1: K2, turn; P2, turn; K3, turn; P3, turn; K4, turn; P4, turn; K5, turn; P5, turn; K6, turn; P6. (First triangle complete.)
Triangle 2: Pick up and knit 6 sts along the left edge of Triangle 1, turn; P6, turn; K5, k2tog, turn; P6, turn; K4, k2tog, turn; P6, turn; K3, k2tog, turn; P6, turn; K2, k2tog, turn; P6, turn; K1, k2tog, turn; P6. (Second triangle complete.)
Triangle 3: Repeat Triangle 2 once more. You now have 3 base triangles (18 sts total).
Rectangle Rows (work 3 rows of rectangles):
Row 1 (Right-leaning rectangles, CC1):
Rect 1: Pick up and knit 6 sts along the right edge of the first base triangle, turn; P6, turn; K5, k2tog, turn; P6, turn; K4, k2tog, turn; P6, turn; K3, k2tog, turn; P6, turn; K2, k2tog, turn; P6, turn; K1, k2tog, turn; P6. (First rectangle complete.)
Rect 2: Pick up and knit 6 sts along the next edge, turn; P6, turn; K5, k2tog, turn; P6, turn; K4, k2tog, turn; P6, turn; K3, k2tog, turn; P6, turn; K2, k2tog, turn; P6, turn; K1, k2tog, turn; P6.
Rect 3: Repeat Rect 2 once more. (3 rectangles in CC1.)
Row 2 (Left-leaning rectangles, MC):
Rect 1: Pick up and knit 6 sts along the left edge of the first CC1 rectangle, turn; P6, turn; K5, k2tog, turn; P6, turn; K4, k2tog, turn; P6, turn; K3, k2tog, turn; P6, turn; K2, k2tog, turn; P6, turn; K1, k2tog, turn; P6.
Rect 2: Repeat Rect 1 twice more. (3 rectangles in MC.)
Row 3 (Right-leaning rectangles, CC1): Repeat Row 1 once more.
Top Triangles (finishing edge):
Triangle 1: Pick up and knit 6 sts along the right edge of the first rectangle, turn; P6, turn; K5, k2tog, turn; P6, turn; K4, k2tog, turn; P6, turn; K3, k2tog, turn; P6, turn; K2, k2tog, turn; P6, turn; K1, k2tog, turn; P6. (First top triangle complete.)
Triangle 2: Repeat Triangle 1 twice more. Bind off all sts loosely.
Sole (make 2)
With CC2 and double-pointed needles, cast on 18 sts.
Row 1: Knit.
Row 2: Purl.
Row 3: K1, kfb, k14, kfb, k1. (20 sts)
Row 4: Purl.
Row 5: K1, kfb, k16, kfb, k1. (22 sts)
Row 6: Purl.
Row 7: Knit.
Row 8: Purl.
Row 9: K1, k2tog, k16, k2tog, k1. (20 sts)
Row 10: Purl.
Row 11: K1, k2tog, k14, k2tog, k1. (18 sts)
Row 12: Purl.
Bind off all sts loosely.
Owl-Eye Appliqués (make 4, two per bootie)
With CC1 (light grey), cast on 4 sts.
Row 1: Knit.
Row 2: Purl.
Row 3: Kfb, k2, kfb. (6 sts)
Row 4: Purl.
Row 5: Knit.
Row 6: Purl.
Row 7: K2tog, k2, k2tog. (4 sts)
Row 8: Purl.
Bind off all sts. With CC2 (dark grey), embroider a small French knot in the center of each eye circle for the pupil.
Beak (make 2)
With CC3 (mustard/ochre), cast on 3 sts.
Row 1: Knit.
Row 2: Purl.
Row 3: K2tog, k1. (2 sts)
Row 4: Purl.
Row 5: K2tog. (1 st)
Bind off.
Assembly and Finishing
- Sew the sole to the vamp. With right sides together, line up the 18-st cast-on edge of the vamp with the 18-st sole edge. Thread your tapestry needle with CC2 and work mattress stitch: bring the needle up through the first stitch of the sole, then across to the matching stitch on the vamp, catching the horizontal bar between stitches on each side. Pull gently after every few stitches so the seam stays invisible and even.
- Sew the back seam. Fold the vamp so the two short edges meet, right sides together, and sew them with mattress stitch to form a tube. Turn the bootie right side out.
- Attach the owl eyes. Sew two eye appliqués side by side on the front of each vamp, about 0.5 in (1.25 cm) apart, positioned 1 in (2.5 cm) below the top edge. Use small, even stitches so the edges lie flat.
- Attach the beak. Sew one beak between the two eyes on each bootie, pointing downward.
- Weave in all ends. Thread each loose end onto your tapestry needle and weave it back and forth through the wrong side of the fabric for about 1 inch, then trim close to the fabric.
- Block. Lightly steam-block the booties to shape: pin them gently into shape on a towel, hold a steam iron about 1 inch above the fabric (never touch the iron to the knitting), let the steam settle in, and leave to dry completely. Ensure all appliqués are securely sewn. The booties are now ready to wear.
Pro Tips and Variations
- Change the colors. Swap dusty rose for soft sage or cream for a woodland-themed pair, or use a single color for a more minimalist look.
- Adjust the size. For a smaller newborn size, use a lighter yarn (fingering weight) and US 3 (3.25 mm) needles, keeping the same rectangle count. For a larger size, go up one needle size and add one extra rectangle row.
- Try a yarn substitution. Any DK weight yarn works — acrylic or cotton blends are machine-washable and great for babies, though merino gives the softest, warmest result.
- Add a non-slip sole. For older babies who are starting to walk, sew a few small dots of puffy fabric paint onto the bottom of each sole to add grip.