Moss & Lichen Rose Crown Peg Doll Free Crochet Pattern
Moss & Lichen Rose Crown Peg Doll — Free Beginner Crochet Pattern
Introduction
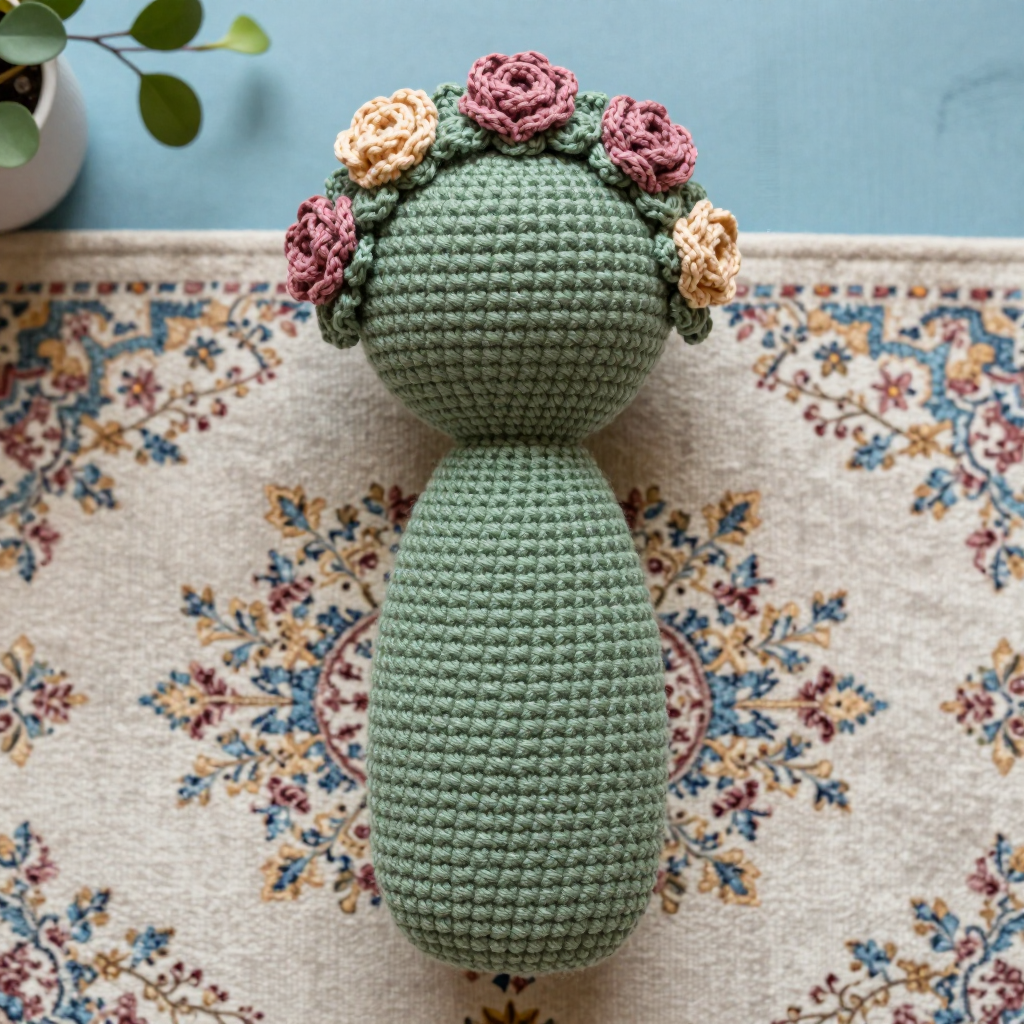
If you have never held a crochet hook before, this little doll is the perfect first project — she is made almost entirely from one simple stitch, worked round and round in a spiral, so there are no seams to sew and no complicated shaping to memorize. The finished doll is a tall, smooth peg about 2 inches wide and 4.5 inches tall, worked in soft moss-green cotton that shows off every neat ridge of single crochet. Around her head sits a flat little circlet in lichen-sage green, decorated with five tiny cupped roses in dusty rose and pale ochre. She has no face, just a gently rounded dome, which gives her that quiet, vintage 1970s handmade charm. By the end you will have learned the magic ring, single crochet, increases, and decreases — the four building blocks of all amigurumi.
Materials Needed
- Yarn: Worsted weight (CYC category 4) cotton. Approx. 60 yards moss green (Color A) for the body, 20 yards lichen/sage green (Color B) for the crown base, and small amounts of dusty rose (Color C) and pale ochre (Color D) for the roses (about 3–4 yards of each).
- Crochet hook: 3.5 mm (US size E/4).
- Stitch marker (one is enough; a safety pin or scrap of contrasting yarn works too).
- Tapestry needle (blunt tip, large eye) for sewing and weaving in ends.
- Scissors.
- Polyester fiberfill stuffing (a small handful).
- Finished size: approx. 2 in (5 cm) wide × 4.5 in (11.5 cm) tall; the crown circlet measures approx. 2.25 in (5.5 cm) in diameter.
Abbreviations and Beginner Glossary
- ch — chain. Make a loop of yarn on the hook and pull the working yarn through it; each loop you pull through is one chain stitch. Chains look like a little braid.
- sc — single crochet. Insert your hook into the stitch, yarn over (wrap the yarn around the hook), pull up a loop (you now have 2 loops on the hook), yarn over again, and pull through both loops. One single crochet made.
- inc — increase. Work 2 sc into the same stitch. This adds one stitch and makes the piece wider.
- dec — decrease (also written sc2tog, "single crochet 2 together"). Insert hook into the first stitch, yarn over, pull up a loop; insert hook into the next stitch, yarn over, pull up a loop; yarn over and pull through all 3 loops on the hook. Two stitches become one, making the piece narrower.
- sl st — slip stitch. Insert hook into the stitch, yarn over, and pull the yarn straight through both the stitch and the loop on your hook in one motion. Makes an almost invisible joining stitch.
- dc — double crochet. Yarn over, insert hook into stitch, yarn over, pull up a loop (3 loops on hook), yarn over and pull through 2 loops, yarn over and pull through the last 2 loops.
- st / sts — stitch / stitches.
- Rnd — round. One complete trip around the circle.
- Magic ring — an adjustable loop you crochet into, then pull tight so there is no hole in the middle. (If it feels tricky, chain 2 and work your first round into the second chain from the hook instead.)
- Continuous rounds — you spiral around and around without joining at the end of each round. The stitch marker marks where each new round begins.
- [ ] — brackets mean "repeat everything inside the brackets the number of times stated after them."
- ( ) — the number in parentheses at the end of a line is the stitch count you should have when that round is finished.
Gauge
20 sc × 22 rounds = 4 inches (10 cm) in continuous single crochet.
Why gauge matters: gauge is simply how big your stitches turn out. If your stitches are bigger than the pattern's, your doll will be taller and wider than 4.5 inches and the crown may not fit; if they are smaller, she will be tiny. How to check: with Color A, make a magic ring, work 6 sc into it, then work 3 rounds of plain sc (no increases) — you'll have a small cup. Measure across the middle: 20 stitches should measure 4 inches. If you get more stitches in 4 inches, your tension is tight — try a slightly larger hook. If you get fewer, try a smaller hook. It's fine to change hook size; the pattern still works.
Beginner Tips Before You Start
- Mark the first stitch of every round. Because you never join, it's easy to lose your place. Place the marker in the very first stitch of the round, and when you reach it again, move it up to the new first stitch.
- Don't pull the yarn tight. Keep an even, relaxed tension. Tight stitches make a stiff doll that's hard to stuff and hard to get the hook into.
- Count out loud (or in your head) at the end of every round. The stitch count in parentheses is your safety net — if it doesn't match, fix it before moving on.
- Stuff as you go. The body is tall and narrow; it's much easier to add small pinches of fiberfill after Round 12 than to cram it all in at the end.
- Cotton has no stretch. That's good for a peg doll — she'll hold her shape — but it means your tension must stay even, so don't yank.
- Keep your roses loose and cupped. The petals are meant to look soft; if you crochet them tightly they'll lie flat like coins instead of curling into a rose.
Step-by-Step Instructions
Body (Color A — moss green)
Work in continuous rounds — do not join at the end of each round. Move your stitch marker to the first stitch of each new round.
- Rnd 1: Make a magic ring, work 6 sc into the ring. Pull the tail tight to close the center. (6 sts)
- Rnd 2: Inc in each st around. (12 sts)
- Rnd 3: [Sc 1, inc] 6 times. (18 sts)
- Rnd 4: [Sc 2, inc] 6 times. (24 sts)
- Rnd 5: [Sc 3, inc] 6 times. (30 sts)
- Rnds 6–8: Sc evenly around (1 sc in each st). (30 sts)
- Rnd 9: [Sc 3, dec] 6 times. (24 sts)
- Rnd 10: Sc evenly around. (24 sts)
- Rnd 11: [Sc 2, dec] 6 times. (18 sts)
- Rnds 12–20: Sc evenly around. (18 sts) — these 9 rounds form the tall cylindrical peg body. Stuff firmly but not overfull as you go, keeping the base flat so she stands.
- Rnd 21: [Sc 1, dec] 6 times. (12 sts)
- Rnd 22: Dec 6 times. (6 sts)
Fasten off (cut the yarn, pull the tail through the last loop and tighten). Thread the tail onto your tapestry needle, run it through the front loop of each of the remaining 6 stitches, and pull gently to close the top. Push the tail inside and shape the top into a soft dome with your fingers. Add a little more stuffing through the top before you close it if needed.
Rose Crown Circlet (Color B — lichen/sage)
This is worked flat and joined into a ring, so it sits like a little headband.
- Rnd 1: Ch 30, join with sl st to the first ch to form a ring — be careful not to twist the chain. Ch 1, then sc in each ch around, join with sl st to the first sc. (30 sts)
- Rnd 2: Ch 1, sc in each st around, join with sl st to the first sc. (30 sts)
Fasten off, leaving a 10 in (25 cm) tail. The circlet should measure about 2.25 in (5.5 cm) in diameter and sit snugly around the doll's head just above the dome.
Small Roses (make 5 — 3 in Color C, 2 in Color D)
- Rnd 1: Magic ring, 5 sc into the ring. Pull the tail tight. (5 sts)
- Rnd 2 (petals): [Ch 2, 2 dc in the next st, ch 2, sl st in the same st] repeat around — you will work this 5 times, once into each of the 5 stitches, giving 5 petals. (5 petals)
Fasten off, leaving a 6 in (15 cm) tail. Gently roll and pinch the center of each rose with your fingers so the petals cup upward.
Assembly and Finishing
- Fit the circlet: Slip the circlet over the doll's head so it rests just above the dome, like a little crown. It should sit snugly without sliding down.
- Sew on the roses: Thread the 6 in tail of one rose onto your tapestry needle. Place the rose on the circlet and sew through the base of the rose and the circlet several times, catching the circlet stitches only (not the doll's head). Repeat with all 5 roses, spacing them evenly around the circlet and alternating dusty rose (C) and pale ochre (D).
- Weave in ends: Thread each remaining tail onto the tapestry needle and run it through the back of several stitches (about 1 inch / 2.5 cm), then snip close. Never knot — knots work loose and show.
- Block the circlet: Pin the circlet flat on a towel or blocking mat, mist lightly with water (or hold a steam iron a few inches above — never touch the iron to the yarn), and let it dry completely. This flattens the ring and opens up the petals.
- Final shaping: Gently roll the doll between your palms to even out the stuffing, and press the base flat so she stands on her own.
Pro Tips and Variations
- Change the colorway: Swap moss green for oatmeal or charcoal for a more modern look, or use a single color for the whole doll and let the roses be the only pop of color.
- Make her taller or shorter: Add or remove plain sc rounds in the Rnds 12–20 section — each extra round adds about 0.18 in (4.5 mm) of height. Keep the count of plain rounds the same on both sides of the body for a balanced peg shape.
- Try a different yarn: Cotton gives a crisp, vintage look, but a smooth acrylic or cotton-blend worsted works too — just check your gauge again, because acrylic stretches more and the doll may end up slightly wider.
- Add more roses or a tiny bow: Six or seven roses make a fuller crown; or leave the circlet plain and tie a narrow ribbon bow at the back for a simpler, quicker finish.