Coconut Cream Red Panda Pill Crochet Free Pattern
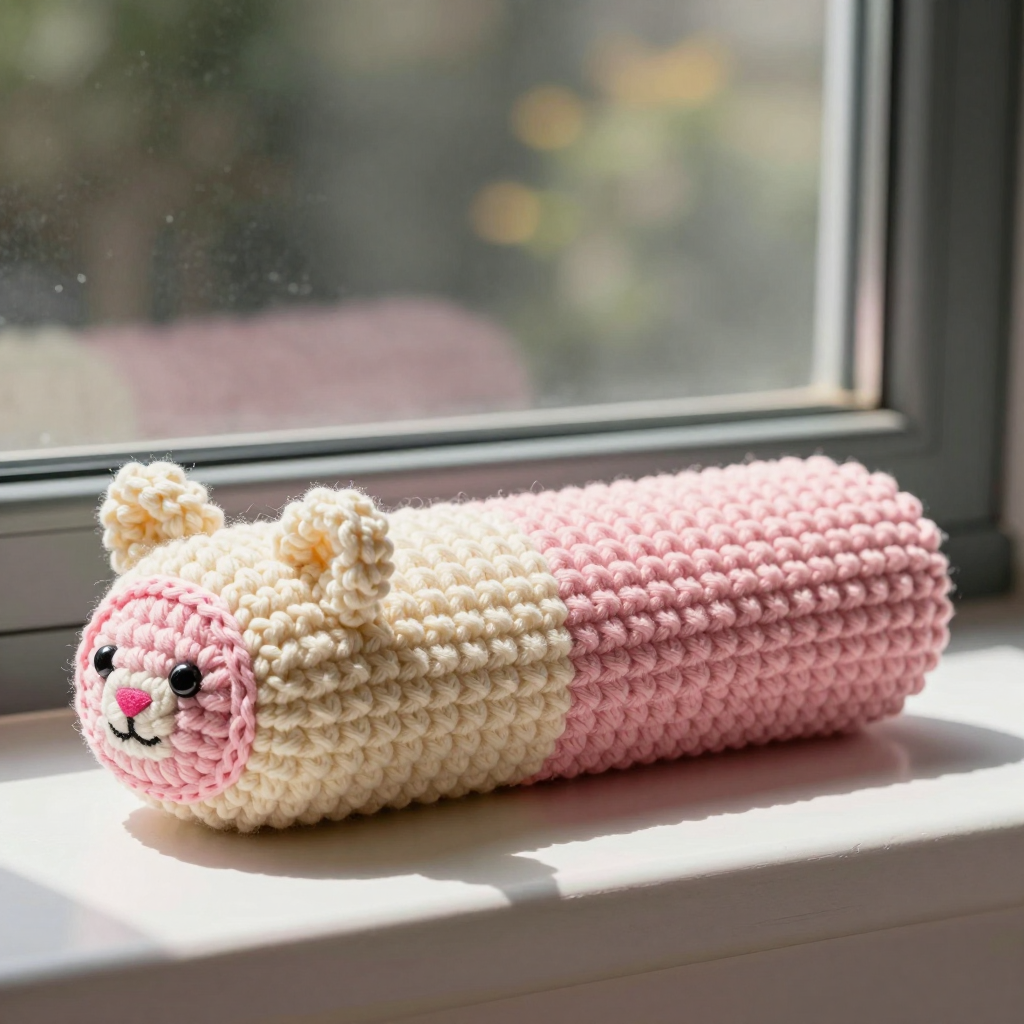
Coconut Cream Red Panda Pill: A Beginner's First Amigurumi
If you have never held a crochet hook before, this is the project I would hand you first. The Coconut Cream Red Panda Pill is a palm-sized, squishy little desk buddy worked from soft velvet yarn in a dreamy cream-and-pastel-pink candy colorway. It is essentially one simple straight tube with a round face sewn on and two tiny ears, so you only need to master one stitch to finish the whole thing. When it is done it feels like a plush little marshmallow: velvety, smooth, and about 4.5 inches (11.5 cm) long, small enough to sit beside your keyboard or tuck in a pocket. There is no shaping to fear, no complicated counting beyond twenty-four, and no sewing machine required. You will be amazed at how quickly a fuzzy little panda appears in your hands.
Materials Needed
- Yarn: Chenille/velvet yarn, super bulky weight (approx. 6–8 mm thickness). You need 1 skein cream (Color A, approx. 25 g) and 1 skein pastel pink (Color B, approx. 25 g). Velvet yarn is what gives the finished panda its soft, fuzzy, plush look.
- Crochet hook: 5.0 mm hook (US size H-8), or the size you need to match the gauge below.
- Stitch marker: 1, to mark the beginning of each round. A safety pin or a scrap of contrasting yarn works too.
- Tapestry needle: A large-eye, blunt-tipped needle for sewing pieces together and weaving in ends.
- Scissors: Any small sharp pair.
- Stuffing: A small amount of polyester fiberfill (about a handful).
- Optional: Two small black beads for eyes and a scrap of pink yarn for the nose.
- Finished size: Approx. 4.5 inches (11.5 cm) long x 2.5 inches (6.5 cm) wide. The face circle is about 1.5 inches (3.8 cm) across and each ear about 1 inch (2.5 cm) across.
Abbreviations and Beginner Glossary
Every term below is explained as if you have never crocheted. Read this once before you start and keep it beside you.
- ch – chain: yarn over the hook and pull the loop through the loop already on your hook. This makes a small linked loop.
- sc – single crochet: insert your hook into the stitch, yarn over, pull up a loop (you now have 2 loops on the hook), yarn over again, and pull through both loops. One single crochet made.
- inc – increase: work 2 single crochet stitches into the same stitch. This adds one stitch and makes the piece wider.
- dec – decrease (also written sc2tog, "single crochet two together"): insert your hook into the next stitch, yarn over and pull up a loop, insert your hook into the following stitch, yarn over and pull up a loop, then yarn over and pull through all three loops on the hook. Two stitches become one, making the piece narrower.
- sl st – slip stitch: insert your hook into the stitch, yarn over, and pull that loop straight through both the stitch and the loop on your hook. Used here only if you want to join a round.
- st(s) – stitch(es): one completed loop of yarn in your work.
- Magic ring – an adjustable loop of yarn you crochet into, then pull tight so there is no hole in the center. If it feels tricky, you can instead chain 2 and work your first round into the first chain.
- Continuous spiral – working round after round without joining or turning, so the rounds spiral upward like a snail shell. This is why we use a stitch marker.
- Fasten off – cut the yarn leaving a tail, then pull the tail all the way through the last loop to lock it.
- Weave in – thread the tail onto the tapestry needle and sew it back and forth through the inside of the work so it disappears.
Gauge
Gauge: 4 sc x 4 rounds = 1 inch (2.5 cm) in continuous spiral single crochet.
Gauge simply means how big your stitches come out. If your stitches are bigger than mine, your panda will be bigger than 4.5 inches; if smaller, it will be smaller. Because this is a soft toy rather than a fitted garment, gauge is not critical, but matching it keeps the proportions of the face and ears correct.
How to check: With your 5.0 mm hook and velvet yarn, make a magic ring, work 6 sc into it, then work 4 rounds of sc in a spiral (increasing as needed so the circle lies flat). Lay a ruler across the middle and count how many stitches fit in 1 inch. If you have more than 4 stitches per inch, your tension is tight; try a larger hook. If you have fewer than 4, try a smaller hook. Velvet yarn is forgiving, so do not worry if you are off by a little.
Beginner Tips Before You Start
- Use your stitch marker every single round. Because we work in a spiral, there is no seam to tell you where a round begins. Move the marker up to the first stitch of each new round.
- Do not pull the yarn tight. Velvet yarn sheds and snaps if you yank it. Keep your tension relaxed and even; the fluff hides small imperfections.
- Count out loud. Counting your stitches at the end of each round is the fastest way to catch a mistake before it grows.
- Stuff as you go. The tube is narrow, so add stuffing in small pinches before the opening gets too small. Firm but soft is the goal, like a firm marshmallow.
- Keep your starting tail long. A long tail makes closing the ends and sewing on the face far easier.
- Work in good light. Velvet yarn is fuzzy and its stitches are hard to see; bright light saves a lot of squinting.
Step-by-Step Instructions
Body (one straight tube, color change at the halfway point)
Use cream (A) for the first half, then pastel pink (B) for the second half. Work in continuous spirals; do not join rounds. Place a stitch marker at the beginning of each round. Numbers in parentheses are the stitch count at the end of that round.
With A, make a magic ring.
Round 1: 6 sc into the ring. (6 sts)
Round 2: inc in each st around. (12 sts)
Round 3: [sc in next st, inc] around. (18 sts)
Round 4: [sc in next 2 sts, inc] around. (24 sts)
Rounds 5–14: sc in each st around. (24 sts)
Change to B at the beginning of Round 15 (simply drop A and pick up B, then continue; you can carry A inside the tube and cut it later).
Rounds 15–24: sc in each st around. (24 sts)
Round 25: [sc in next 2 sts, dec] around. (18 sts)
Stuff the tube firmly but softly with fiberfill, keeping the shape cylindrical and even.
Round 26: [sc in next st, dec] around. (12 sts)
Round 27: dec around. (6 sts)
Fasten off, leaving a long tail. Thread the tail through the remaining 6 sts with the tapestry needle and pull closed. Weave in the end.
Face Appliqué (pastel pink)
Worked flat in a spiral with B. Do not stuff.
With B, make a magic ring.
Round 1: 6 sc into the ring. (6 sts)
Round 2: inc in each st around. (12 sts)
Round 3: [sc in next st, inc] around. (18 sts)
Round 4: [sc in next 2 sts, inc] around. (24 sts)
Round 5: sc in each st around. (24 sts)
Fasten off, leaving a long tail. Pin the circle flat onto the cream half of the body, centered about 1 inch (2.5 cm) from the cream end. Sew in place with the tail using small whip stitches (tiny stitches that go over the edge of both layers) all around the edge. Weave in the end.
Ears (make 2, cream)
With A, make a magic ring.
Round 1: 6 sc into the ring. (6 sts)
Round 2: inc in each st around. (12 sts)
Round 3: sc in each st around. (12 sts)
Fasten off, leaving a long tail. Flatten each ear slightly and sew to the cream end of the body, about 1 inch (2.5 cm) apart, just above the face appliqué. Weave in the ends.
Assembly and Finishing
Adjust the stuffing: Use the blunt end of your tapestry needle to push small pinches of fiberfill into any hollow spots so the tube is smooth and evenly rounded. It should feel firm but still squishy.
Sew on the face: Pin the pink circle in place first and check it looks centered from every angle. Sew with small whip stitches around the edge, catching only the surface of the body so the stitches do not show on the other side.
Sew on the ears: Pin each flattened ear just above the face, about 1 inch apart. Sew around the base of each ear with a few stitches, then pass the needle through the ear and body a couple of times to anchor it firmly.
Weave in all ends: Thread each tail onto the tapestry needle and run it back and forth through the inside of the work for about an inch, then trim close to the surface.
Blocking (optional): Velvet yarn does not need wet blocking. Instead, gently steam the finished panda from a distance of about 6 inches with a steamer or an iron held above the surface (never touch the iron to the yarn), then pat the shape smooth with your fingers and let it dry.
Optional details: Embroider a tiny pink nose in the center of the face with a few straight stitches, and add two small black bead eyes above the nose if desired. If you use beads, sew each one on with doubled thread and pass through it several times so it is secure.
Pro Tips and Variations
- Change the colorway: Swap the pastel pink for mint, lavender, or butter yellow for a different candy palette, or work the whole body in one color and use a contrasting face for a bolder look.
- Make it bigger or smaller: Use a thicker yarn and larger hook (such as 6.5 mm) for a chunkier pillow, or a thinner velvet yarn and 4.0 mm hook for a keychain-sized version. Adjust the number of plain sc rounds (Rounds 5–24) to change the length.
- Try a different yarn: Any super bulky chenille or velvet yarn works. If you substitute a smooth yarn, your panda will be less fuzzy but the stitch counts stay exactly the same.
- Add personality: Embroider a little white muzzle, add a tiny crocheted tail at the pink end, or sew a small loop of yarn to the top so it can hang from a bag.


