Peacock Lace Crochet Infinity Cowl Free Pattern – A Regal Feather Wrap
Peacock Lace Crochet Infinity Cowl Free Pattern – A Regal Feather Wrap
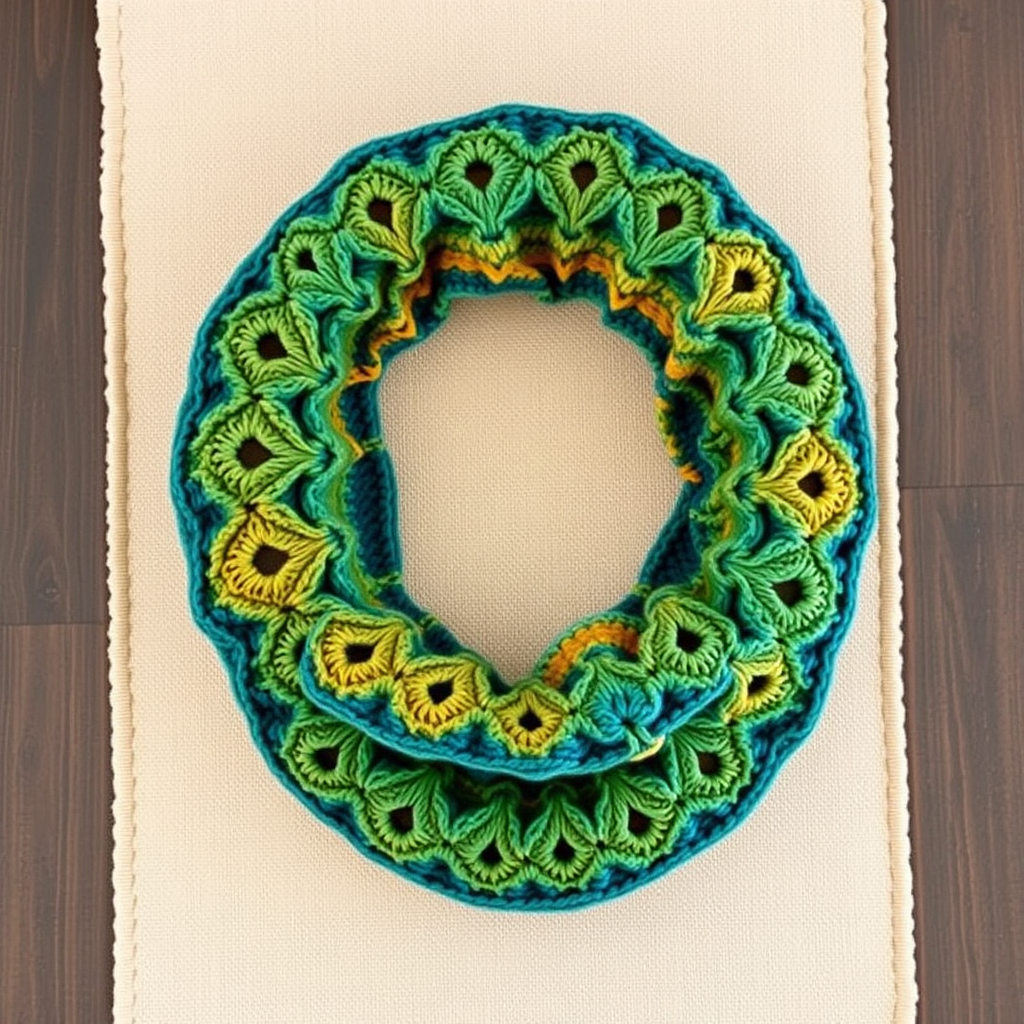
Wrap yourself in the iridescent shimmer of a peacock's plume with this luxurious, lacy infinity cowl. The intricate feather-and-eyelet stitch pattern creates a flowing, elegant drape that feels like a gentle embrace on chilly days. This free crochet pattern is perfect for intermediate beginners looking to expand their skills while creating a stunning, wearable piece of art. The rich gradient of deep teal, emerald green, and golden amber mimics the iridescent feathers of a peacock, making this cowl a true statement accessory.
Whether you're a seasoned crocheter or a confident beginner ready for a new challenge, this pattern offers a rewarding project that works up beautifully in worsted weight yarn. The seamless tube construction means no seaming at the end—just pure, uninterrupted crochet bliss. Let's dive into creating this regal accessory that will have everyone asking where you bought it!
Materials Needed
Before you begin, gather the following materials to ensure a smooth and enjoyable crochet experience:
Yarn
- Worsted weight yarn in 3 colors:
- Color A (Deep Teal): Approximately 200g (about 400 yards)
- Color B (Emerald Green): Approximately 100g (about 200 yards)
- Color C (Gold/Amber): Approximately 50g (about 100 yards)
- Total yarn needed: Approximately 350g (700 yards)
Suggested yarn: Lion Brand Wool-Ease in colors 'Teal', 'Forest Green', and 'Gold' for a soft, slightly shiny finish that enhances the regal look. However, any worsted weight yarn (Category 4) will work beautifully.
Hook and Notions
- Crochet hook: 5.5mm (I-9) or size needed to obtain gauge
- Yarn needle: For weaving in ends
- Stitch markers: To track the beginning of each round
- Scissors: For cutting yarn
Gauge
4 pattern repeats (16 stitches) x 8 rows = 4 inches in Peacock Lace pattern (after blocking).
Important: Always check your gauge before starting. If your gauge is off, adjust your hook size accordingly. A tighter gauge will result in a stiffer cowl, while a looser gauge will create more drape.
Step-by-Step Instructions
This pattern is worked in the round as a continuous spiral with no joining between rounds (except where noted). Use a stitch marker to track the beginning of each round. The pattern uses a 3-color striping sequence: 2 rounds of Color A, 1 round of Color B, 1 round of Color C, then repeat. The ch 3 at the start of each round counts as the first double crochet (dc).
Abbreviations
- ch: chain
- dc: double crochet
- sc: single crochet
- sl st: slip stitch
- sp: space
- sk: skip
Foundation Round
With Color A: Chain 120. Join with a slip stitch to form a ring, being careful not to twist the chain. Ch 3 (counts as first dc).
Round 1 (Color A): Work 1 dc in each chain around. Join with a sl st to the top of the ch-3. (120 dc)
Pro tip: Place a stitch marker in the first stitch of each round to keep track of your starting point. This is crucial for maintaining the pattern's integrity.
Round 2 (Color A) – Creating the First Shells
Ch 3 (counts as first dc). *Skip 2 dc, work 5 dc in the next dc (this creates a shell), skip 2 dc, work 1 dc in the next dc; repeat from * around, ending with skip 2 dc, 5 dc in the next dc, skip 2 dc, sl st to the top of the ch-3.
Count check: You should have 20 shells and 20 single dc at the end of this round.
Round 3 (Color B) – Building the Eyelet Spaces
Ch 3 (counts as first dc). *Work 1 dc in the single dc from the previous round, ch 2, skip the 5-dc shell, work 1 dc in the next single dc; repeat from * around, ending with ch 2, sl st to the top of the ch-3.
Count check: You should have 40 dc and 20 ch-2 spaces.
Round 4 (Color C) – Filling the Spaces
Ch 3 (counts as first dc). *Work 3 dc in the ch-2 space, ch 1, skip the next dc, work 1 dc in the next dc; repeat from * around, ending with 3 dc in the last ch-2 space, ch 1, sl st to the top of the ch-3.
Count check: You should have 60 dc and 20 ch-1 spaces.
Round 5 (Color A) – Creating the Second Shell Layer
Ch 3 (counts as first dc). *Skip 3 dc, work 5 dc in the ch-1 space (this creates a shell), skip 3 dc, work 1 dc in the next dc (the single dc from Round 4); repeat from * around, ending with skip 3 dc, 5 dc in the last ch-1 space, skip 3 dc, sl st to the top of the ch-3.
Count check: You should have 20 shells and 20 single dc.
Round 6 (Color A) – Repeating the Eyelet Pattern
Ch 3 (counts as first dc). *Work 1 dc in the single dc from the previous round, ch 2, skip the 5-dc shell, work 1 dc in the next single dc; repeat from * around, ending with ch 2, sl st to the top of the ch-3.
Count check: You should have 40 dc and 20 ch-2 spaces.
Round 7 (Color B) – Filling the Spaces Again
Ch 3 (counts as first dc). *Work 3 dc in the ch-2 space, ch 1, skip the next dc, work 1 dc in the next dc; repeat from * around, ending with 3 dc in the last ch-2 space, ch 1, sl st to the top of the ch-3.
Count check: You should have 60 dc and 20 ch-1 spaces.
Round 8 (Color C) – Creating the Third Shell Layer
Ch 3 (counts as first dc). *Skip 3 dc, work 5 dc in the ch-1 space (shell), skip 3 dc, work 1 dc in the next dc; repeat from * around, ending with skip 3 dc, 5 dc in the last ch-1 space, skip 3 dc, sl st to the top of the ch-3.
Count check: You should have 20 shells and 20 single dc.
Rounds 9-40 – Continuing the Pattern
Repeat Rounds 3-8, following the color sequence: Color A, Color A, Color B, Color C, Color A, Color A, Color B, Color C... Continue this sequence until the cowl measures approximately 10 inches (25 cm) in height, or your desired length.
Important note: The color sequence means you'll work 2 rounds of Color A, then 1 round of Color B, then 1 round of Color C, then repeat. This creates the beautiful gradient effect that mimics peacock feathers.
Finishing Round (Color A)
Ch 1, work 1 sc in each dc and 1 sc in each ch-space around. Join with a sl st to the first sc. Fasten off and weave in all ends with your yarn needle.
Pro tip: Take your time weaving in ends. A neat finish makes all the difference in the final look of your cowl. Weave each end in at least 2 inches in both directions to ensure it stays secure.
Blocking – The Final Touch
Gently wet block the cowl to open up the lace pattern and enhance the drape. To do this:
- Soak the cowl in lukewarm water with a small amount of gentle wool wash for 15-20 minutes.
- Gently squeeze out excess water (do not wring or twist).
- Lay the cowl flat on a clean towel and roll it up to remove additional moisture.
- Shape the cowl into a neat circle on a dry towel or blocking mat.
- Pin the edges if needed to open up the lace pattern.
- Allow to dry completely, which may take 24-48 hours.
Once dry, your Peacock Lace Infinity Cowl is ready to wear! The blocking process is essential for this pattern—it transforms the fabric from a slightly scrunched tube into a flowing, elegant drape that showcases the intricate stitch work.
Tips for Success
- Count your stitches regularly: The pattern relies on consistent stitch counts. If you lose track, count your shells and single dc at the end of each round.
- Use a stitch marker: This is non-negotiable for a spiral pattern. Mark the first stitch of each round to avoid losing your place.
- Keep your tension consistent: Try to maintain the same tension throughout. If you crochet tightly, consider going up a hook size; if loosely, go down a size.
- Don't rush the blocking: This step is crucial for the final look. A well-blocked cowl will have beautifully defined shells and open, airy eyelets.
- Customize your length: The pattern calls for 10 inches, but you can easily add more rounds to make a taller cowl or fewer for a shorter one. Just be sure to end with a complete color sequence.
This Peacock Lace Infinity Cowl is more than just a winter accessory—it's a piece of wearable art that showcases your crochet skills. The combination of rich colors and intricate stitch work creates a truly regal piece that will be treasured for years to come. Whether you make it for yourself or as a gift for someone special, this cowl is sure to become a favorite in any wardrobe.
Happy crocheting, and enjoy creating your own piece of peacock-inspired luxury!