Ochre Trail Rearview Mirror Cuff Free Pattern: Overlay Crochet Squiggle Wrap
Introduction
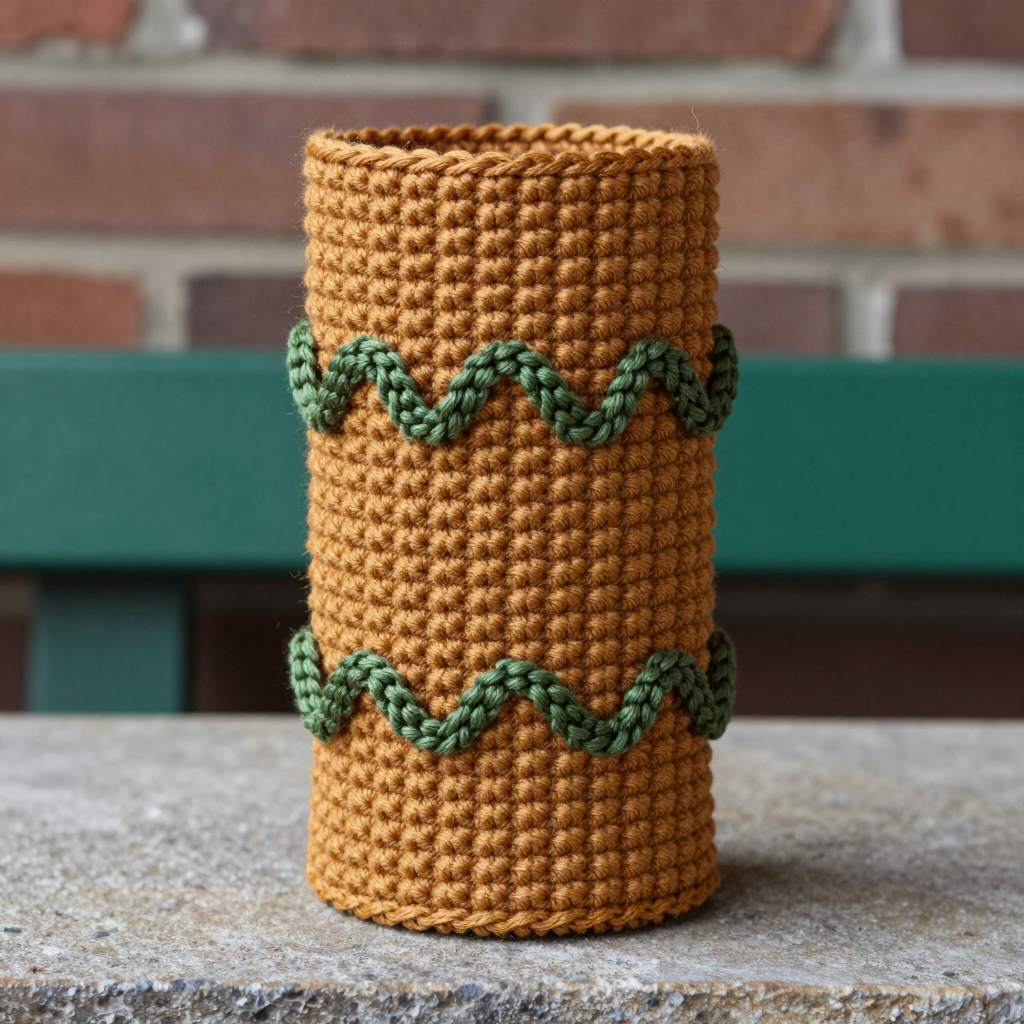
Welcome! If you have never held a crochet hook before, you are in exactly the right place. This Ochre Trail Rearview Mirror Cuff is one of the friendliest first projects you can make: it is a tiny tube, only about 2 inches tall, worked in one continuous spiral with no seams to sew and no tricky shaping. It is perfect for absolute beginners, for anyone who wants a finished object in under an hour, and for anyone who loves that warm, rustic farmhouse look. When it is done, you will have a snug little ochre cylinder with a soft, slightly ridged texture and three raised olive squiggle waves crawling across the front. It feels firm but stretchy, slides over your mirror arm, and stays put all by itself — no buttons, no ties, no fasteners. Let's make one together.
Materials Needed
- Yarn A (main color): Worsted weight (category 4) cotton yarn in ochre — approximately 25 yd / 23 m (one small ball is plenty).
- Yarn B (accent color): Worsted weight (category 4) cotton yarn in olive — approximately 10 yd / 9 m.
- Crochet hook: Size H-8 / 5.0 mm. (The "H-8" is the US size; 5.0 mm is the metric size. They are the same hook.)
- Stitch marker: 1 removable marker or a small safety pin. This marks where each round begins.
- Tapestry needle: A blunt, large-eyed needle for weaving in yarn tails.
- Scissors for cutting yarn.
- Finished size: About 2 in / 5 cm tall and 2 in / 5 cm in circumference — a small tube designed to slip snugly over a standard rearview mirror arm.
Abbreviations and Beginner Glossary
- ch — chain. Make a loop of yarn on your hook, then pull the yarn through that loop. Each one you make is a "chain."
- sc — single crochet. Insert your hook into the stitch, wrap yarn over the hook, pull up a loop (2 loops on hook), wrap yarn over again, pull through both loops. One single crochet made.
- sl st — slip stitch. Insert hook into the stitch, wrap yarn over, and pull that yarn straight through both the stitch and the loop on your hook at the same time. It makes a nearly invisible joining stitch.
- st / sts — stitch / stitches. A "stitch" is one completed unit of crochet fabric.
- rnd — round. One complete trip around the tube. In this pattern we work in a spiral, so each round is simply the next circle of stitches.
- BLO — back loop only. Every single crochet stitch has two top loops (a front one nearer you and a back one farther away). "Back loop only" means you insert your hook under just the back loop, leaving the front loop free.
- FLO — front loop only. The same idea, but you work under just the front loop (the one closest to you).
- overlay sc — overlay single crochet. A single crochet worked around the post (the vertical body) of a stitch two rounds below, bringing the accent yarn across the front of the fabric to create a raised squiggle. You insert your hook around that lower stitch from front to back and complete a normal single crochet.
- magic ring — an adjustable loop of yarn that you crochet into, then pull closed so there is no hole in the center. (If you prefer, chain 2 and work Round 1 into the first chain instead.)
- fasten off — cut the yarn a few inches from your work, then pull the tail all the way through the last loop to lock it.
- 2 sc in next st — work two single crochets into the same stitch. This is an "increase" and makes the tube wider.
Gauge
Gauge: 4 sc per 1 in / 2.5 cm and 4 rounds per 1 in / 2.5 cm, worked in the round.
Why gauge matters: Gauge is simply how big your stitches turn out. If your stitches are bigger than mine, your cuff will be too loose and slide off the mirror arm; if they are smaller, it may not fit over the arm at all. Because this cuff must fit snugly, gauge is worth checking.
How to make a gauge swatch: With your hook and yarn, make a magic ring, work 6 sc into it, then work 2 sc in each stitch (12 sts) and continue working 1 sc in each stitch around for about 8 rounds. Lay it flat and measure: 4 stitches across should equal 1 inch, and 4 rounds up should equal 1 inch. If you get more stitches per inch, go up one hook size; if you get fewer, go down one hook size.
Beginner Tips Before You Start
- Use the stitch marker every round. Because we never join rounds, the tube spirals upward. Move the marker into the first stitch of each new round so you always know where you are.
- Do not pull the yarn too tight. Tension should feel relaxed. Tight stitches make a stiff, tiny tube that will not stretch over the mirror arm.
- Keep the overlay yarn loose. When you work the olive squiggles, let the accent yarn lie gently across the front. If you pull it snug, the cuff loses its stretch.
- Count your stitches at the end of each round. Rounds 1–4 grow from 6 to 24 stitches; from Round 5 onward every round stays at 24. Counting takes ten seconds and saves frustration.
- Work the back loops on Rounds 5–12. This creates the firm, slightly ridged texture that helps the cuff grip. Look for the loop farthest from you and go under only that one.
- Cotton is forgiving. If a stitch looks uneven, gently tug the fabric — cotton settles into place beautifully.
Step-by-Step Instructions
Note on overlay crochet: Overlay stitches are worked into the front loop of a stitch from two rounds below, bringing the olive yarn across the front of the ochre fabric to create raised squiggles. Keep the overlay yarn relaxed so the cuff stays stretchy.
Body of the Cuff (worked in the round, no joining)
With yarn A (ochre), make a magic ring.
Rnd 1: 6 sc into the ring. Do not join. Place marker in first st. (6 sc)
Rnd 2: 2 sc in each st around. (12 sc)
Rnd 3: [2 sc in next st, 1 sc in next st] around. (18 sc)
Rnd 4: [2 sc in next st, 1 sc in each of next 2 sts] around. (24 sc)
Rnds 5–12: Sc in each st around, working in the back loop only (BLO) to create a firm, slightly ridged tube. (24 sc per rnd)
Fasten off A after Rnd 12, leaving a 6 in / 15 cm tail. You now have a tube 12 rounds tall — at 4 rounds per inch, that is about 3 inches of fabric, which rolls and settles to the finished 2 in / 5 cm height once the edges relax and the cuff is steamed.
Overlay Squiggles (worked with yarn B over the front of the tube)
Hold the cuff with the right side facing you. Join B with a sl st in the front loop of any st on Rnd 6.
Row 1 (squiggle 1): Ch 1. Work 1 overlay sc around the front loop of the next st on Rnd 6, then 1 overlay sc around the front loop of the next st on Rnd 7, then 1 overlay sc around the front loop of the next st on Rnd 8, then 1 overlay sc around the front loop of the next st on Rnd 7, then 1 overlay sc around the front loop of the next st on Rnd 6. This makes a small wave. Sl st into the front loop of the next st on Rnd 6. Fasten off B. (5 overlay sc + 1 sl st)
Row 2 (squiggle 2): Join B with a sl st in the front loop of a st on Rnd 9, about 4 sts to the right of the first squiggle. Ch 1. Work 1 overlay sc around the front loop of the next st on Rnd 9, then 1 overlay sc around the front loop of the next st on Rnd 10, then 1 overlay sc around the front loop of the next st on Rnd 11, then 1 overlay sc around the front loop of the next st on Rnd 10, then 1 overlay sc around the front loop of the next st on Rnd 9. Sl st into the front loop of the next st on Rnd 9. Fasten off B. (5 overlay sc + 1 sl st)
Row 3 (squiggle 3): Join B with a sl st in the front loop of a st on Rnd 5, about 4 sts to the left of the first squiggle. Ch 1. Work 1 overlay sc around the front loop of the next st on Rnd 5, then 1 overlay sc around the front loop of the next st on Rnd 6, then 1 overlay sc around the front loop of the next st on Rnd 7, then 1 overlay sc around the front loop of the next st on Rnd 6, then 1 overlay sc around the front loop of the next st on Rnd 5. Sl st into the front loop of the next st on Rnd 5. Fasten off B. (5 overlay sc + 1 sl st)
Assembly and Finishing
No seaming is needed — the cuff is a seamless tube. Here is how to finish it neatly:
- Weave in the ends: Thread each yarn tail onto your tapestry needle. Working on the wrong side (the inside of the tube), pass the needle in and out through the backs of several stitches, changing direction once or twice so the tail cannot work loose. Trim close to the fabric.
- Close the center hole: If your magic ring left a small gap at the bottom, use the starting tail to draw the ring closed, then weave that tail in as above.
- Steam lightly: Hold a steam iron an inch or two above the cuff (never press it down) and let the steam settle the overlay squiggles and relax the edges. Be careful not to flatten the raised olive waves.
- Fit it: Slip the cuff over the mirror arm. The snug fit holds it in place without fasteners — no glue, no clips, nothing to scratch.
Pro Tips and Variations
- Change the colors: Swap ochre for cream and olive for rust for an autumn palette, or use charcoal with mustard squiggles for a modern look. Any two contrasting worsted cottons work beautifully.
- Make it taller or shorter: Add or remove plain BLO rounds in the Rnds 5–12 section, keeping the total a multiple of 4 rounds so the overlay squiggles still line up two rounds apart. Each extra 4 rounds adds about 1 in / 2.5 cm of height.
- Adjust the fit: If your mirror arm is thicker, work one more increase round — [2 sc in next st, 1 sc in each of next 3 sts] around (30 sc) — then continue every following round at 30 sts.
- Substitute yarn: Cotton gives the firmest grip, but a cotton-blend or a smooth acrylic also works. Avoid fuzzy or hairy yarns, which hide the crisp overlay squiggles.