Mossy Meadow Turtle Amigurumi Free Pattern – Crocheted Earth Day Keepsake
Mossy Meadow Turtle Amigurumi Free Pattern – Crocheted Earth Day Keepsake
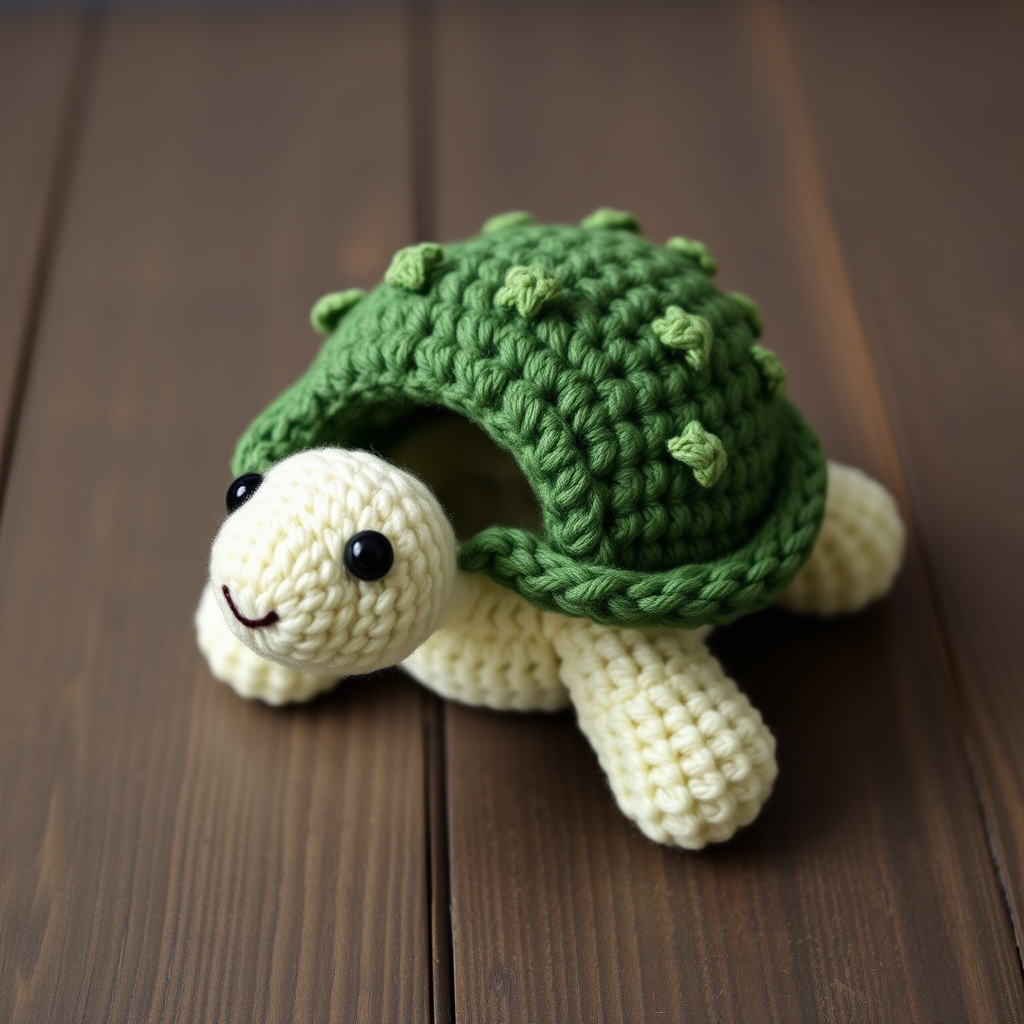
Celebrate Earth Day with this adorable crocheted turtle, featuring a textured shell of earthy greens and a soft, huggable body. This pattern is perfect for eco-conscious crafters looking to create a meaningful, handmade gift. Whether you're a seasoned crocheter or a complete beginner, this amigurumi project is designed to be approachable, rewarding, and utterly charming. The finished turtle makes a wonderful keepsake, a thoughtful present, or a lovely addition to your own nature-inspired decor.
This pattern uses basic crochet stitches and simple shaping techniques, making it an ideal project for those new to amigurumi. The result is a sturdy, huggable turtle that sits upright, about 5 inches long and 3 inches tall. Let's gather our materials and get started on this eco-friendly craft!
Materials Needed
Before we begin, let's make sure you have everything you need. Here's a complete list of materials for your Mossy Meadow Turtle:
- Yarn: Worsted weight cotton yarn in the following colors:
- Forest green (for the main shell)
- Moss green (for the shell rim)
- Sage green (for decorative moss stitches)
- Cream (for the body, head, legs, and tail)
- Crochet Hook: 3.5mm (E) crochet hook
- Stuffing: Polyester fiberfill stuffing
- Eyes: Safety eyes (8mm) or black embroidery thread for a no-plastic option
- Notions:
- Yarn needle
- Stitch marker
- Scissors
Gauge: Not critical for amigurumi; aim for tight stitches to prevent stuffing showing. Approximately 4 sc = 1 inch.
Abbreviations
Familiarize yourself with these standard crochet abbreviations before you start:
- MR: Magic ring
- sc: Single crochet
- inc: Increase (2 sc in same stitch)
- dec: Decrease (invisible decrease)
- sl st: Slip stitch
- ch: Chain
- FO: Fasten off
Step-by-Step Instructions
Follow these detailed instructions carefully, and you'll have your very own Mossy Meadow Turtle in no time. Remember to work in a continuous spiral unless otherwise noted, and use your stitch marker to keep track of your rounds.
Body (make 1, starting with cream)
The body forms the base of your turtle and is worked from the bottom up. Keep your stitches tight to prevent the stuffing from showing through.
- Round 1: MR, 6 sc (6)
- Round 2: inc in each st around (12)
- Round 3: (sc, inc) around (18)
- Round 4: (2 sc, inc) around (24)
- Round 5: (3 sc, inc) around (30)
- Round 6: (4 sc, inc) around (36)
- Rounds 7-12: sc in each st around (36) – 6 rounds even. This creates the height of the body.
- Round 13: (4 sc, dec) around (30)
- Round 14: (3 sc, dec) around (24)
- Round 15: (2 sc, dec) around (18)
- Stuff firmly: Fill the body with polyester fiberfill. Make sure it's packed tightly but not so much that it distorts the shape.
- Round 16: (sc, dec) around (12)
- Round 17: dec around (6)
- FO: Fasten off and weave in the end securely.
Head (make 1, cream)
The head is worked separately and sewn onto the body. It's slightly smaller than the body to create a cute proportion.
- Round 1: MR, 6 sc (6)
- Round 2: inc in each st around (12)
- Round 3: (sc, inc) around (18)
- Rounds 4-6: sc in each st around (18) – 3 rounds even. This forms the face area.
- Round 7: (sc, dec) around (12)
- Stuff lightly: Add a small amount of stuffing to the head. It should be soft and squishy, not too firm.
- Round 8: dec around (6)
- FO: Fasten off, leaving a long tail for sewing. Attach safety eyes between rounds 4 and 5, about 4 stitches apart. If using embroidery thread, you can embroider the eyes after assembly.
Legs (make 4, cream)
These little stubby legs give the turtle its charming, grounded look. Make all four identically.
- Round 1: MR, 6 sc (6)
- Round 2: inc in each st around (12)
- Rounds 3-4: sc in each st around (12) – 2 rounds even
- Stuff lightly: Add a tiny bit of stuffing to each leg.
- Round 5: dec around (6)
- FO: Fasten off, leaving a long tail for sewing.
Tail (make 1, cream)
A small, cute tail completes the turtle's silhouette.
- Round 1: MR, 4 sc (4)
- Round 2: sc in each st around (4)
- Round 3: inc in each st around (8)
- FO: Fasten off, leaving a long tail for sewing.
Shell (make 1, starting with forest green)
The shell is the star of the show! It's worked in a dome shape and then attached over the body. The color change to moss green creates a beautiful rim.
- Round 1: MR, 6 sc (6)
- Round 2: inc in each st around (12)
- Round 3: (sc, inc) around (18)
- Round 4: (2 sc, inc) around (24)
- Round 5: (3 sc, inc) around (30)
- Round 6: (4 sc, inc) around (36)
- Round 7: (5 sc, inc) around (42)
- Rounds 8-14: sc in each st around (42) – 7 rounds even. This creates the dome of the shell.
- Switch to moss green for the rim. Attach the moss green yarn with a slip stitch.
- Round 15: sc in back loops only around (42). This creates a nice edge for attaching to the body later.
- Round 16: (5 sc, dec) around (36)
- Round 17: (4 sc, dec) around (30)
- Round 18: (3 sc, dec) around (24)
- Stuff shell firmly: Fill the shell with stuffing. It should be firm to hold its dome shape.
- Round 19: (2 sc, dec) around (18)
- Round 20: (sc, dec) around (12)
- Round 21: dec around (6)
- FO: Fasten off and weave in the end.
Shell Pattern Detail (optional but recommended)
This step adds the charming "mossy" texture that makes this turtle special. It's easy and adds so much character.
Using sage green yarn, embroider small scattered French knots or lazy daisy stitches on the shell top to mimic moss patches. Alternatively, crochet a few tiny circles (MR, 6 sc, FO) and sew them onto the shell. This is a great way to use up small scraps of yarn and add a personal touch.
Assembly
Now it's time to bring all the pieces together. Take your time with the sewing to ensure a neat, professional finish.
- Sew the head to the front of the body: Position the head centered between rounds 10-12 of the body. Use the long tail from the head to sew it securely in place. Make sure the eyes are facing forward.
- Sew the legs to the sides of the body: Attach two legs on each side, positioned evenly. They should be placed so the turtle sits flat and stable. Use the long tails to sew them firmly.
- Sew the tail to the back of the body: Position the tail opposite the head, at the back. Sew it in place using its long tail.
- Attach the shell: Place the shell over the body, aligning the back loops of round 15 of the shell with the body. Sew the shell to the body using a whip stitch, going through the back loops of the shell and the body stitches. Leave a small opening to add extra stuffing if needed, then close the opening securely.
- Weave in all ends: Use your yarn needle to hide any remaining yarn tails inside the turtle.
Finishing Touches
These final details bring your turtle to life!
- Embroider a small smile: Using black embroidery thread or a small piece of black yarn, embroider a simple smile on the head. This adds a friendly, happy expression.
- Optional charm: Add a tiny crocheted leaf or flower to the shell for extra charm. This is a lovely way to personalize your turtle.
Congratulations! You've just completed your very own Mossy Meadow Turtle. This eco-friendly keepsake is perfect for Earth Day, a thoughtful gift, or a delightful addition to your home. The combination of earthy greens and soft cream creates a gentle, nature-inspired aesthetic that's sure to be cherished. Happy crocheting!


