Whimsical Woodland Acorn Cottage Free Pattern – Crochet a Cozy Gnome Home
Whimsical Woodland Acorn Cottage Free Pattern – Crochet a Cozy Gnome Home
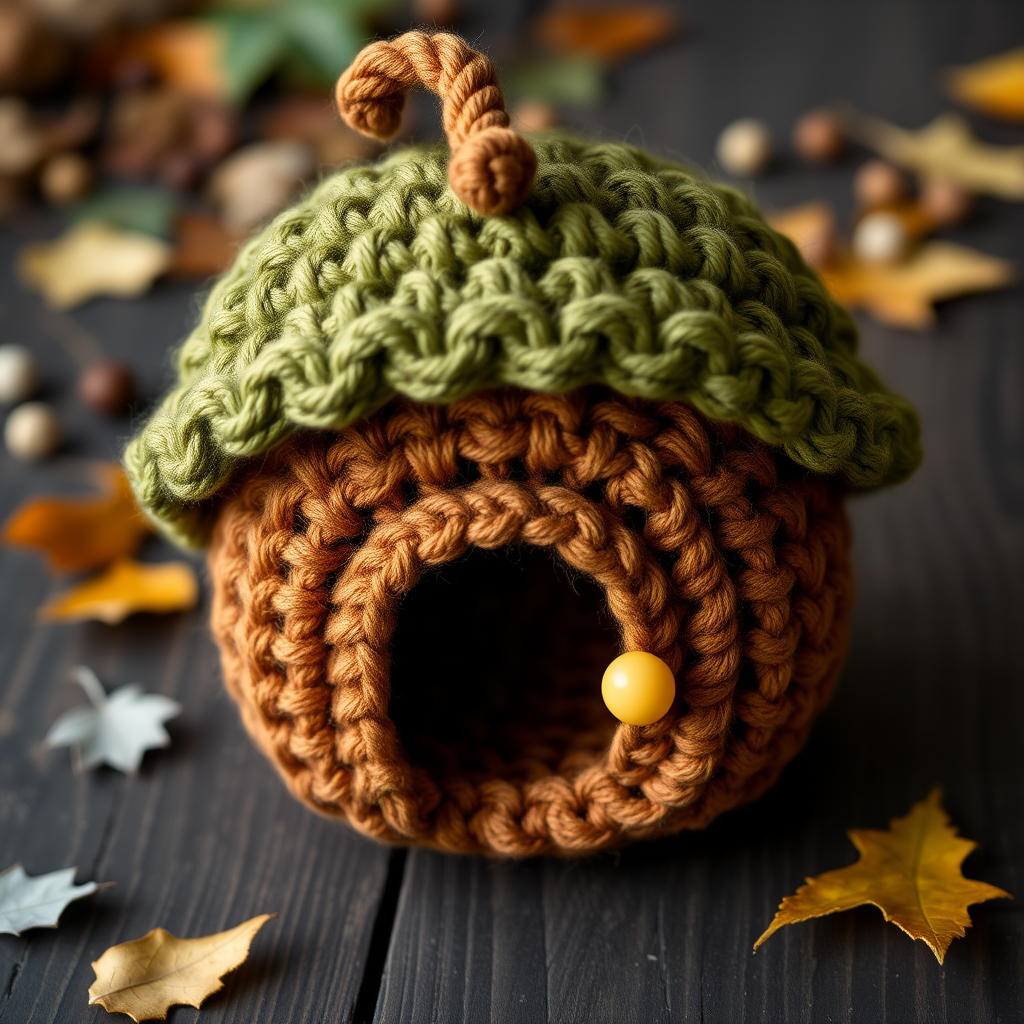
Nestle into the forest floor with this enchanting acorn-shaped cottage, complete with a tiny door and mossy roof. This crochet pattern brings a touch of woodland magic to your shelf or garden. Whether you're an experienced amigurumi maker or a curious beginner, this whimsical gnome home is a delightful project that works up quickly and makes a charming gift or seasonal decoration.
The finished piece is soft, plush, and huggable, with a storybook charm that invites you into a miniature world. The warm brown body mimics a real acorn, while the deep moss green cap features a ruffled, bumpy edge that looks just like fresh forest moss. A tiny cream door and golden window complete the cottage look, making it the perfect home for any gnome or fairy figurine you might have.
Materials Needed
Before you begin, gather the following supplies. All materials are readily available at craft stores or online:
- Yarn: Worsted weight yarn in four colors:
- Warm brown (for the acorn body and stem)
- Cream (for the door)
- Moss green (for the cap and roof trim)
- Golden yellow (for the window)
- Crochet Hook: 3.5mm (E) crochet hook
- Stitch Marker: To track your rounds (a scrap of contrasting yarn works too)
- Fiberfill: Polyester stuffing for a firm, plush finish
- Yarn Needle: For sewing pieces together and weaving in ends
- Scissors: For cutting yarn
Note on gauge: The pattern specifies 4 sc x 4 rows = 1 inch, but gauge is not critical for this project. As long as your stitches are tight enough that the stuffing doesn't show through, you're good to go. If you crochet loosely, consider using a slightly smaller hook.
Step-by-Step Instructions
This pattern is worked in continuous rounds unless otherwise stated. Use a stitch marker to track your rounds—place it in the first stitch of each round and move it up as you go. This is crucial for amigurumi to maintain the correct shape.
Acorn Body (Brown Yarn)
The body is worked from the bottom up, starting with a magic ring and increasing to create a rounded base, then working straight, and finally decreasing to close the top.
Round 1: Make a magic ring, work 6 single crochet (sc) into the ring. Pull the tail to close the ring tightly. (6 stitches)
Round 2: Work 2 sc in each stitch around. This doubles your stitch count. (12 stitches)
Round 3: *Sc in the next stitch, 2 sc in the next stitch* — repeat from * to * around. This creates a gentle increase. (18 stitches)
Round 4: *Sc in the next 2 stitches, 2 sc in the next stitch* — repeat around. (24 stitches)
Round 5: *Sc in the next 3 stitches, 2 sc in the next stitch* — repeat around. (30 stitches)
Round 6: *Sc in the next 4 stitches, 2 sc in the next stitch* — repeat around. (36 stitches)
Rounds 7-12: Sc in each stitch around for 6 rounds straight. No increases or decreases. This creates the tall, rounded body of the acorn. (36 stitches each round)
Round 13: *Sc in the next 4 stitches, sc2tog (single crochet 2 together)* — repeat around. This begins the shaping of the top. (30 stitches)
Round 14: *Sc in the next 3 stitches, sc2tog* — repeat around. (24 stitches)
Round 15: *Sc in the next 2 stitches, sc2tog* — repeat around. (18 stitches)
Stuff firmly with fiberfill. Make sure to push stuffing into the bottom corners and sides so the acorn is plump and round. Don't overstuff to the point of stretching the stitches, but it should be firm to the touch.
Round 16: *Sc in the next stitch, sc2tog* — repeat around. (12 stitches)
Round 17: Sc2tog around. This means you'll work a decrease in every stitch. (6 stitches)
Fasten off, leaving a long tail (about 12 inches). Thread the tail through a yarn needle, weave it through the front loops of the remaining 6 stitches, pull tight to close the hole, and secure with a knot. Weave the end into the body.
Acorn Cap (Moss Green Yarn)
The cap is worked flat at first, then turns downward to create the rim that fits over the top of the body.
Round 1: Magic ring, 6 sc in ring. (6 stitches)
Round 2: 2 sc in each stitch around. (12 stitches)
Round 3: *Sc in next stitch, 2 sc in next stitch* — repeat around. (18 stitches)
Round 4: *Sc in next 2 stitches, 2 sc in next stitch* — repeat around. (24 stitches)
Round 5: *Sc in next 3 stitches, 2 sc in next stitch* — repeat around. (30 stitches)
Round 6: *Sc in next 4 stitches, 2 sc in next stitch* — repeat around. (36 stitches)
Rounds 7-8: Sc in each stitch around for 2 rounds straight. (36 stitches each round)
Round 9: Working in back loops only, sc in each stitch around. This creates a ridge that will become the edge of the cap. (36 stitches)
Round 10: Sc in each stitch around, working through both loops this time. (36 stitches)
Fasten off, leaving a long tail for sewing. Set the cap aside.
Door (Cream Yarn)
The door is worked in rows, not rounds, to create a flat rectangular piece.
Row 1: Chain 6. Sc in the 2nd chain from the hook and in each chain across. (5 stitches)
Rows 2-5: Chain 1, turn your work, sc in each stitch across. (5 stitches each row)
Fasten off, leaving a tail for sewing.
Placement: Sew the door onto the front of the acorn body, centered between rounds 8-12. Position it so the bottom of the door sits about 2-3 rounds above the bottom of the acorn. Use a whip stitch or mattress stitch, keeping your stitches small and neat.
Window (Golden Yellow Yarn)
The window is a small circle, worked in the round.
Round 1: Magic ring, 6 sc in ring. (6 stitches)
Round 2: 2 sc in each stitch around. (12 stitches)
Fasten off, leaving a tail for sewing.
Placement: Sew the window to the right of the door, between rounds 9-11. It should sit slightly higher than the middle of the door, giving the cottage a charming, slightly asymmetrical look.
Stem (Brown Yarn)
The stem is a small tube that sits on top of the cap.
Round 1: Magic ring, 4 sc in ring. (4 stitches)
Rounds 2-4: Sc in each stitch around for 3 rounds. (4 stitches each round)
Fasten off, leaving a tail for sewing.
Placement: Sew the stem to the top center of the acorn cap. Make sure it's centered and secure.
Mossy Roof Trim (Moss Green Yarn)
This is the finishing touch that gives the cap its mossy, organic look.
Attach yarn to the edge of the acorn cap at the ridge created by the back-loop-only round (Round 9). You'll be working into those unworked front loops.
Round 1: Work a round of sc in each stitch around. This will create a fluffy, bumpy rim that mimics moss. (36 stitches)
Fasten off and weave in the end.
Finishing
Now it's time to assemble your acorn cottage.
- Sew the cap onto the body: Position the cap so it slightly overlaps the top of the body. The cap should sit like a hat, covering the top 2-3 rounds of the body. Use the long tail from the cap to sew it in place, working around the circumference. Make sure it's centered and secure.
- Weave in all ends: Use your yarn needle to hide any remaining tails inside the work. Trim any excess.
- Optional hanging loop: If you'd like to hang your acorn cottage, create a small loop of brown yarn at the top of the stem. Chain 10-12 stitches, fasten off, and sew the ends to the top of the stem.
Your Whimsical Woodland Acorn Cottage is complete! Display it on a shelf, tuck it into a fairy garden, or give it as a handmade gift. The soft, plush texture and storybook charm make it a treasured piece for any crochet lover.
Pro tip: This pattern is easily customizable. Try using different colors for the cap (like deep red for autumn or white for winter), or add tiny embroidered details like a heart on the door or flowers around the window. Let your imagination wander through the woods!


