Heirloom Pearl Blossom Baby Dress and Bolero Jacket Set Free Pattern
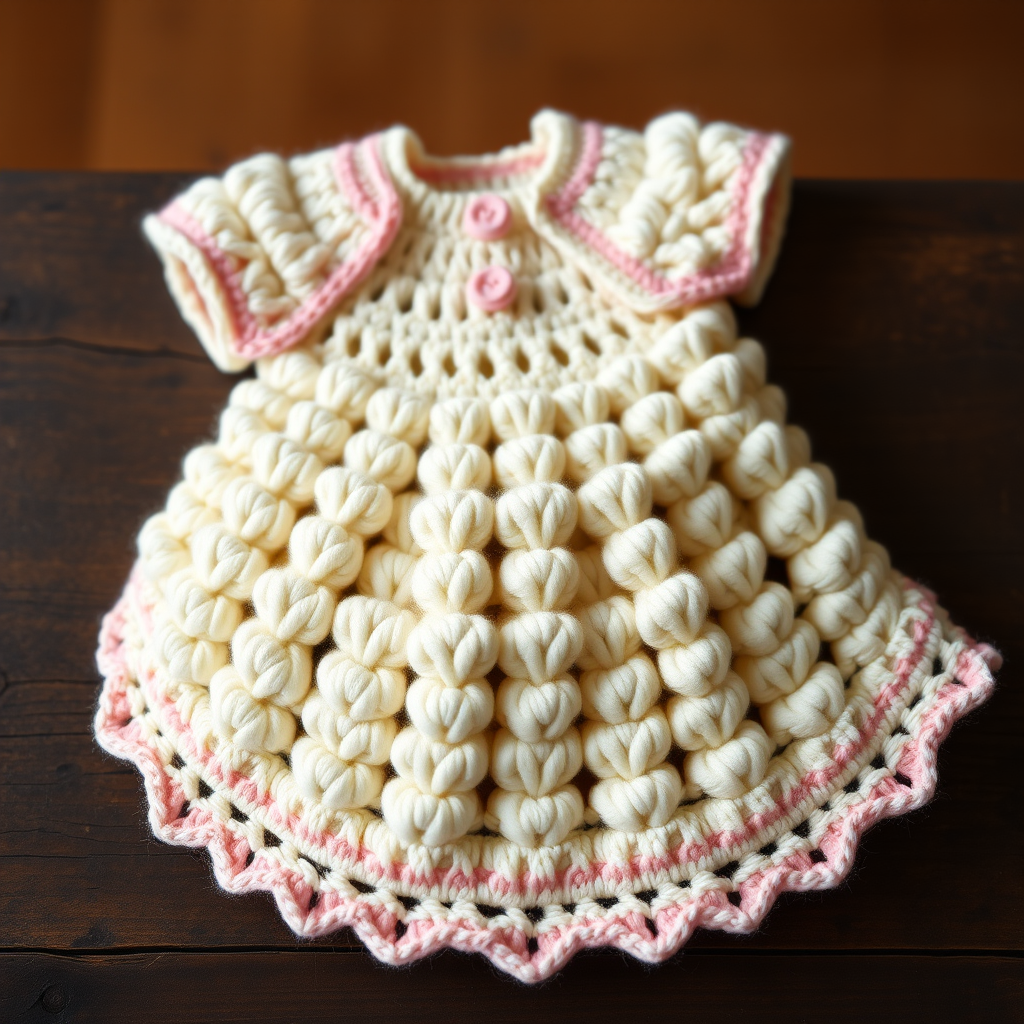
Heirloom Pearl Blossom Baby Dress and Bolero Jacket Set: A Free Crochet Pattern
There are certain projects that transcend mere crafting—they become heirlooms, treasured keepsakes passed down through generations. The Heirloom Pearl Blossom Baby Dress and Bolero Jacket Set is exactly that kind of project. This delicate two-piece ensemble features a scalloped pearl-edged dress with a matching open-front bolero, designed to capture timeless elegance for your little one. Crafted from soft, breathable cotton yarn, this set is perfect for christenings, birthdays, or any special occasion worthy of a cherished memory. Whether you're a seasoned crocheter or a confident beginner looking for a meaningful challenge, this free pattern will guide you through creating a stunning gift that will be adored for years to come.
This pattern is thoughtfully designed with three sizes (0-3 months, 3-6 months, and 6-12 months), making it a versatile choice for baby showers and new arrivals. The combination of a fitted yoke, flowing shell-stitch skirt, and delicate picot edging creates a vintage, romantic aesthetic that never goes out of style. Let's dive into this beautiful project and create something truly special.
Materials Needed
Before you begin, gather the following materials to ensure a smooth and enjoyable crocheting experience:
- Yarn: DK weight cotton yarn (e.g., Lion Brand 24/7 Cotton) in Ivory (MC - Main Color) and Soft Pink (CC - Contrast Color). You will need approximately 400g total for the complete set.
- Crochet Hook: 3.5mm (E) crochet hook
- Notions: Stitch markers, tapestry needle for weaving in ends
- Optional: Small pearl buttons for the bolero front (if desired)
Gauge: 20 double crochet (dc) x 12 rows = 10 cm (4 inches). Always check your gauge to ensure the correct sizing for your finished garment.
Step-by-Step Instructions
This pattern is written for the smallest size (0-3 months), with larger sizes (3-6 months and 6-12 months) shown in parentheses. Follow the instructions carefully, and you'll have a beautiful set in no time.
Part 1: The Dress
Yoke (Top Section)
Row 1: With your Main Color (MC) yarn, chain (ch) 62 (68, 74). Double crochet (dc) in the 4th chain from the hook and in each chain across. Turn your work. You should now have 60 (66, 72) double crochet stitches.
Row 2: Chain 3 (this counts as your first double crochet), dc in the next 9 (11, 13) stitches. Chain 2, skip 2 stitches (this creates the first armhole opening), dc in the next 20 (22, 24) stitches. Chain 2, skip 2 stitches (this creates the second armhole opening), dc in the last 10 (12, 14) stitches. Turn.
Row 3: Chain 3, dc in each double crochet stitch across, and work 2 dc into each chain-2 space from the previous row. Turn. You should be back to 60 (66, 72) double crochet stitches.
Row 4: Chain 3, dc in each stitch across. Turn.
Repeat Row 4 until the yoke measures 8 (9, 10) cm from the beginning. This forms the fitted top portion of the dress that will sit over the baby's chest and shoulders.
Skirt (Flowing Bottom Section)
Next Row (Increase Row): Chain 3, work 2 dc in the next stitch. Then *dc in the next stitch, 2 dc in the next stitch* repeat from * to * across the entire row. Turn. You will now have 90 (99, 108) double crochet stitches. This increase creates the fullness needed for the flowing skirt.
Shell Pattern Row: Chain 3, skip 2 stitches, work 5 dc in the next stitch (this forms a shell), skip 2 stitches, single crochet (sc) in the next stitch. Repeat this pattern across the row, ending with a single crochet in the last stitch. Turn.
Repeat the Shell Pattern Row until the skirt measures 15 (18, 21) cm from the yoke. The shell stitch creates a beautiful scalloped texture that gives the dress its heirloom quality.
Edging: With your Contrast Color (CC) yarn, single crochet evenly around the bottom edge of the skirt. Then, work a picot edging around the entire bottom: *single crochet in the next stitch, chain 3, slip stitch (sl st) in the same stitch* repeat from * to * around. Fasten off and weave in the ends.
Straps
Attach your MC yarn to the front edge of the yoke. Chain 30 (32, 34). Slip stitch to the back edge of the yoke to form the first strap. Fasten off. Repeat on the other side to create the second strap. These straps will sit over the baby's shoulders.
Part 2: The Bolero Jacket
The bolero is an open-front jacket with short sleeves, perfect for layering over the dress.
Back Panel
With MC yarn, chain 42 (46, 50). Dc in the 4th chain from the hook and in each chain across. Turn. You should have 40 (44, 48) double crochet stitches. Work even in double crochet (dc in each stitch across, chain 3, turn) until the piece measures 10 (12, 14) cm. Fasten off.
Front Panels (Make 2)
Chain 22 (24, 26). Dc in the 4th chain from the hook and in each chain across. Turn. You should have 20 (22, 24) double crochet stitches. Work even in double crochet until the piece measures the same length as the back panel. Fasten off.
Sleeves (Make 2)
Chain 26 (28, 30). Dc in the 4th chain from the hook and in each chain across. Turn. You should have 24 (26, 28) double crochet stitches. Increase 1 double crochet at each end of every 4th row until you have 32 (36, 40) double crochet stitches. To increase, simply work 2 dc in the first and last stitch of the row. Work even (no increases) until the sleeve measures 8 (10, 12) cm. Fasten off.
Assembly
Now it's time to bring all the pieces together:
- Sew Shoulder Seams: Using your tapestry needle and MC yarn, sew the shoulder seams of the front panels to the back panel.
- Attach Sleeves: Sew the sleeves into the armholes. The armhole edges are the straight edges of the front and back panels where they meet.
- Sew Side and Sleeve Seams: Sew the side seams of the bolero, continuing down the sleeve seams to close them.
Edging
With your CC yarn, single crochet evenly around the entire front opening and bottom edge of the bolero. Work the same picot edging as you did for the dress: *single crochet in the next stitch, chain 3, slip stitch in the same stitch* repeat around. Fasten off.
Finishing Touches
- Weave in All Ends: Use your tapestry needle to carefully weave in all loose yarn ends to give your garment a clean, professional finish.
- Block Your Pieces: Blocking is essential for cotton garments. Gently wet the pieces and lay them flat on a towel, shaping them to the correct measurements. Allow them to dry completely. This will help the stitches relax and even out.
- Add Buttons (Optional): If desired, sew small pearl buttons onto the front edges of the bolero for an extra touch of elegance. Since the bolero is open-front, the buttons are purely decorative.
Your Heirloom Pearl Blossom Baby Dress and Bolero Jacket Set is now complete! This beautiful ensemble is sure to become a treasured family heirloom, perfect for capturing precious memories. Whether you're making it for your own little one or as a thoughtful baby shower gift, the love and care you've stitched into every shell and picot will shine through. Happy crocheting!


