Harvest Hearth Cable Knit Pillow Trio Free Pattern – A Cozy Autumn Set
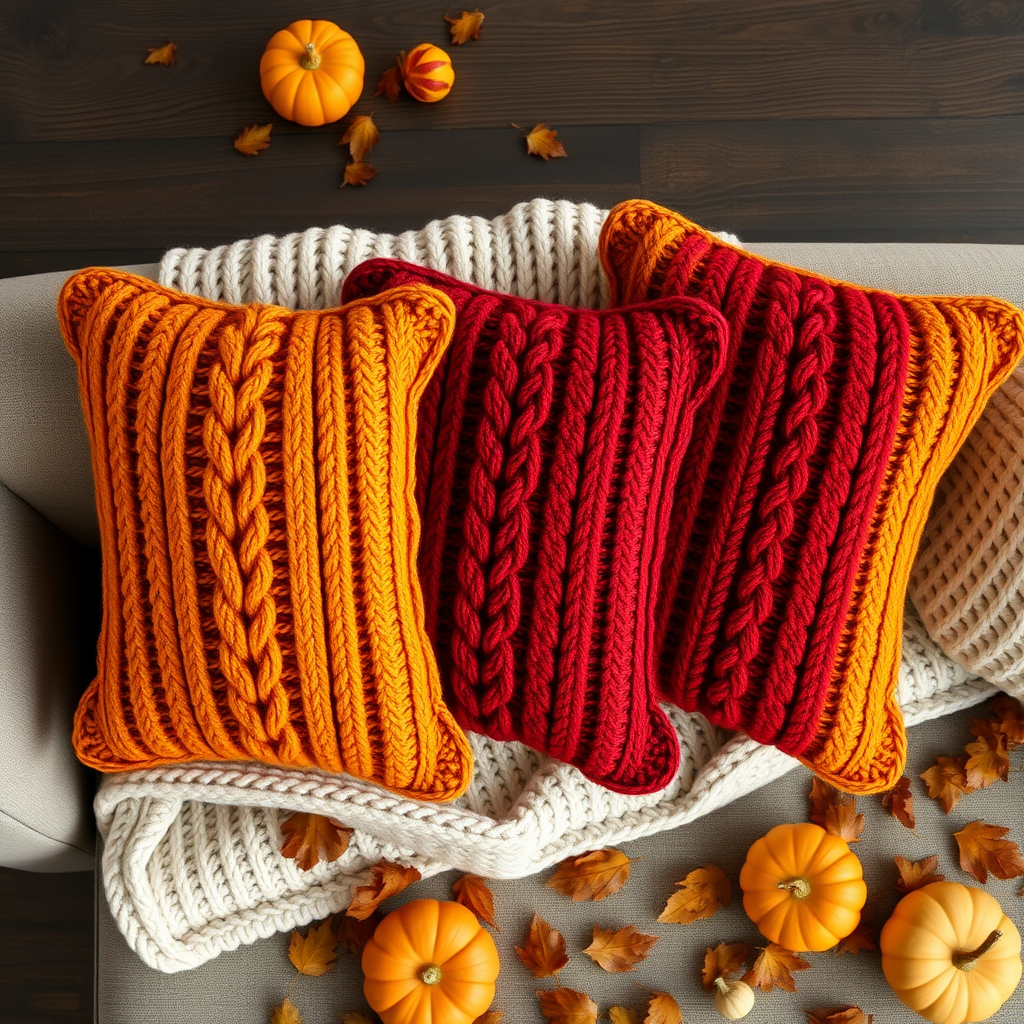
Cozy Up Your Space with the Harvest Hearth Cable Knit Pillow Trio
There's something magical about the arrival of autumn—the crisp air, the golden light, and the irresistible urge to make our homes feel warmer and more inviting. If you're looking for a knitting project that captures that cozy harvest spirit, look no further than the Harvest Hearth Cable Knit Pillow Trio. This free pattern features three plush, textured pillows, each adorned with a unique braided cable motif in earthy tones of Pumpkin Spice, Rustic Berry, and Golden Wheat. Whether you're an experienced knitter or a confident beginner ready for a new challenge, this set will transform your living space into a rustic retreat.
In this comprehensive guide, I'll walk you through everything you need to know—from gathering your materials to mastering the cable stitches—so you can create these stunning pillows with ease. Let's dive in and bring some handcrafted warmth into your home!
Why You'll Love This Pattern
This pillow trio is more than just a knitting project—it's a statement piece. The bold, twisted braids running vertically across each pillow create a sophisticated texture that looks far more complex than it actually is. The garter stitch borders frame the cables beautifully, while the simple stockinette backs keep the project manageable. Plus, with three colorways to choose from, you can mix and match to perfectly complement your existing decor. These pillows are destined to become the focal point of your sofa or bed this season.
Materials Needed
Before you begin, gather the following supplies. Having everything ready will make your knitting experience smooth and enjoyable.
Yarn
- Worsted weight yarn in three colors (approximately 350 yards per pillow):
- Pumpkin Spice (warm burnt orange)
- Rustic Berry (deep burgundy red)
- Golden Wheat (mustard yellow)
Tip: Choose a yarn with good stitch definition, like a wool or wool-blend, to make your cables really pop.
Needles & Notions
- US 8 (5 mm) circular knitting needles, 24-inch cable (or straight needles if you prefer)
- Cable needle (or a double-pointed needle as a substitute)
- Stitch markers (at least 4)
- Tapestry needle for weaving in ends
- Scissors
- Three 16x16-inch pillow forms
Gauge
18 stitches and 24 rows = 4 inches in stockinette stitch. Always knit a gauge swatch before starting to ensure your pillows come out the correct size. If your gauge is off, adjust your needle size accordingly.
Step-by-Step Instructions
This pattern is worked flat, and you'll make two panels for each pillow—a cabled front and a simple stockinette back. The instructions below are for one pillow; simply repeat with the other two colors to complete your trio.
Pillow Front Panel (Make 1 per pillow)
Garter Stitch Border
Cast on 72 stitches with your chosen color.
Rows 1-6: Knit all stitches. This creates a neat garter stitch border that will frame your cable pattern beautifully.
Setting Up the Cable Pattern
Row 7 (Right Side): K6, place marker, work the cable pattern across the next 60 stitches, place marker, K6. You'll maintain the 6 knit stitches on each side as a border throughout the pattern.
The Cable Pattern (60 stitches)
This is the heart of your pillow. The pattern is a 12-row repeat that creates those gorgeous twisted braids. Here's how it works:
Row 1: *P2, K6*; repeat from * to * 7 more times (this uses 56 stitches), then end with P2. (Total: 60 stitches)
Row 2 and all even rows (Wrong Side): Knit the knit stitches and purl the purl stitches as they appear. In other words, if you see a knit stitch, knit it; if you see a purl stitch, purl it. This maintains the ribbed texture between cables.
Row 3: P2, *C6F (Cable 6 Front)*, P2; repeat from * to * across the row, ending with P2.
How to work C6F: Slip 3 stitches onto your cable needle and hold it in front of your work. Knit the next 3 stitches from your left needle, then knit the 3 stitches from the cable needle. This twists the cable to the left.
Row 5: Repeat Row 1 (P2, K6 pattern).
Row 7: Repeat Row 3 (C6F cables).
Row 9: Repeat Row 1.
Row 11: P2, *C6B (Cable 6 Back)*, P2; repeat from * to * across the row, ending with P2.
How to work C6B: Slip 3 stitches onto your cable needle and hold it in back of your work. Knit the next 3 stitches from your left needle, then knit the 3 stitches from the cable needle. This twists the cable to the right.
Row 12: Repeat Row 2 (work stitches as they appear).
Repeat Rows 1-12 until your piece measures 16 inches from the cast-on edge, ending with a wrong-side row (Row 2, 4, 6, 8, 10, or 12).
Finishing the Front Panel
Rows 1-6: Knit all stitches to create the bottom garter stitch border, matching the top.
Bind off loosely to ensure the edge remains stretchy and doesn't pucker. Weave in any loose ends.
Pillow Back Panel (Make 1 per pillow)
The back is wonderfully simple—a smooth stockinette fabric that contrasts perfectly with the textured front.
Cast on 72 stitches with the same color yarn.
Work in stockinette stitch (knit on the right side, purl on the wrong side) until the piece measures 16 inches from the cast-on edge.
Bind off loosely and weave in ends.
Finishing Your Pillow
Now it's time to bring your pillow together. This is a simple sewing process that even beginners can master.
Step 1: Place your front and back panels with right sides together. Make sure the edges align neatly.
Step 2: Using a tapestry needle and matching yarn, sew three sides together using a mattress stitch or whip stitch. Leave one side completely open.
Mattress stitch tip: Work from the wrong side, picking up the horizontal bars between the edge stitches. This creates an invisible seam.
Step 3: Turn the pillow cover right side out. Gently push out the corners for a crisp finish.
Step 4: Insert your 16x16-inch pillow form through the open side.
Step 5: Sew the remaining side closed using the same technique. Weave in all loose ends securely.
Repeat the entire process for the other two pillows, using a different color for each. Before you know it, you'll have a stunning trio ready to adorn your living space.
Tips for Perfect Cables
If you're new to cabling, don't be intimidated! Here are a few pro tips to ensure your cables look crisp and professional:
- Keep your tension even. When working the cable needle stitches, be careful not to pull too tightly, as this can distort the cable.
- Use a cable needle that matches your yarn weight. A metal or wooden cable needle with a slight curve will hold stitches securely.
- Count your rows. It's easy to lose track of where you are in the 12-row repeat. Use a row counter or mark your pattern chart to stay on track.
- Block your panels. Before sewing, gently block the front and back panels to even out the stitches and enhance the cable definition. This makes a world of difference in the final look.
Styling Your Harvest Hearth Pillows
Once your pillows are complete, it's time to style them! These beauties look stunning arranged on a neutral-toned sofa, paired with a soft knit throw blanket. For that perfect harvest aesthetic, scatter a few fallen leaves and small pumpkins around them. The warm, earthy tones will instantly make your space feel more inviting and cozy.
I hope you enjoy knitting this trio as much as I enjoyed creating the pattern. There's nothing quite like the satisfaction of snuggling up with a handmade pillow you crafted yourself. Happy knitting, and may your home be filled with warmth and harvest charm!


