Frostline Grip Mitts Free Pattern – Textured Knit Ice Scraper Mittens
Frostline Grip Mitts: Cozy Textured Knit Ice Scraper Mittens – Free Pattern
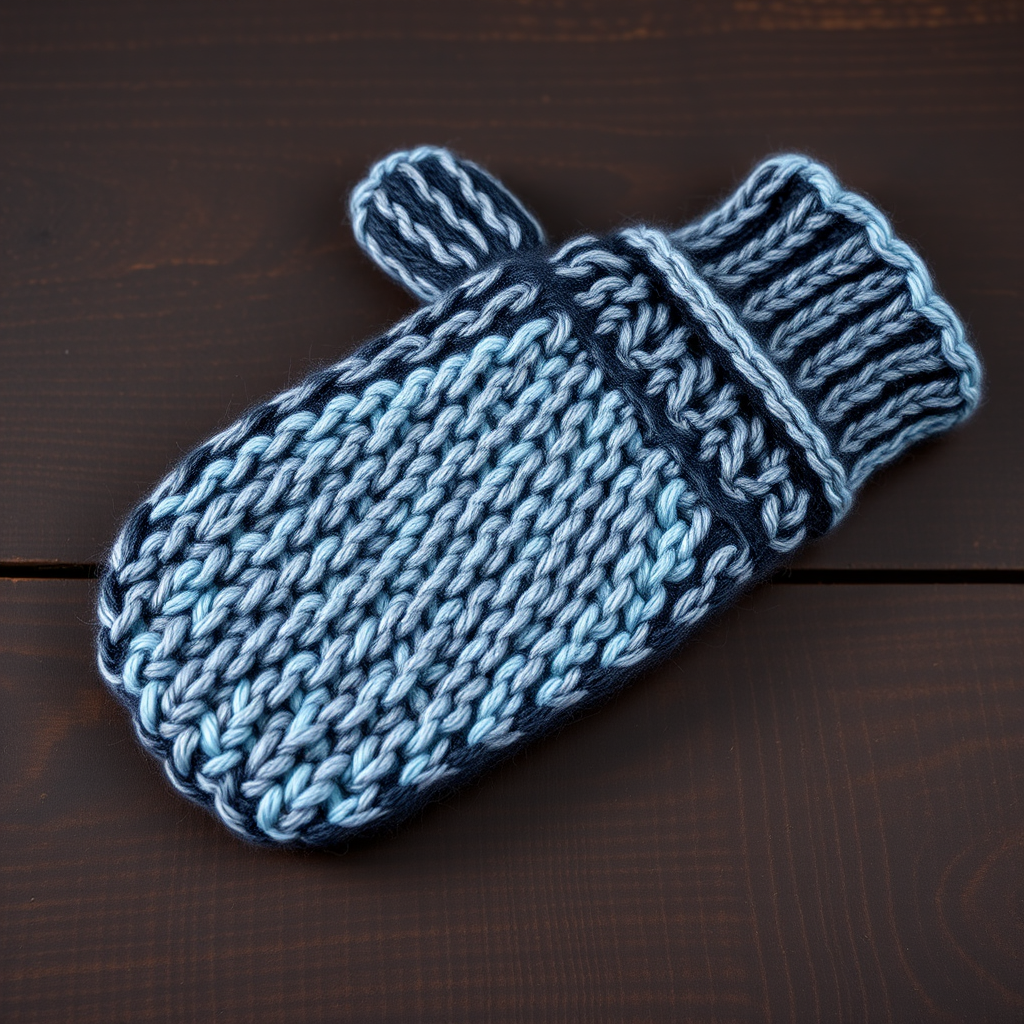
Are you tired of freezing fingers while scraping ice off your windshield on frosty winter mornings? Say hello to the Frostline Grip Mitts – the ultimate fusion of cozy warmth and practical functionality. These textured knit mittens feature a built-in slip-stitch grip panel in a contrasting frost blue, giving you the dexterity and traction you need to tackle icy car windows without sacrificing comfort.
Knit in a soft, heathered worsted weight yarn, these mitts boast a modern, rustic aesthetic that looks as good as it feels. The chunky ribbed cuff keeps your wrists toasty, while the thumb gusset ensures a perfect, ergonomic fit. Whether you're a seasoned knitter or a confident beginner looking for a rewarding project, this free pattern will guide you through every step to create a pair of mitts that are as beautiful as they are useful.
Let's dive into this delightful project and transform a simple ball of yarn into a cold-weather essential you'll reach for all season long!
Materials Needed
Before you begin, gather the following supplies to ensure a smooth and enjoyable knitting experience:
- Yarn: Worsted weight yarn in two colors:
- Main Color (MC): Heathered Charcoal (approx. 150g / 300 yards)
- Contrast Color (CC): Frost Blue (approx. 50g / 100 yards)
- Needles: US 7 (4.5mm) knitting needles – or the size needed to obtain gauge. A 16-inch circular needle or straight needles both work for this flat-knit pattern.
- Notions: Tapestry needle for weaving in ends and seaming, stitch holders (or scrap yarn) for the thumb stitches, and a stitch marker (optional).
Gauge: 20 stitches x 26 rows = 4 inches in stockinette stitch. Always knit a gauge swatch first to ensure your mitts fit perfectly!
Step-by-Step Instructions
Follow these detailed instructions carefully, and you'll have a beautiful pair of Frostline Grip Mitts in no time. This pattern is worked flat from the cuff down, then seamed up the side.
Finished Size & Abbreviations
Finished Size: One size fits most adult hands (approx. 7.5 inches circumference, 9 inches long from cuff to tip).
Abbreviations:
- CO: Cast on
- K: Knit
- P: Purl
- K2tog: Knit two stitches together (right-leaning decrease)
- SSK: Slip, slip, knit (left-leaning decrease)
- M1: Make one (increase) – pick up the bar between stitches and knit through the back loop
- St(s): Stitch(es)
- MC: Main Color
- CC: Contrast Color
- RS: Right Side
- WS: Wrong Side
Pattern Notes:
- The mitts are worked flat from the cuff down, then seamed.
- The grip panel is created with a slip-stitch pattern using CC, which creates a dense, textured surface perfect for gripping.
- Make two identical pieces, but mirror the thumb gusset for the left and right hands (instructions provided below).
Cuff (Make 2)
With MC, CO 40 stitches.
Row 1: *K2, P2*; repeat from * to end of row.
Repeat Row 1 for a total of 12 rows (or until the cuff measures approximately 2 inches from the cast-on edge). The ribbing should be nice and stretchy.
Main Body
Switch to stockinette stitch (Knit on RS rows, Purl on WS rows) and work even for 10 rows. This creates the base of the hand area above the cuff.
Thumb Gusset – Right Mitt
The thumb gusset adds stitches to create room for your thumb. Work the following increases on the RS rows only.
- Row 1 (RS): K20, M1, K2, M1, K18. (42 sts)
- Row 2 (WS): Purl all stitches.
- Row 3 (RS): K20, M1, K4, M1, K18. (44 sts)
- Row 4 (WS): Purl all stitches.
- Row 5 (RS): K20, M1, K6, M1, K18. (46 sts)
- Row 6 (WS): Purl all stitches.
- Row 7 (RS): K20, M1, K8, M1, K18. (48 sts)
- Row 8 (WS): Purl all stitches.
- Row 9 (RS): K20, M1, K10, M1, K18. (50 sts)
- Row 10 (WS): Purl all stitches.
- Row 11 (RS): K20, M1, K12, M1, K18. (52 sts)
You now have 52 stitches on your needle, with the thumb gusset stitches sitting between the 20th and 21st stitch markers (or visually in the center).
Thumb Separation
Next Row (RS): K20, place the next 14 stitches onto a stitch holder (these are your thumb stitches), CO 2 stitches (using the backward loop method), K18. (40 sts)
You now have 40 stitches on your needle for the main hand body. Continue working in stockinette stitch (K on RS, P on WS) for 8 more rows.
Grip Panel
Now we'll add the textured grip panel using your Contrast Color (CC). This slip-stitch pattern creates a dense, non-slip surface on the palm side of the mitt.
- Row 1 (RS): With CC, *K1, slip 1 purlwise with yarn in back*; repeat from * to end of row. (40 sts)
- Row 2 (WS): With CC, *P1, slip 1 purlwise with yarn in front*; repeat from * to end of row.
- Row 3 (RS): With MC, knit all stitches.
- Row 4 (WS): With MC, purl all stitches.
Repeat these 4 rows until the grip panel measures approximately 2 inches from the thumb separation point. End with a WS row (Row 4 of the pattern).
Top Shaping
Now we'll decrease to shape the rounded top of the mitt. Continue with MC.
- Row 1 (RS): *K3, K2tog*; repeat from * to end. (32 sts)
- Row 2 (WS): Purl all stitches.
- Row 3 (RS): *K2, K2tog*; repeat from * to end. (24 sts)
- Row 4 (WS): Purl all stitches.
- Row 5 (RS): *K1, K2tog*; repeat from * to end. (16 sts)
- Row 6 (WS): Purl all stitches.
- Row 7 (RS): *K2tog*; repeat from * to end. (8 sts)
Cut the yarn, leaving a long tail (about 12 inches). Thread the tail through a tapestry needle, slide it through the remaining 8 stitches, and pull tight to gather the top. Secure with a knot.
Thumb
Place the 14 stitches from the holder back onto your needle. With the RS facing you, pick up and knit 2 stitches from the cast-on edge at the base of the thumb (where you CO 2 stitches earlier). You now have 16 stitches on your needle.
Work in stockinette stitch (K on RS, P on WS) for 6 rows.
Next Row (RS): *K2tog*; repeat from * to end. (8 sts)
Cut the yarn, leaving a long tail. Thread through the remaining 8 stitches, pull tight, and secure.
Left Mitt
Work the left mitt exactly as the right mitt, but mirror the thumb gusset placement. To do this, work the gusset increases on the opposite side of the row:
- Row 1 (RS): K18, M1, K2, M1, K20. (42 sts)
- Continue the gusset increases in the same manner, keeping the M1 increases around the center 2 stitches, but starting with K18 instead of K20.
All other steps (thumb separation, grip panel, top shaping, and thumb) remain the same.
Finishing
With the right sides facing out, sew the side seam of each mitt using a mattress stitch. Start from the cuff and work your way up to the top of the hand. Then, sew the thumb seam closed using the same technique.
Weave in all loose ends with your tapestry needle, being careful to hide them within the stitches so they don't show on the outside. Fold the cuff over if you prefer a shorter, more snug fit around the wrist.
Congratulations! You've just completed your very own pair of Frostline Grip Mitts. These cozy, functional mittens are perfect for scraping ice, shoveling snow, or simply keeping your hands warm on a brisk winter walk. The textured grip panel ensures you'll have a firm hold on anything you pick up, and the chunky yarn provides unbeatable warmth.
We'd love to see your finished mitts! Share your creations on social media with the hashtag #FrostlineGripMitts and tag us so we can admire your handiwork. Happy knitting!