Enchanted Forest Owl Baby Hat Free Pattern – Crochet a Whimsical Woodland Friend
Enchanted Forest Owl Baby Hat Free Pattern – Crochet a Whimsical Woodland Friend
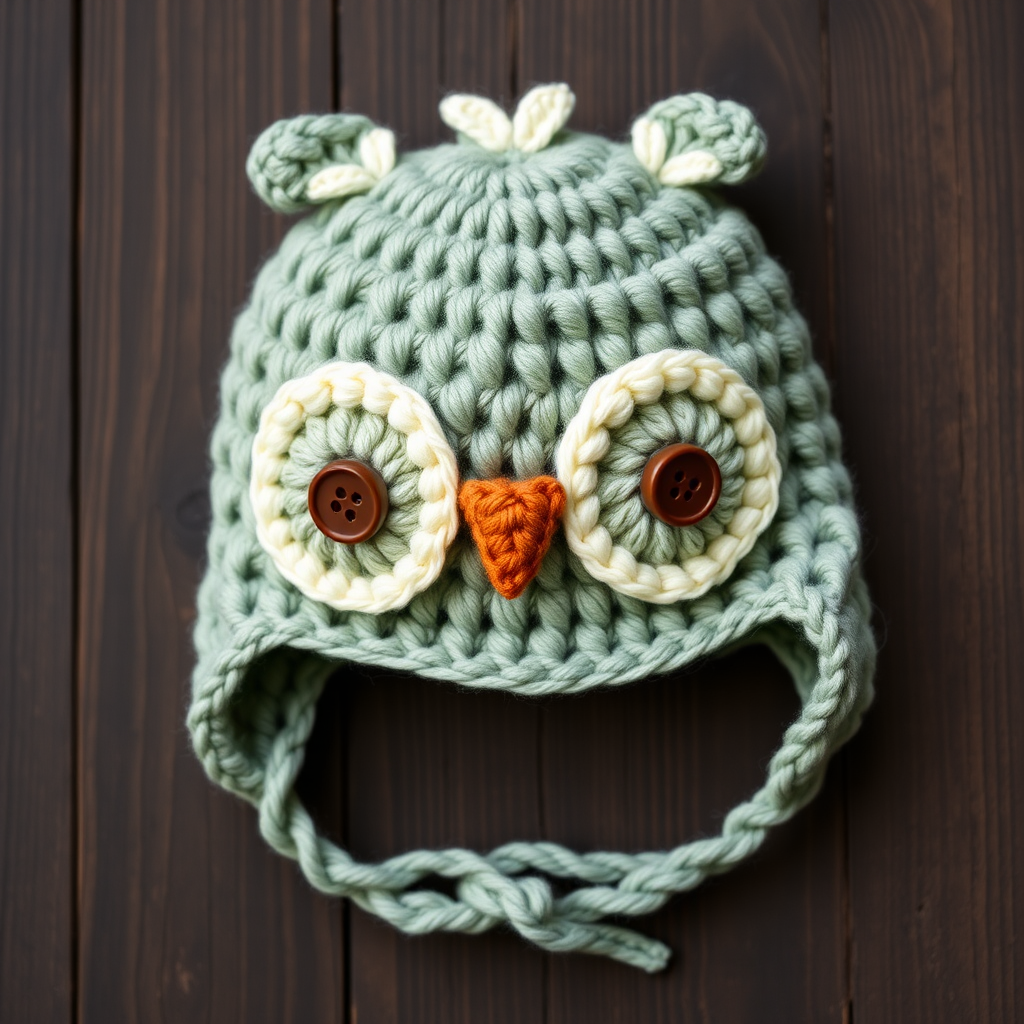
Wrap your little one in woodland wonder with this enchanting owl hat, complete with textured feather stitches and sweet button eyes. This free crochet pattern is perfect for baby showers and cozy autumn days. Whether you're a seasoned crocheter or just picking up a hook for the first time, this beginner-friendly pattern will guide you through creating a truly magical keepsake. The combination of sage green, cream, and burnt orange creates a nature-inspired palette that feels both rustic and refined, while the playful owl face will bring smiles to everyone who sees it.
This hat isn't just adorable—it's also incredibly practical. The worsted weight yarn provides warmth without bulk, making it ideal for crisp fall walks or chilly winter mornings. The ear flaps add extra coziness and ensure the hat stays securely on even the wiggliest of babies. Plus, the button eyes are sewn on securely, making this a safe and durable gift that can be passed down through siblings or given as a cherished handmade present.
Materials Needed
Before you begin, gather the following materials. All items are readily available at craft stores or online, and the total cost is minimal compared to the joy this hat will bring.
- Yarn: Worsted weight yarn in sage green, cream, and burnt orange (approximately 150g total). Look for a soft, washable acrylic or wool blend for easy care.
- Hook: 5.0 mm (H-8) crochet hook. This size works perfectly with worsted weight yarn to create a dense, warm fabric.
- Gauge: 16 single crochet stitches x 18 rows = 4 x 4 inches. Achieving the correct gauge ensures the hat fits a standard baby head (approximately 14-16 inches in circumference).
- Extras: Yarn needle for weaving in ends and sewing pieces together, scissors, and two dark brown buttons (approximately ½ inch in diameter) for the owl's eyes. Optional: a pom-pom maker for the top of the hat.
Pro tip: If you're making this hat for a newborn, consider using a slightly smaller hook (4.5 mm) to achieve a snugger fit. For an older baby or toddler, you can add an extra round of increases to widen the hat.
Step-by-Step Instructions
Follow these detailed instructions carefully, and you'll have a beautiful owl hat in no time. Remember to count your stitches after each round to ensure accuracy. Let's begin!
Abbreviations
Before we dive in, familiarize yourself with these common crochet abbreviations:
- ch = chain
- sc = single crochet
- hdc = half double crochet
- dc = double crochet
- sl st = slip stitch
- st(s) = stitch(es)
- rnd = round
- inc = increase (2 sc in same st)
- dec = decrease (sc 2 together)
Hat Base (Worked in Continuous Rounds)
The hat base is worked in a spiral, meaning you won't join rounds with a slip stitch—just keep going in a continuous circle. Use a stitch marker to keep track of the beginning of each round.
Rnd 1: With sage green yarn, make a magic ring. Ch 1, then work 6 sc into the ring. Pull the tail to tighten the ring. (6 sts)
Rnd 2: Inc in each st around. This means work 2 sc into each of the 6 stitches. (12 sts)
Rnd 3: *Sc in next st, inc* repeat around. So you'll work 1 sc in the first stitch, then 2 sc in the next stitch, and repeat this pattern 6 times total. (18 sts)
Rnd 4: *Sc in next 2 sts, inc* repeat around. Work 1 sc in each of the next 2 stitches, then 2 sc in the following stitch. Repeat this sequence 6 times. (24 sts)
Rnd 5: *Sc in next 3 sts, inc* repeat around. Work 1 sc in each of the next 3 stitches, then 2 sc in the following stitch. Repeat 6 times. (30 sts)
Rnd 6: *Sc in next 4 sts, inc* repeat around. Work 1 sc in each of the next 4 stitches, then 2 sc in the following stitch. Repeat 6 times. (36 sts)
Rnd 7: *Sc in next 5 sts, inc* repeat around. Work 1 sc in each of the next 5 stitches, then 2 sc in the following stitch. Repeat 6 times. (42 sts)
Rnd 8: *Sc in next 6 sts, inc* repeat around. Work 1 sc in each of the next 6 stitches, then 2 sc in the following stitch. Repeat 6 times. (48 sts)
Rnd 9: *Sc in next 7 sts, inc* repeat around. Work 1 sc in each of the next 7 stitches, then 2 sc in the following stitch. Repeat 6 times. (54 sts)
Rnd 10: *Sc in next 8 sts, inc* repeat around. Work 1 sc in each of the next 8 stitches, then 2 sc in the following stitch. Repeat 6 times. (60 sts)
Rnds 11-18: Sc in each st around. That's 8 rounds of plain single crochet, working 1 sc in every stitch. This creates the body of the hat that covers the baby's head. (60 sts each round)
Fasten off by cutting the yarn, pulling the tail through the last loop, and weaving in the ends with your yarn needle. Set the hat base aside—it should look like a simple beanie.
Ear Flaps (Make 2)
The ear flaps are worked back and forth in rows, not rounds. They'll be sewn onto the sides of the hat to keep little ears warm and add to the owl's charm.
Row 1: With sage green yarn, ch 2. Work 4 sc into the second ch from your hook (the one farthest from the hook). Turn your work. (4 sts)
Row 2: Ch 1 (this counts as your turning chain, but you won't work into it). Inc in the first st, sc in the next 2 sts, inc in the last st. Turn. (6 sts)
Row 3: Ch 1, inc in first st, sc in next 4 sts, inc in last st. Turn. (8 sts)
Row 4: Ch 1, inc in first st, sc in next 6 sts, inc in last st. Turn. (10 sts)
Row 5: Ch 1, sc in each st across. Turn. (10 sts)
Row 6: Ch 1, dec (sc 2 together) over the first 2 sts, sc in next 6 sts, dec over the last 2 sts. Turn. (8 sts)
Row 7: Ch 1, dec over first 2 sts, sc in next 4 sts, dec over last 2 sts. Turn. (6 sts)
Row 8: Ch 1, dec over first 2 sts, sc in next 2 sts, dec over last 2 sts. Turn. (4 sts)
Row 9: Ch 1, dec twice (sc 2 together, then sc 2 together again). (2 sts)
Fasten off, leaving a long tail (about 12 inches) for sewing. Repeat to make a second ear flap. To attach them, position each flap on the bottom edge of the hat, centered on each side (imagine the hat's front and back—the flaps go on the left and right sides). Use the long tail and your yarn needle to sew them securely in place with a whip stitch.
Owl Eyes (Make 2)
The eyes are what give this owl its personality! They're crocheted in cream yarn and then embellished with buttons.
Rnd 1: With cream yarn, make a magic ring. Ch 1, work 8 hdc into the ring. Join with a sl st to the first hdc. (8 sts)
Rnd 2: Ch 2 (this counts as your first dc). Work 2 dc into each st around. Join with a sl st to the top of the ch-2. (16 sts)
Fasten off, leaving a tail for sewing. Now, take your dark brown buttons and sew one onto the center of each eye patch using a needle and thread (or a small piece of yarn). Make sure the button is securely attached—this is important for baby safety. Then, sew the eye patches onto the front of the hat, positioning them about 2 inches apart and just above the ear flaps. The eyes should sit roughly in the middle of the hat's front.
Owl Beak
The beak is a simple triangle shape that adds the finishing touch to the owl's face.
With burnt orange yarn, ch 4. Work 1 sc in the second ch from the hook, 1 hdc in the next ch, and 1 dc in the last ch. Fasten off, leaving a tail.
Position the beak between the two eyes, pointing downward (the dc end should be at the bottom). Sew it in place with your yarn needle, making sure it's centered and secure.
Feather Texture (Optional)
To add that extra woodland charm, you can embroider small V-shaped stitches across the top of the hat to mimic feathers. Using cream yarn and a yarn needle, create small "V" shapes by bringing the needle up through the hat, making a diagonal stitch, then coming back down to form the other side of the V. Space them evenly across the crown of the hat. This step is purely decorative but really elevates the design.
Finishing
Weave in all remaining ends with your yarn needle, making sure they're hidden inside the hat so they don't irritate baby's skin. If you'd like, add a pom-pom to the top of the hat for extra cuteness—simply make a pom-pom using sage green or cream yarn and sew it securely to the crown.
Give your hat a gentle block by lightly steaming it or laying it flat to shape. Then, step back and admire your handiwork! This Enchanted Forest Owl Baby Hat is sure to become a treasured heirloom, perfect for photo shoots, baby showers, or just snuggling on a cool day.
Happy crocheting, and may your little owl always find their way home to the nest!