Emberwood Button-Up Cowl Free Pattern – A Knitted Cozy Forest Wrap
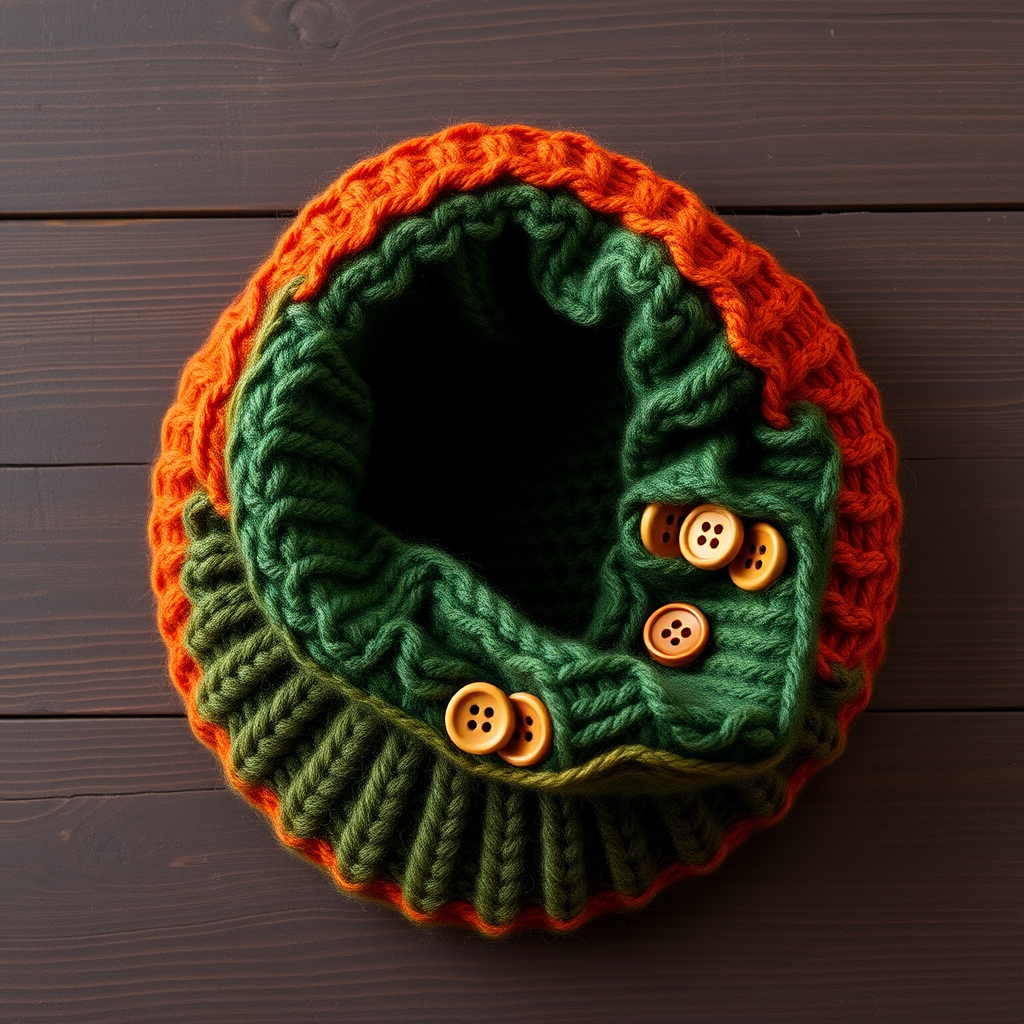
Emberwood Button-Up Cowl: A Cozy Forest Wrap You'll Love to Knit
Wrap yourself in the warmth of a hand-knitted forest with the Emberwood Button-Up Cowl. This textured, beginner-friendly pattern brings together the deep, calming greens of a dense woodland with the vibrant, fiery orange of autumn leaves. The result is a stunning, cozy accessory that's as stylish as it is practical. Whether you're a seasoned knitter looking for a quick, satisfying project or a beginner ready to tackle your first garment, this pattern is designed for you. With four sizes, clear instructions, and a beautiful, modern design, you'll have a gorgeous, handmade cowl to enjoy all season long.
Why You'll Love This Pattern
This isn't just another cowl. The Emberwood features a sophisticated 2x2 rib stitch that creates a dense, stretchy, and reversible fabric—perfect for trapping warmth. The buttoned overlap adds a touch of modern style and allows you to adjust the fit, while the seed stitch borders provide a neat, polished finish. It's a quick knit that works up beautifully in worsted weight yarn, making it an ideal weekend project.
Materials Needed
Before you begin, gather your supplies. Here’s everything you'll need to bring your Emberwood Cowl to life:
- Yarn: Worsted weight yarn in two colors:
- Main Color (MC): Deep Forest Green (approx. 200-350 yards depending on size)
- Contrast Color (CC): Burnt Orange (approx. 100-200 yards)
- Knitting Needles: US Size 8 (5.0 mm) knitting needles. Straight needles work for all sizes, but circular needles are recommended for larger sizes to hold the stitches more comfortably.
- Notions: Tapestry needle for weaving in ends and seaming, stitch markers (optional but helpful), and 4-6 buttons (1 inch in diameter) for a rustic, natural look.
Gauge
Getting the right gauge is crucial for achieving the correct size and fit. Always knit a swatch first!
Gauge: 18 stitches and 24 rows = 4 inches in Stockinette stitch (knit one row, purl one row) after blocking.
Sizes & Measurements
This pattern includes four sizes to fit the whole family. The measurements are for the final, buttoned cowl.
- Child: Width 8 inches, Length 12 inches (buttoned)
- Small Adult: Width 10 inches, Length 16 inches (buttoned)
- Medium Adult: Width 12 inches, Length 20 inches (buttoned)
- Large Adult: Width 14 inches, Length 24 inches (buttoned)
Abbreviations
Familiarize yourself with these standard knitting abbreviations before you start:
- CO: Cast On
- K: Knit
- P: Purl
- K2tog: Knit two stitches together (a right-leaning decrease)
- YO: Yarn Over (an increase that creates a hole for a buttonhole)
- BO: Bind Off
- MC: Main Color
- CC: Contrast Color
- RS: Right Side
- WS: Wrong Side
Pattern Notes
- The cowl is worked flat in one piece, then seamed at the back. Buttonholes are created along one edge, and buttons are sewn on the opposite edge.
- The main stitch pattern is a simple 2x2 rib with a seed stitch border, creating a textured, reversible fabric.
- For the buttonhole band, you will work a garter stitch edge (knit every row) to keep it flat and sturdy.
Step-by-Step Instructions
Follow these detailed instructions carefully, and you'll have a beautiful cowl in no time.
Step 1: Cast On
With your Main Color (MC), cast on the following number of stitches based on your chosen size:
- Child: 36 stitches
- Small Adult: 44 stitches
- Medium Adult: 52 stitches
- Large Adult: 60 stitches
Use a long-tail cast-on method for a neat, stretchy edge that will complement the ribbing.
Step 2: Bottom Border
Work in Seed Stitch for 6 rows to create a firm, non-curling edge.
- Row 1: *K1, P1; repeat from * to end.
- Row 2: *P1, K1; repeat from * to end.
- Repeat Rows 1 and 2 for a total of 6 rows. Your work should end after completing a Row 2.
Step 3: Main Body
Now, switch to the 2x2 Rib pattern for the main body of the cowl.
- Row 1 (RS): K2, *P2, K2; repeat from * to end.
- Row 2 (WS): P2, *K2, P2; repeat from * to end.
- Repeat Rows 1 and 2 until the piece measures your desired length minus 2 inches (for the top border). For example, for the Medium size, knit until the piece measures 18 inches from the cast-on edge.
Pro Tip: Place a stitch marker at the beginning of the row to help you keep track of your place.
Step 4: Top Border
Once the main body reaches the desired length, work in Seed Stitch for 6 rows, exactly as you did in Step 2 for the bottom border. This will create a symmetrical, polished look.
Step 5: Buttonhole Band
This is where we create the overlapping edge with buttonholes. This band is worked along one of the short edges of your knitted rectangle.
- Pick Up Stitches: With the Right Side (RS) facing you, pick up and knit stitches along the entire length of one short edge. The number of stitches should be approximately 1 stitch for every row of the ribbing. (For a 20-inch length, you'll pick up about 120 stitches.)
- Garter Stitch Base: Work in Garter stitch (knit every row) for 4 rows.
- Buttonhole Row (RS): K3, *K2tog, YO, K6; repeat from * until the last 5 stitches, K2tog, YO, K3. This creates evenly spaced buttonholes. Adjust the spacing based on your button size and number of buttons.
- Garter Stitch Top: Work in Garter stitch for 4 more rows.
- Bind Off: Bind off all stitches loosely to maintain the stretch of the edge.
Step 6: Button Overlap Edge
Now, we'll create the opposite edge where the buttons will be sewn.
- Pick Up Stitches: On the opposite short edge, pick up and knit stitches in the same manner as Step 5.
- Garter Stitch Band: Work in Garter stitch for 8 rows.
- Bind Off: Bind off all stitches loosely.
Step 7: Seaming
Now it's time to join the cowl into a loop.
- Fold the cowl in half with the buttonhole band overlapping the button band. The Right Sides should be facing each other.
- Using a tapestry needle and a length of MC yarn, sew the back seam, joining the two short edges together. Use a mattress stitch or whip stitch for a secure, invisible seam.
- Make sure the buttonholes align with the button band.
Step 8: Finishing
Your cowl is almost complete!
- Weave in Ends: Weave in all loose ends with your tapestry needle to give your work a clean, professional finish.
- Sew Buttons: Sew buttons onto the button band, directly opposite the buttonholes. Ensure they are securely attached.
- Blocking: Block the cowl gently to even out the stitches and set the shape. This will also help the ribbing relax and drape beautifully. Lay it flat to dry.
Optional: Adding a Pop of Color
Want to add a little extra flair? For a fun, modern twist, incorporate a stripe of your Contrast Color (CC) into the main body. Simply knit 4 rows with CC in the middle of the main body, then switch back to MC. This is a great way to use up leftover yarn and add a unique touch to your cowl.
Congratulations! You've just completed your very own Emberwood Button-Up Cowl. This cozy, stylish accessory is perfect for crisp fall days, chilly commutes, or simply snuggling up by the fire. The textured ribbing and beautiful button detail make it a standout piece that you'll be proud to say you made yourself. Happy knitting!


